Openclaw सिर्फ़ एक और ओपन-सोर्स प्रोजेक्ट नहीं है—यह उन सभी के लिए एक भरोसेमंद पर्सनल AI असिस्टेंट बन चुका है जो ChatGPT-जैसे एजेंट की ताकत चाहते हैं, लेकिन अपने ही मशीन पर चलाने से मिलने वाली गोपनीयता और नियंत्रण के साथ। 2026 में Openclaw की लोकप्रियता को कम आँकना मुश्किल है: मई 2026 तक 370,000 से ज़्यादा GitHub stars, हर हफ़्ते हज़ारों Docker pulls, और एक ऐसी कम्युनिटी जो जितनी उत्साही है, उतनी ही माँग भी करती है। लेकिन बड़ी ताकत के साथ… खैर, कुछ इंस्टॉलेशन की परेशानियाँ भी आती हैं, खासकर जब नए फ़ीचर रिलीज़ होते हैं और compatibility requirements बदलती हैं।
मैंने खुद देखा है कि कैसे अनुभवी यूज़र्स भी किसी छूटी हुई dependency या onboarding flow में आए छोटे से बदलाव की वजह से अटक जाते हैं। इसी वजह से मैंने 2026 के लिए यह step-by-step Openclaw installation guide तैयार की है—ताकि आप झंझट से बचें, आम गलतियों से दूर रहें, और अपना AI assistant जल्दी से चालू कर सकें। साथ ही, मैं आपको दिखाऊँगा कि सेटअप आसान बनाने, documentation जाँचने, और यहाँ तक कि install debug करने के लिए Thunderbit के AI web scraper का इस्तेमाल कैसे करें। तैयार हैं? चलिए, एक ज़्यादा स्मार्ट और ज़्यादा सुरक्षित AI setup की ओर बढ़ते हैं।
Openclaw क्या है? एक त्वरित परिचय
Openclaw एक self-hosted AI assistant है जो किसी और के cloud में नहीं, बल्कि आपके अपने device पर चलता है। इसे अपने personal chatbot, automation hub, और productivity sidekick की तरह समझिए—सब कुछ local रूप से चलता है, इसलिए आपका data आपका ही रहता है। 2026 में Openclaw सिर्फ़ एक chat interface नहीं रह गया है: यह एक पूरा platform है, जिसमें local Gateway (control plane), browser-based Control UI, और plugins तथा “skills” का बढ़ता हुआ ecosystem शामिल है, जो इसे आपकी पसंदीदा chat apps और AI providers से जोड़ता है।
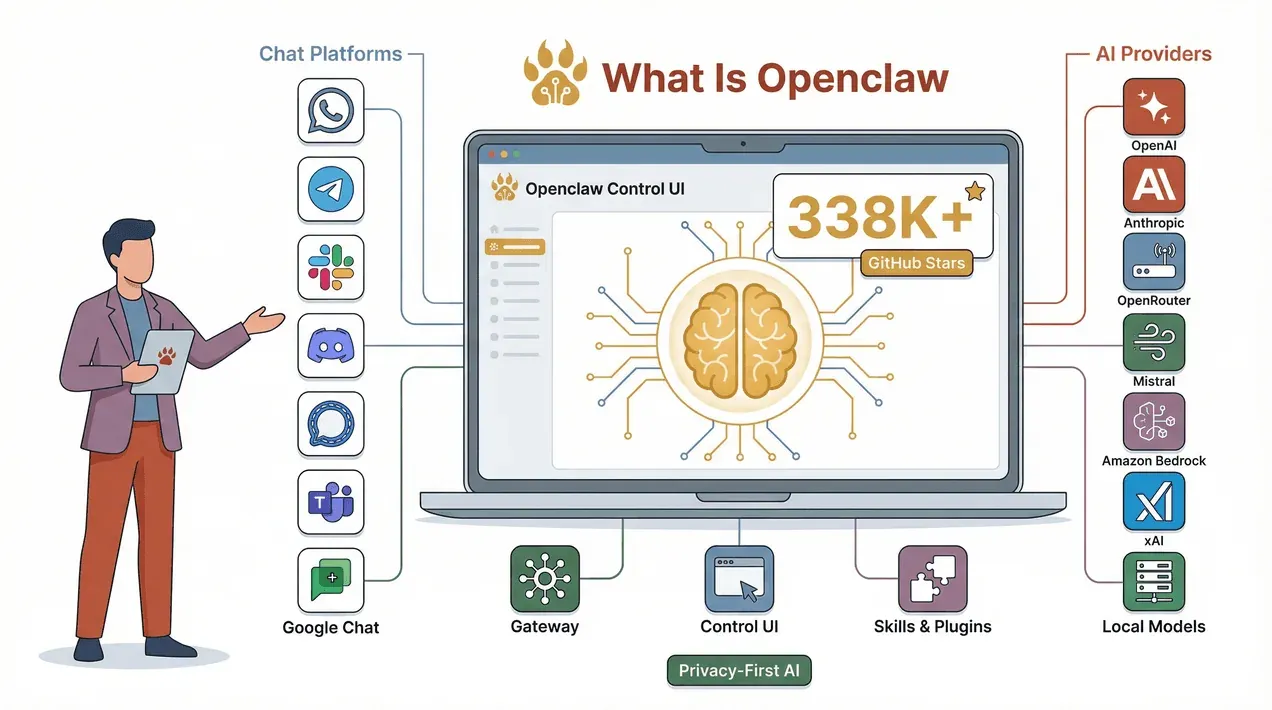
समर्थित chat platforms में WhatsApp, Telegram, Slack, Discord, Signal, Microsoft Teams, और Google Chat वगैरह शामिल हैं। AI brain के लिए आप OpenAI, Anthropic, OpenRouter, Vercel AI Gateway, Cloudflare AI Gateway, Mistral, Amazon Bedrock, xAI, और यहाँ तक कि vLLM या SGLang के जरिए local models भी जोड़ सकते हैं (पूरी provider सूची यहाँ)। संक्षेप में: अगर आप एक शक्तिशाली, privacy-first AI assistant चाहते हैं जो आपकी सभी apps से बात कर सके, तो Openclaw सही जगह है।
2026 में Openclaw installation steps क्यों मायने रखते हैं
सच कहें तो: Openclaw की लोकप्रियता का मतलब है कि यह बहुत तेज़ी से evolve हो रहा है। 2026 में कई नए फीचर और breaking changes आए हैं—जैसे strict Node.js version checks, बेहतर onboarding flows, और तेज़ी से बढ़ता plugin ecosystem। अगर आप पुरानी guide follow करते हैं या कोई step छोड़ देते हैं, तो dashboard टूट सकता है, skills गायब हो सकती हैं, या (सबसे बुरा) Gateway गलत तरीके से configure होकर आपके सिस्टम को जोखिम में डाल सकता है।
हालिया updates ने installation को ज़्यादा शक्तिशाली, लेकिन थोड़ा ज़्यादा जटिल भी बना दिया है। उदाहरण के लिए, Openclaw अब minimum Node.js version (22.16+) लागू करता है, और onboarding process local setup के लिए भी by default security tokens लिखती है। फ़ायदा? बेहतर security, ज़्यादा भरोसेमंद upgrades, और नए फीचर्स तक पहुँच। नुकसान? एक dependency छूट गई या PATH में दिक्कत आ गई, तो घंटों troubleshooting करनी पड़ सकती है (यक़ीन मानिए, मैं वहाँ रहा हूँ)।
इसीलिए latest, step-by-step installation process follow करना बेहद ज़रूरी है। इससे सिर्फ़ समय नहीं बचता, बल्कि यह भी सुनिश्चित होता है कि आप Openclaw की नई क्षमताओं का फ़ायदा उठा रहे हैं—बिना उन आम जालों में फँसे जो बहुत-से नए users को रोक देते हैं।
Installation से पहले की checklist: शुरू करने से पहले आपको क्या चाहिए
शुरू करने से पहले, चलिए सुनिश्चित करें कि आपका सिस्टम तैयार है। Openclaw macOS, Linux, और Windows पर चलता है (Windows users के लिए WSL2 की सलाह दी जाती है)। यह एक छोटी-सी checklist है जो आपको सही track पर रखेगी:
| प्लेटफ़ॉर्म | Node.js Version | Service/Daemon Behavior | 2026-विशिष्ट नोट्स |
|---|---|---|---|
| macOS | Node 24 recommended; 22.16+ supported (docs) | Onboarding या gateway install के जरिए LaunchAgent install | LaunchAgent PATH shell से अलग हो सकता है (tools/skills के लिए "command not found" आ सकता है) (issue) |
| Linux | Node 24 recommended; 22.16+ supported (docs) | आमतौर पर systemd user service | Headless installs के लिए सही user session चाहिए; systemd "user bus" गायब हो सकता है (issue) |
| Windows (WSL2) | WSL2 के अंदर Node; systemd enabled (docs) | WSL2 के अंदर systemd user service; वैकल्पिक Windows Scheduled Task | Docs में पूरा "boot chain" recipe दिया गया है (docs) |
| Windows (native) | Windows पर Node; फिर भी WSL2 की सलाह दी जाती है (docs) | Scheduled Tasks या Startup-folder | Non-interactive onboarding में reachable local gateway की अपेक्षा होती है (docs) |
तैयारी जाँचने के त्वरित सुझाव:
- अपना Node.js version जाँचने के लिए
node -vचलाएँ। - सुनिश्चित करें कि आपके पास global npm packages install करने की अनुमति है।
- Linux/WSL2 पर systemd enabled हो और proper user session हो।
- Docker installs के लिए कम-से-कम 2GB RAM उपलब्ध हो (docs)।
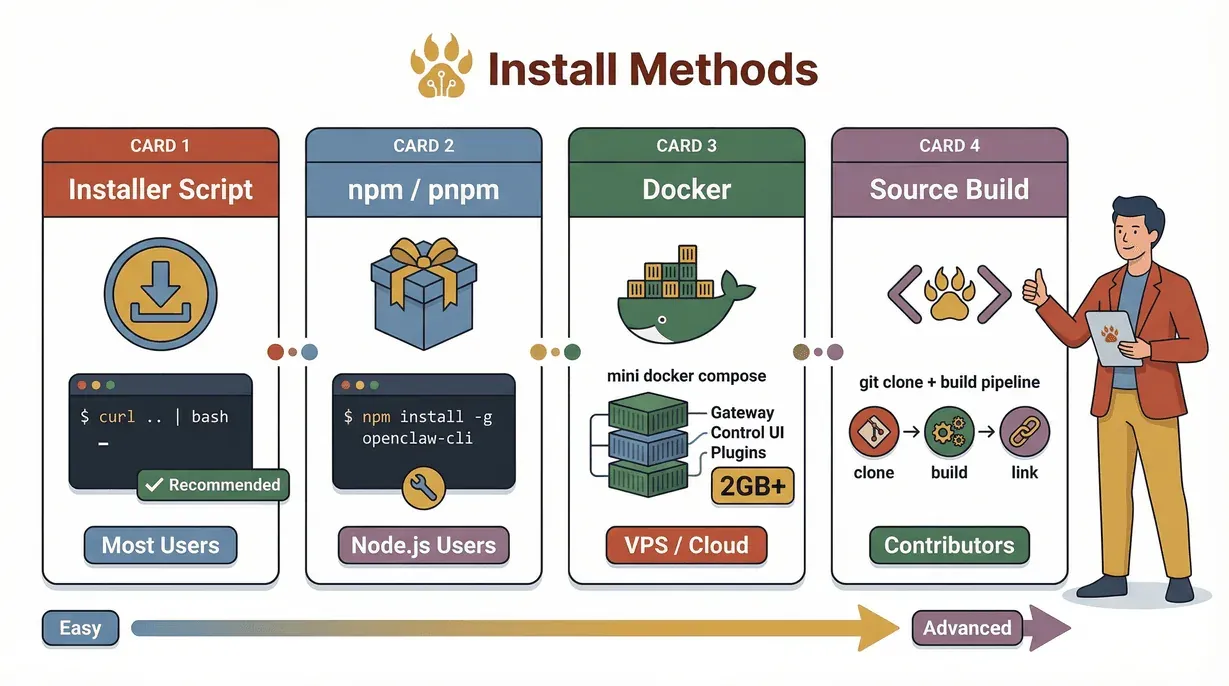
2026 के लिए step-by-step Openclaw installation guide
अब आते हैं असली काम पर: Openclaw install करना। इसके लिए कुछ अलग-अलग रास्ते हैं, लेकिन 2026 के लिए मैं आपको सबसे सामान्य और भरोसेमंद तरीक़े दिखाऊँगा।
1. वेबसाइट installer script (ज़्यादातर users के लिए recommended)
शुरू करने का यह सबसे तेज़ तरीक़ा है। यह script आपका OS पहचानती है, ज़रूरत होने पर Node.js install करती है, और onboarding flow शुरू करती है।
curl -fsSL https://openclaw.ai/install.sh | bash
या Windows पर PowerShell के लिए:
irm https://openclaw.ai/install.ps1 | iex
फ़ायदे: तेज़, ज़्यादातर dependencies संभालता है, onboarding UI अपने-आप खोल देता है।
नुकसान: फिर भी PATH की सही सेटिंग पर निर्भर रहता है; shell या PATH में पुराने Node से quirks आ सकती हैं (docs)।
2. npm/pnpm global install (Node.js users के लिए)
अगर आप पहले से Node.js versions manage करते हैं, तो यह एक अच्छा विकल्प है।
npm install -g openclaw@latest
openclaw onboard --install-daemon
फ़ायदे: अपडेट करना आसान, Node के साथ comfortable हैं तो बढ़िया काम करता है।
नुकसान: PATH/global bin की समस्याएँ आम हैं; Linux users को EACCES permission errors मिल सकते हैं (docs)।
3. Docker Compose (Isolation या VPS installs के लिए)
Containerized environment में Openclaw चलाने के लिए बढ़िया।
git clone https://github.com/openclaw/openclaw.git
cd openclaw
./scripts/docker/setup.sh
फ़ायदे: अलग-थलग, अनुमानित dependencies, VPS/cloud के लिए आसान।
नुकसान: builds के लिए कम-से-कम 2GB RAM चाहिए; port exposure और firewalling की ज़िम्मेदारी आपकी होगी (docs)।
4. Source से (contributors/advanced users के लिए)
अगर आप Openclaw में patch या customization करना चाहते हैं, तो source से build करें:
git clone https://github.com/openclaw/openclaw.git
cd openclaw
pnpm install && pnpm ui:build && pnpm build
pnpm link --global .
फ़ायदे: contributors के लिए सबसे अच्छा, packaging bugs को workaround करना आसान।
नुकसान: build break हो सकते हैं; “बस चल जाए” चाहने वालों के लिए ideal नहीं (issue)।
तुलना तालिका: installation methods
| तरीका | किनके लिए सबसे अच्छा | फ़ायदे | नुकसान |
|---|---|---|---|
| Installer Script | ज़्यादातर users | तेज़, dependencies संभालता है, onboarding UI | PATH quirks, Node version issues |
| npm/pnpm | Node.js users | आसान updates, लचीला | PATH/EACCES errors, packaging regressions |
| Docker | VPS/Cloud/Isolation | अनुमानित, isolated, health endpoints | RAM की ज़रूरत, port/firewall management |
| From Source | Contributors | customization, patching | build breaks, ज़्यादा complex setup |
Onboarding और Gateway configuration
Installation के बाद onboarding process आपको इन चीज़ों में मदद करेगी:
- अपने local या remote Gateway को configure करना (default port: 18789)
- chat channels सेट करना (WhatsApp, Telegram, Slack आदि)
- AI providers से connect करना (OpenAI, Anthropic, OpenRouter आदि)
- skills/plugins और workspace defaults सेट करना
Onboarding UI आपसे API keys और security tokens माँगेगी। Automation या non-interactive installs के लिए, secrets को environment variable references के रूप में store करने के लिए --secret-input-mode ref flag का उपयोग करें (docs)।
AI providers से जोड़ना
Openclaw कई तरह के AI providers को support करता है। उदाहरण के लिए, OpenRouter (एक लोकप्रिय OpenAI-compatible gateway) से जुड़ने के लिए:
openclaw onboard --provider openrouter --token $OPENROUTER_API_KEY
Provider-specific निर्देश आपको provider directory में मिलेंगे।
2026 में आम Openclaw installation errors से कैसे बचें
एक अच्छी guide होने के बावजूद, चीज़ें गड़बड़ा सकती हैं। नीचे वे सबसे आम errors हैं जो मुझे दिखते हैं (और उन्हें ठीक कैसे करें):
| लक्षण | संभावित कारण | ठीक करने का तरीक़ा |
|---|---|---|
openclaw: command not found | npm global bin dir PATH में नहीं है | npm prefix -g जाँचें, सुनिश्चित करें कि <prefix>/bin PATH में हो; shell restart करें (docs) |
Linux पर npm install -g के दौरान EACCES | Global prefix user-writable नहीं है | npm global prefix को $HOME/.npm-global पर ले जाएँ और PATH में जोड़ें (docs) |
systemctl --user ... Failed to connect to bus | सक्रिय systemd user session नहीं है (Linux/WSL2) | linger/proper login session सुनिश्चित करें; WSL2 boot chain follow करें (issue) |
| Control UI में "Missing Control UI assets" दिखे | Packaging/build output missing या mismatched | fixed release पर upgrade करें; Docker image या source build + pnpm ui:build इस्तेमाल करें (issue) |
| macOS: LaunchAgent के अंदर tools fail हों | LaunchAgent PATH में Node/tools नहीं हैं | LaunchAgent environment में explicit PATH सेट करें; Gateway restart करें (issue) |
| Docker install fail हो (exit 137/OOM) | image build के लिए RAM बहुत कम है | builds के लिए ≥2GB RAM इस्तेमाल करें; prebuilt image tags का उपयोग करें (docs) |
| Upgrade native module install पर टूट जाए | Node version mismatch या build requirements | Node version जाँचें, sharp workaround follow करें, release guidance के अनुसार pin/retry करें (docs) |
| Windows native: onboarding non-interactive fail हो | Health check running local gateway की अपेक्षा करता है | --skip-health इस्तेमाल करें या WSL2 को प्राथमिकता दें (docs) |
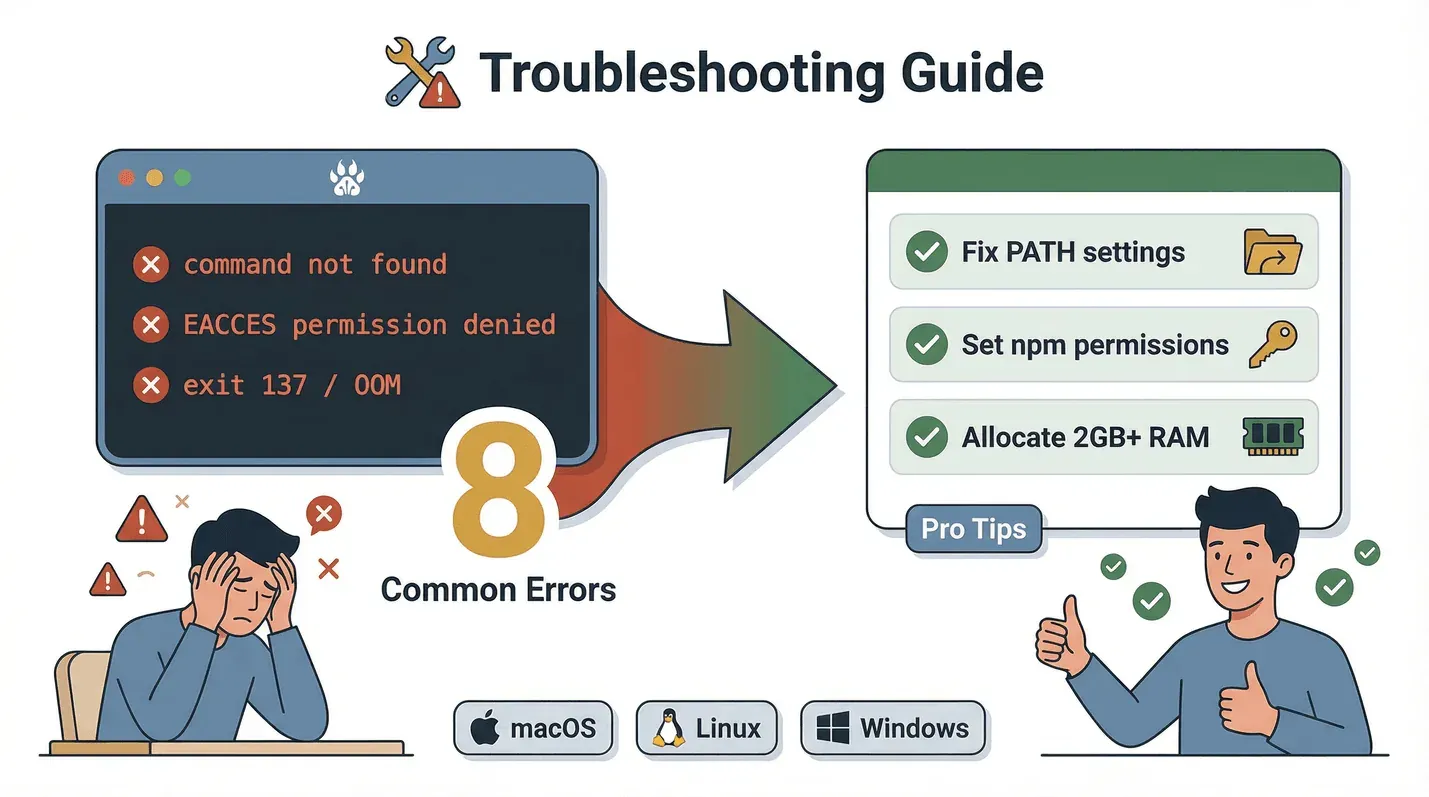
प्रो टिप: अगर आप कहीं अटक जाएँ, तो Openclaw GitHub issues या official docs में ताज़ा fixes देखें।
AI के साथ Openclaw docs scrape करें Get Started Free
Openclaw setup को आसान बनाने के लिए Thunderbit AI Web Scraper को जोड़ना
अब आता है मज़ेदार हिस्सा। Openclaw की docs और plugin lists बहुत तेज़ी से बदलती हैं—कभी-कभी आपकी पकड़ से भी तेज़। यहीं पर Thunderbit काम आता है। Thunderbit एक AI-powered web scraper है (और हाँ, यहाँ मेरी थोड़ी पक्षपातपूर्ण पसंद है) जो बिखरी हुई documentation को structured checklists, tables, और resource lists में बदल सकता है।
- Provider/channel lists को एक जगह लाएँ: समर्थित AI providers या chat channels को जल्दी से एक table में खींच लें, ताकि आपको पता रहे कि 2026 में क्या उपलब्ध है।
- Breaking changes पर नज़र रखें: install को प्रभावित करने वाले updates और changelogs के लिए GitHub releases page scrape करें।
- अपनी runbooks बनाएँ: Docker setup steps, environment variables, और health check endpoints को एक actionable checklist में व्यवस्थित करने के लिए Thunderbit का उपयोग करें।
छोटी guide: Openclaw setup के लिए Thunderbit का इस्तेमाल
- Thunderbit Chrome Extension install करें।
- Openclaw की relevant documentation page खोलें।
- Thunderbit में "AI Suggest Fields" पर क्लिक करें ताकि tables, requirements, या step lists अपने-आप detect हो जाएँ।
- Structured data को आसान tracking के लिए Google Sheets, Notion, या Airtable में export करें।
- Exported checklist का उपयोग करके हर install step को चलते-चलते verify करें।
यह तरीका आपको tabs के बीच भटकने और किसी छिपी हुई requirement को चूकने से बचाता है। यह आपके install process के लिए एक personal research assistant जैसा है।
प्रभावी Openclaw debugging: post-setup validation के लिए Thunderbit का उपयोग
Openclaw install हो जाने के बाद, आप यह सुनिश्चित करना चाहेंगे कि सब कुछ वाकई काम कर रहा है। इसमें भी Thunderbit मदद कर सकता है।
Post-setup validation के लिए Thunderbit का उपयोग कैसे करें:
- Gateway health जाँचें: आपका Openclaw Gateway live और ready है या नहीं, यह देखने के लिए उसके
/healthzऔर/readyzendpoints scrape करें (docs)। - Control UI verify करें: Thunderbit का उपयोग करके जाँचें कि Control UI सही तरीके से load हो रही है और अपेक्षित version से मेल खाती है।
- Skills/plugins audit करें: ClawHub skills directory scrape करके देखें कि कौन-से plugins installed हैं, उनकी स्थिति क्या है, और किन्हें updates या security review चाहिए।
- Audit results export करें: अपने records के लिए
openclaw doctorऔरopenclaw security audit --deepके output को structured report में बदलने के लिए Thunderbit का उपयोग करें।
Sample workflow:
- Install के बाद अपने browser में
http://localhost:18789/healthzऔरhttp://localhost:18789/readyzखोलें। - Thunderbit का उपयोग करके status fields scrape करें और tracking के लिए export करें।
- Terminal में
openclaw doctorचलाएँ, output कॉपी करें, और Thunderbit से results को structured बनाएं। openclaw security audit --deepके लिए यही दोहराएँ, और मिली किसी भी समस्या का रिकॉर्ड रखें।
इससे समस्याएँ जल्दी पकड़ना, setup document करना, और best practices के साथ बने रहना आसान हो जाता है।
2026 में अपने Openclaw installation को secure करना
Security बहुत बड़ी बात है—खासकर तब जब आपका AI assistant files access कर सकता हो, commands चला सकता हो, और आपकी chat apps से connect हो सकता हो। Openclaw की 2026 security docs साफ़ कहती हैं: अपने Gateway को एक trusted boundary मानें, और मजबूत authentication तथा firewalls के बिना इसे public internet पर expose न करें।
ज़रूरी security steps:
- Gateway को loopback पर bind करें: जब तक सच में ज़रूरत न हो, सिर्फ़ local connections की अनुमति दें (docs)।
- Token authentication ज़रूरी करें: सभी connections के लिए onboarding-generated token का उपयोग करें।
- Tool access सीमित करें: सिर्फ़ वही skills/plugins enable करें जिन पर आपको भरोसा है, और exec/command tools को सख़्त scope में रखें।
- Workspace-only filesystem access लागू करें: plugins को आपकी पूरी drive तक पहुँचने से रोकें।
- Elevated tools बंद रखें: जब तक बेहद आवश्यक न हो, "run as admin/root" features off रखें।
- नियमित audit करें: किसी भी बदलाव के बाद
openclaw security audit --deep --fixचलाएँ।
Secure install के लिए checklist:
- Gateway 127.0.0.1 पर bound हो (या remote होने पर firewall से सुरक्षित हो)
- Token authentication enabled हो
- केवल trusted skills/plugins installed हों
- Filesystem access workspace तक सीमित हो
- कोई elevated tools enabled न हों
- Regular security audits scheduled हों
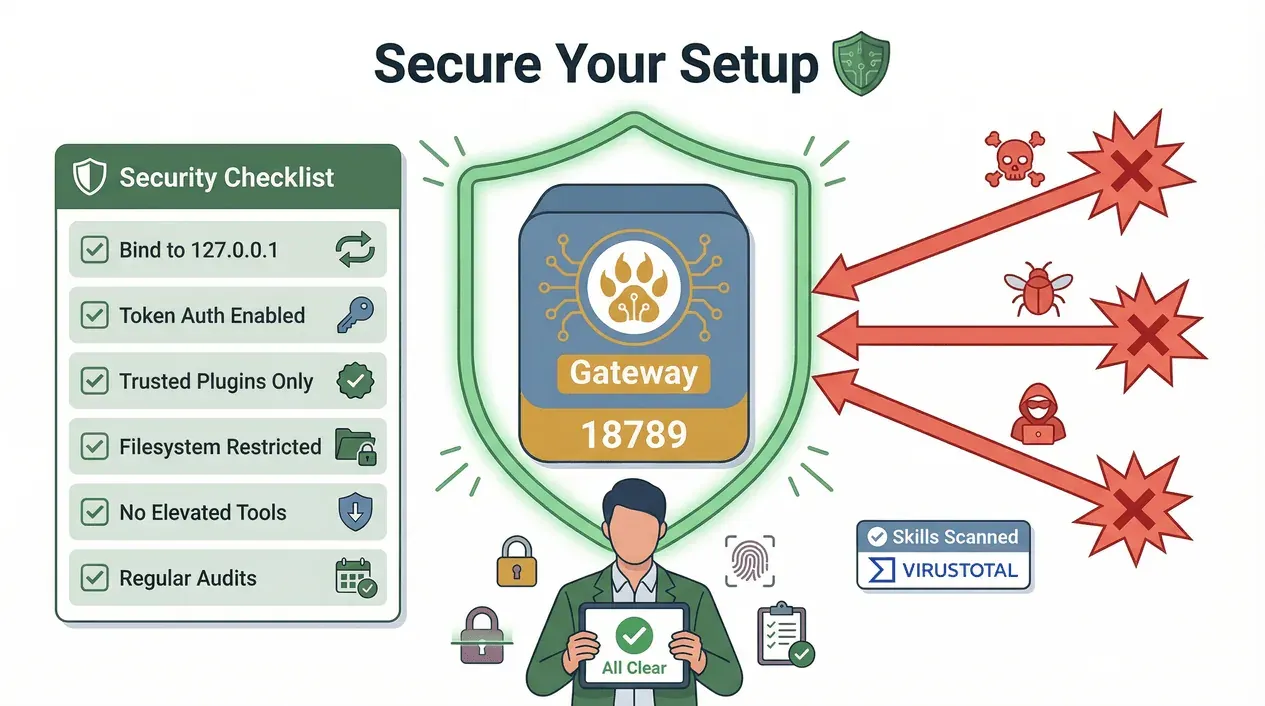
2026 में यह क्यों मायने रखता है: Public skills marketplaces (जैसे ClawHub) के बढ़ने से supply chain attacks का असली जोखिम पैदा होता है। Openclaw अब skills scan करने के लिए VirusTotal के साथ साझेदारी करता है, लेकिन फिर भी आपको जो install करना है उसे खुद review करना चाहिए और अपने Gateway को locked down रखना चाहिए।
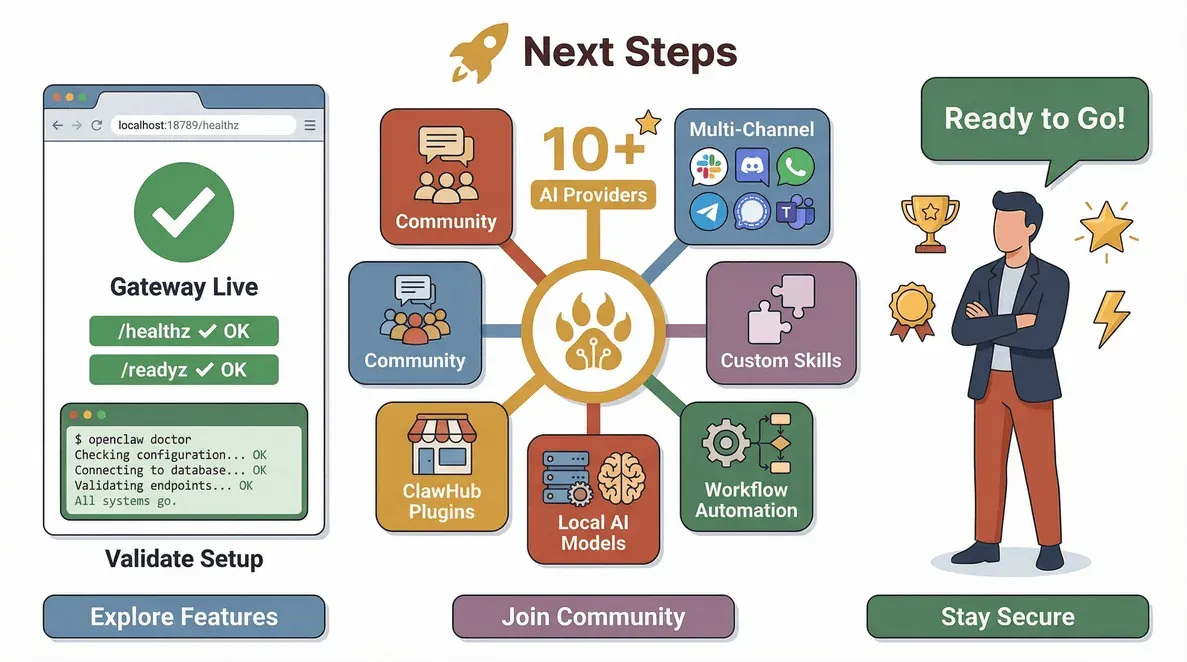
Openclaw की पूरी क्षमता का उपयोग: अगले कदम और advanced resources
बधाई हो—Openclaw अब चल रहा है! लेकिन सिर्फ़ basics पर मत रुकिए। अपने setup से और भी ज़्यादा पाने का तरीक़ा यह है:
- Advanced features explore करें: multi-channel support, custom skills, और workflow automation आज़माएँ।
- और channels जोड़ें: unified messaging के लिए Slack, Discord, Signal, या Teams जोड़ें।
- अपने AI models customize करें: vLLM/SGLang के साथ local models इस्तेमाल करें, या नए providers launch होने पर उन्हें आज़माएँ (provider directory)।
- Community से जुड़ें: Openclaw Discord, GitHub discussions, और official docs देखें।
- नए skills पर नज़र रखें: अपनी workflow के हिसाब से ClawHub में plugins browse करें—लेकिन permissions और security notes हमेशा review करें।
- Thunderbit के open API के साथ integrate करें: documentation checks, dashboard monitoring, या यहाँ तक कि अपना install/runbook generator बनाने को automate करें (Thunderbit API docs)।
निष्कर्ष और मुख्य बातें
Openclaw 2026 में self-hosted AI assistants के लिए नेतृत्व कर रहा है, लेकिन इसे सही तरीके से सेटअप करने का मतलब है नवीनतम steps follow करना, आम pitfalls से बचना, और security को हमेशा प्राथमिकता देना। Thunderbit जैसे tools का इस्तेमाल करके अपने install process को व्यवस्थित करने, documentation जाँचने, और setup verify करने से आप घंटों की निराशा बचा सकते हैं और अपने AI assistant से अधिकतम फ़ायदा उठा सकते हैं।
याद रखें:
- हमेशा latest Node.js और system requirements जाँचें।
- सबसे smooth experience के लिए recommended installer script या Docker का उपयोग करें।
- PATH और permission issues से सावधान रहें—ये सबसे आम अड़चनें हैं।
- अपने Gateway को secure करें और plugins का नियमित audit करें।
- documentation checks और post-install validation को automate करने के लिए Thunderbit का लाभ उठाएँ।
जिज्ञासु बने रहें, सुरक्षित रहें, और अपने नए AI-powered sidekick का आनंद लें। अगर आप किसी परेशानी में फँसते हैं या और advanced integrations देखना चाहते हैं, तो Openclaw और Thunderbit communities बस एक क्लिक दूर हैं।
Openclaw setup के लिए Thunderbit आज़माएँ Get Started Free
FAQs
1. 2026 में Openclaw install करने का सबसे तेज़ तरीक़ा क्या है?
Recommended method website installer script है (curl -fsSL https://openclaw.ai/install.sh | bash), जो आपका OS detect करता है, ज़रूरत होने पर Node.js install करता है, और onboarding शुरू करता है। Windows के लिए, बेहतर अनुभव के लिए WSL2 की सलाह दी जाती है।
2. Openclaw installation के सबसे आम errors क्या हैं, और मैं उन्हें कैसे ठीक करूँ?
PATH issues (जैसे openclaw: command not found), permission errors (Linux पर EACCES), और missing Control UI assets मुख्य समस्याएँ हैं। अपनी Node.js version जाँचें, सुनिश्चित करें कि npm global bin आपके PATH में है, और अगर packaging bugs मिलें तो Docker या source builds का उपयोग करें।
3. Openclaw installation और troubleshooting में Thunderbit कैसे मदद कर सकता है?
Thunderbit Openclaw documentation, provider lists, और troubleshooting steps को scrape करके structured checklists में व्यवस्थित कर सकता है। यह Gateway health endpoints जाँचने और audit results export करने के जरिए आपकी install validation में भी उपयोगी है।
4. मैं अपने Openclaw installation को secure कैसे रखूँ?
Gateway को हमेशा loopback पर bind करें या firewall से सुरक्षित रखें, token authentication अनिवार्य करें, plugin access सीमित करें, और नियमित security audits चलाएँ। public skills/plugins को लेकर सावधान रहें और install करने से पहले permissions review करें।
5. Openclaw के लिए मदद या community support मुझे कहाँ मिलेगा?
official docs, GitHub issues, Discord server, और Openclaw community forums देखें। automation और scraping tips के लिए Thunderbit Blog पर जाएँ।
क्या आप अपने AI assistant को सचमुच अपना बनाना चाहते हैं? Thunderbit डाउनलोड करें और आज ही अपना ultimate Openclaw setup बनाना शुरू करें।
और जानें
- 2026 में Web Crawling की स्थिति: प्रमुख आँकड़े और उद्योग मानक
- किसी साइट को Web Crawl कैसे करें? शुरुआती लोगों के लिए गाइड
- List Crawling क्या है और इसे AI से कैसे करें
- Crawl4AI की Thunderbit से तुलना: वास्तविक users को क्या जानना चाहिए
- Octoparse बनाम Thunderbit: No-Code Web Scrapers के लिए 2025 की तुलना