
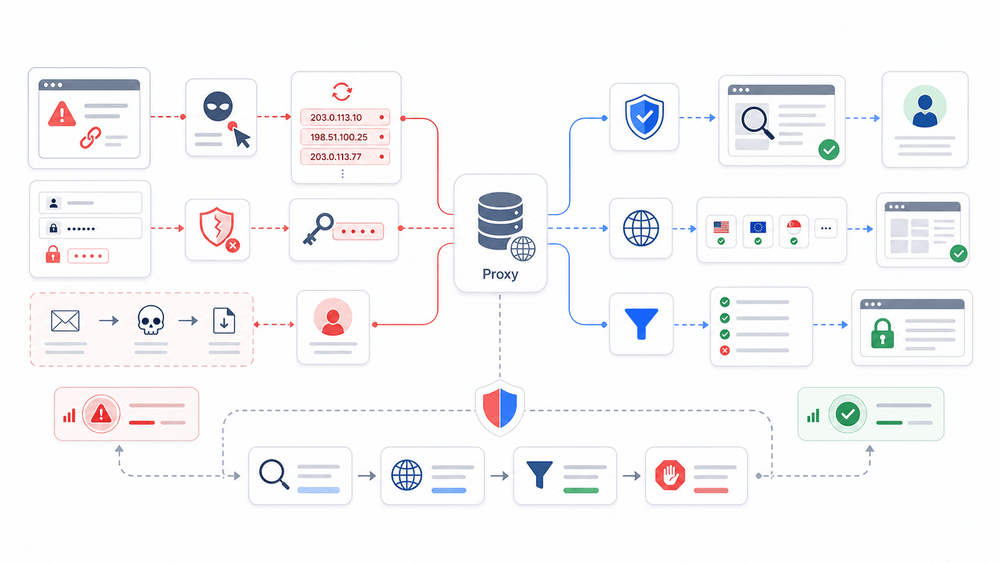
APWG ने अकेले Q1 2026 में 971,181 फ़िशिंग हमले दर्ज किए — जो पिछली तिमाही से 13.8% ज़्यादा हैं। और जनवरी 2026 में, Google ने उस नेटवर्क को बाधित किया जिसे उसने दुनिया के सबसे बड़े रेज़िडेंशियल प्रॉक्सी नेटवर्क में से एक बताया, क्योंकि उसने पाया कि एक ही हफ़्ते में 550 से ज़्यादा थ्रेट ग्रुप्स इसके ज़रिए ट्रैफ़िक रूट कर रहे थे। यानी, प्रॉक्सी फ़िशिंग की लड़ाई के दोनों तरफ़ मौजूद हैं।
यही वह टकराव है जिसे "प्रॉक्सी और फ़िशिंग" पर लिखे ज़्यादातर लेख नज़रअंदाज़ कर देते हैं। वे या तो कहते हैं कि प्रॉक्सी एक ढाल हैं (हमारा प्रॉक्सी प्रोडक्ट खरीदिए, सुरक्षित रहिए) या फिर चेतावनी देते हैं कि प्रॉक्सी हमलावरों का हथियार हैं (डरिए)। हक़ीक़त इससे कहीं ज़्यादा जटिल और दिलचस्प है।
हमलावर प्रॉक्सी इंफ्रास्ट्रक्चर का इस्तेमाल अपनी पहचान छिपाने, भरोसेमंद IP पतों के बीच रोटेट करने और MFA के बाद भी authenticated sessions चुराने के लिए करते हैं। दूसरी तरफ़, डिफेंडर संदिग्ध लिंक्स को सुरक्षित तरीके से जांचने, अलग-अलग देशों में फ़िशिंग पेज क्या दिखाते हैं यह देखने, और अपनी साइट तक पहुँचने से पहले ही malicious traffic को फ़िल्टर करने के लिए प्रॉक्सी का इस्तेमाल करते हैं। यह गाइड दोनों पक्षों को कवर करती है, और फिर एक ऐसा practical workflow बताती है जिसे आप सच में लागू कर सकते हैं। कोई अस्पष्ट बातें नहीं, कोई जादुई समाधान नहीं।
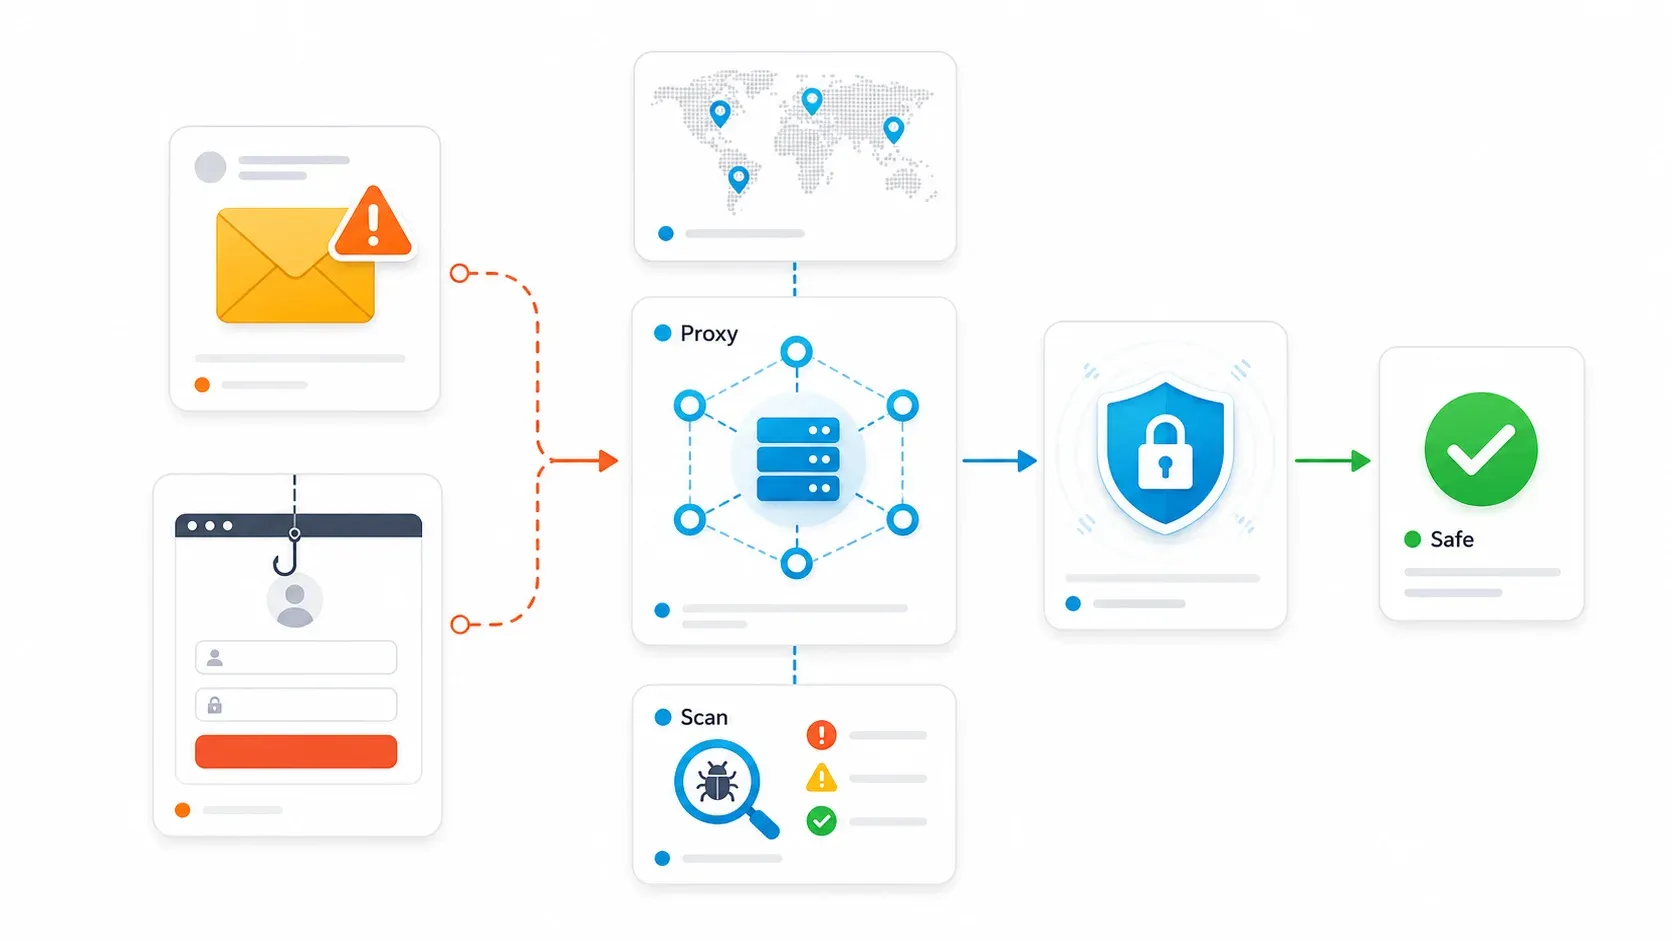
- कठिनाई: मध्यम
- समय: पढ़ने और योजना बनाने के लिए ~25 मिनट; implementation चरण के अनुसार बदल सकती है
- आपको क्या चाहिए: आपकी organization के web infrastructure की बुनियादी समझ, आपके domain की DNS settings तक access, एक Chrome browser (Thunderbit steps के लिए), और वैकल्पिक रूप से एक proxy provider account
फ़िशिंग क्या है और आपका बिज़नेस इससे क्यों प्रभावित होना चाहिए?
फ़िशिंग एक deception attack है। अपराधी email, text messages, fake login pages, QR codes, या spoofed websites का इस्तेमाल करके लोगों को credentials देने, login approve करने, malware install करने, या पैसे ट्रांसफ़र करने के लिए फँसाते हैं।
अब यह सिर्फ़ “खराब email” की समस्या नहीं रही। आज की फ़िशिंग में cloud-hosted pages, fake Microsoft 365 login flows, QR codes, और session-token theft शामिल हैं।
बिज़नेस के लिए इसका असर बहुत वास्तविक होता है। IBM की 2025 Cost of a Data Breach रिपोर्ट के अनुसार वैश्विक औसत breach cost USD 4.4 million है। FBI की 2025 Internet Crime Report बताती है कि IC3 को लगभग 453,000 cyber-enabled fraud शिकायतें मिलीं, जिनमें reported losses USD 17.7 billion से अधिक थे, और इनमें business email compromise (BEC) का हिस्सा 3 अरब डॉलर से ज़्यादा था।
Credential theft, wire fraud, supply chain compromise, regulatory fines — फ़िशिंग इन सब पर असर डालती है।
आगे: प्रॉक्सी attack और defense दोनों में कैसे फिट होते हैं, और layered, practical defense वास्तव में कैसी दिखती है।
प्रॉक्सी की दोहरी भूमिका: आपकी ढाल और उनका हथियार
प्रॉक्सी आपके device और internet के बीच एक intermediary होता है। वेबसाइट को आपका असली IP address दिखने की बजाय प्रॉक्सी का address दिखता है। इसे ऐसे समझिए जैसे mail-forwarding service: recipient को पत्र forwarding address से मिलता है, आपके घर के address से नहीं।
यही गुण प्रॉक्सी को dual-use बना देता है। Security teams threats की जांच corporate IP या analyst workstation को उजागर किए बिना करने के लिए प्रॉक्सी का इस्तेमाल करती हैं। हमलावर वही तकनीक malicious traffic को सामान्य users, अलग-अलग देशों, या भरोसेमंद residential networks से आता हुआ दिखाने के लिए इस्तेमाल करते हैं। Barracuda के April 2026 विश्लेषण के अनुसार residential IP addresses इसलिए authentic लगते हैं क्योंकि वे असली घर या छोटे बिज़नेस internet connections से जुड़े होते हैं, इसलिए fraud systems उन्हें कम ही flag करते हैं।
ज़्यादातर competing articles सिर्फ़ एक ही पक्ष दिखाते हैं। इससे readers को अधूरी तस्वीर मिलती है — और अधूरी defense।
हमलावर आपके ख़िलाफ़ प्रॉक्सी कैसे इस्तेमाल करते हैं
Business defenders के लिए तीन मुख्य attack vectors सबसे ज़्यादा मायने रखते हैं: anonymity और IP rotation, residential proxy abuse, और trusted-platform evasion.
AiTM (Adversary-in-the-Middle) फ़िशिंग क्या है
AiTM वह attack है जो “MFA हमें बचाता है” वाली धारणा तोड़ देता है (spoiler alert: traditional MFA इससे नहीं बचती)।
AiTM attack में, attacker victim और legitimate login page — जैसे Microsoft 365 — के बीच एक reverse proxy लगा देता है। User को सब कुछ असली login flow जैसा दिखता है। वह credentials डालता है, MFA complete करता है, और असली identity provider एक session cookie जारी कर देता है। लेकिन क्योंकि पूरा traffic attacker के proxy से होकर गुजर रहा होता है, attacker उस session cookie को पकड़ लेता है। अब वह उसे replay करके account तक पहुँच सकता है — password या MFA prompt की ज़रूरत नहीं।
Microsoft का Tycoon2FA विश्लेषण, जो प्रमुख AiTM phishing kits में से एक है, दिखाता है कि operators Microsoft 365, Outlook, SharePoint, OneDrive, और Google login pages की नकल कर सकते हैं। यह kit PDFs और QR codes बनाती है, redirect chains को manage करती है, और MFA usage तथा session cookie capture को track करती है। इसका infrastructure short-lived subdomains और Cloudflare-hosted infrastructure का इस्तेमाल blocklists को चकमा देने के लिए करता है।
यह सब theoretical नहीं है। AiTM kits बड़े पैमाने पर actively exploited हैं, और यही #1 वजह है कि “हमारे पास MFA है” फ़िशिंग का पूरा जवाब नहीं है।
Residential Proxy Abuse और IP Rotation
Residential proxy networks attacker traffic को असली home IP addresses के ज़रिए route करते हैं, जिससे phishing requests legitimate लगती हैं और IP-based fraud detection को पार कर जाती हैं। कई providers यह rigorously verify नहीं करते कि उनके IPs का इस्तेमाल कैसे हो रहा है, जिससे एक gray market बनता है।
सबसे ठोस उदाहरण: जनवरी 2026 में, Google Threat Intelligence Group ने IPIDEA residential proxy network को बाधित किया, जिससे उसका उपलब्ध device pool लाखों तक घट गया। GTIG ने एक ही सात-दिन की अवधि में 550 से ज़्यादा अलग-अलग threat groups को IPIDEA exit nodes का इस्तेमाल करते देखा। जांच में botnets, SaaS access abuse, password spray attacks, और global espionage actors के साथ overlap मिला। कई proxy SDK deployments में स्पष्ट user consent नहीं था।
FBI की 2026 residential proxies advisory में phishing, stolen-credential login, brute force attacks, account takeovers, spam, और C2 obfuscation को criminal uses के रूप में सूचीबद्ध किया गया है।
Trusted-Platform Hosting और Phishing Kit Evasion
एक और evasion tactic है भरोसेमंद platforms — SharePoint, Google Docs, Azure Blob Storage — पर phishing pages host करना, ताकि domain reputation का फ़ायदा लिया जा सके। Microsoft के Azure Blob Storage threats विश्लेषण से पता चलता है कि attacker इसका इस्तेमाल spoofed Microsoft sign-in pages host करने के लिए करते हैं, जिससे certificates के आधार पर उन्हें malicious पहचानना मुश्किल हो जाता है।
Phishing kits में evasion logic भी होता है। Cofense के phishing-kit विश्लेषण में geolocation filtering, user-agent और language filtering, CAPTCHA, developer-tools detection, और legitimate pages पर redirects का विवरण है। अगर visitor intended victim profile से match नहीं करता — गलत country, गलत browser, या security scanner जैसा दिखता है — तो page benign content या 404 दिखाता है।
एक ही corporate IP या cloud datacenter से scanning करने पर ऐसे pages छूट सकते हैं। Kit को सचमुच आपसे छिपने के लिए बनाया गया है।
डिफेंडर प्रॉक्सी का इस्तेमाल कैसे करते हैं
रक्षा की तरफ़, प्रॉक्सी चार practical काम करते हैं:
-
Anonymous URL और domain scanning. संदिग्ध links को controlled proxy के ज़रिए route करें ताकि destination proxy IP देखे, किसी employee laptop या corporate network को नहीं। इससे direct exposure कम होता है और investigation प्रक्रिया repeatable बनती है।
-
Threat intelligence gathering. Rotating proxies का इस्तेमाल phishing infrastructure, domain lists, public threat feeds, या newly registered domain sources को crawl करने के लिए करें, बिना कुछ requests के बाद block हुए। (हमेशा legal और terms-of-service सीमाओं के अंदर।)
-
Geo-distributed phishing detection. कई regions में proxies का इस्तेमाल करके देखें कि कोई संदिग्ध URL US, EU, APAC, या किसी अन्य target market से अलग तरह से behave करता है या नहीं। इससे geofencing या user-agent filtering वाले kits पकड़े जाते हैं — वही evasion techniques जिनका ऊपर ज़िक्र किया गया है।
-
Reverse proxy / WAF deployment. Reverse proxies आपकी अपनी domains के सामने रहते हैं। ये employees को outbound phishing links क्लिक करने से नहीं रोकते, लेकिन आपकी owned web properties को bot traffic, credential stuffing, malicious payloads, और abusive traffic patterns से बचाते हैं।
Proxy-based फ़िशिंग के खिलाफ़ MFA अकेले क्यों नाकाम हो जाता है
मैंने यह बातचीत दर्जनों IT forums में देखी है: “हमारे पास MFA है, इसलिए हम सुरक्षित हैं।” जिन sysadmins ने सच में AiTM incident झेला है, उनका नज़रिया बहुत अलग होता है।
Mechanism सीधा है। Victim एक असली login flow जैसा दिखने वाले पेज पर MFA complete करता है। असली identity provider session token जारी कर देता है। Attacker उस token को अपने reverse proxy के ज़रिए पकड़ लेता है।
Authentication सफल हो गई — लेकिन अब session attacker के हाथ में है। अगर active sessions और attacker द्वारा किए गए MFA changes बने रहते हैं, तो सिर्फ़ password reset काफी नहीं हो सकता। Microsoft साफ़ तौर पर कहता है कि प्रभावित organizations को standard remediation से आगे जाकर session cookies revoke करनी चाहिए और attacker-made MFA modifications वापस लेने चाहिए।
SMS codes, OTP apps, push approvals — अगर user उन्हें attacker-controlled flow के अंदर complete कर दे, तो वे सब phishing का शिकार हो सकते हैं। MFA ने अपना काम किया। समस्या यह है कि attacker पूरी प्रक्रिया के दौरान देख रहा था।
AiTM फ़िशिंग को वास्तव में क्या रोकता है
FIDO2 / Passkeys. FIDO Alliance बताता है कि passkeys डिज़ाइन से ही phishing-resistant हैं: चोरी करने के लिए password नहीं, और reuse करने योग्य sign-in data नहीं। Cryptographic key pair legitimate domain के origin से bound रहता है, इसलिए attacker का proxy challenge को replicate नहीं कर सकता। CISA भी पुष्टि करता है कि FIDO और PKI ही व्यापक रूप से उपलब्ध non-proprietary MFA methods हैं जो credential phishing को रोकते हैं।
Certificate-based authentication. Enterprise-grade और deploy करने में अधिक जटिल, लेकिन उतनी ही phishing-resistant क्योंकि यह user-entered codes के बजाय device certificates पर निर्भर करती है।
Conditional Access policies. Microsoft environments में, Conditional Access compliant devices, trusted locations, risk-based checks, या phishing-resistant authentication strength की मांग कर सकता है — जिससे stolen session token का मूल्य कम हो जाता है, भले attacker उसे हासिल कर ले।
ये सब proxies के पूरक हैं, विकल्प नहीं। लक्ष्य layers का है।
Budget वाले SMBs के लिए practical options
स्पष्ट आपत्ति: “Intune, MDM, hardware keys — ये तो enterprise budget की चीज़ें हैं।” ठीक है। यह रहा budget-friendly रास्ता:
- Browser-based passkeys. ज़्यादातर modern browsers passkeys को native रूप से support करते हैं। हार्डवेयर खरीदने की ज़रूरत नहीं। शुरुआत admin, finance, और HR accounts से करें।
- Free DMARC deployment. SPF, DKIM, और DMARC records publish करना मुफ़्त है। Google Workspace और Microsoft 365 में built-in setup guides हैं।
- Defensive domain registration. अपने brand के common misspellings और lookalike domains register करें। ज़्यादातर registrars हर domain के लिए सालाना $10–15 लेते हैं। हर domain पर DMARC reject policies लगाएँ।
- Targeted training. कर्मचारी awareness को खास तौर पर AiTM lures पर केंद्रित करें: fake Microsoft 365 login pages, fake document shares, QR codes, device code scams, और “urgent payroll/vendor” workflows।
इसे ऐसे समझिए: “यहाँ से शुरू करें, बाद में upgrade करें।” आंशिक adoption भी risk को बहुत घटा देता है।
फ़िशिंग से बचने के लिए कौन-सा proxy type सबसे अच्छा है?
अलग-अलग proxy types अलग-अलग anti-phishing कामों के लिए होते हैं, और गलत चुनाव पैसे की बर्बादी या blind spots पैदा कर सकता है।
| प्रॉक्सी प्रकार | सबसे अच्छा anti-phishing उपयोग | फ़ायदे | नुकसान | लागत स्तर |
|---|---|---|---|---|
| Datacenter | Bulk URL scanning, domain monitoring | तेज़, सस्ता, उच्च volume | Sophisticated phishing kits इसे आसानी से पकड़ लेते हैं | कम |
| Residential | Geo-targeted phishing detection, user-perspective testing | असली user traffic जैसा दिखता है, geo-blocks पार कर सकता है | धीमा, महँगा, sourcing को लेकर गंभीर नैतिक चिंताएँ | अधिक |
| Rotating | Threat intel crawling, sustained monitoring | लंबे crawl sessions में IP bans से बचाता है | Setup अधिक जटिल, latency बदलती रहती है | मध्यम |
| Reverse Proxy / WAF | आपकी own web properties की सुरक्षा | inbound threats फ़िल्टर करता है, bot detection, DDoS protection | outbound phishing detection में मदद नहीं करता | मध्यम |
Ethical sourcing पर एक नोट। Google/IPIDEA case और FBI advisory दोनों साफ़ करते हैं कि residential proxy networks compromised devices, deceptive SDKs, hidden VPN terms, या malware से बने हो सकते हैं। Residential proxy traffic खरीदने से पहले provider से transparent user consent, opt-out mechanisms, auditability, और abuse handling की माँग करें। जिन providers को security research में पहले flag किया गया है (PacketStream, अब बंद हो चुका 911 Proxy) उनके साथ अत्यधिक सावधानी बरतें।
ज़्यादातर छोटे और मध्यम बिज़नेस के लिए, bulk scanning के लिए datacenter proxies और अपनी domains के लिए reverse proxy/WAF से शुरुआत करें। Residential proxies तभी जोड़ें जब आपको geo-targeted testing की ज़रूरत हो और आप provider को पूरी तरह vet कर सकें।
Step-by-Step: प्रॉक्सी के साथ फ़िशिंग से कैसे बचें (एक practical workflow)
ज़्यादातर लेख theory पर खत्म हो जाते हैं। नीचे हर step के साथ tool recommendation और इतना detail है कि आप इसे अपनी IT team को दे सकें या खुद follow कर सकें।
Step 1: Newly Registered Lookalike Domains पर नज़र रखें
हमलावर campaign शुरू करने से पहले आपकी तरह दिखने वाले domains register करते हैं: thunderb1t.com, thunderbit-login.com, thunderbit-support.net.
इन्हें जल्दी पकड़ना सबसे ज़्यादा value देने वाले defensive actions में से एक है।
कैसे करें:
- अपने brand terms, product names, executive names, और login-related शब्दों (जैसे "login," "portal," "invoice," "payment") की watchlist बनाइए।
- crt.sh का इस्तेमाल करके रोज़ Certificate Transparency (CT) logs query करें, जिससे आप domain या organization name के हिसाब से certificate records खोज सकते हैं। CT logs में public certificates दर्ज होते हैं, इसलिए lookalike domains के नए certificates यहाँ दिख जाते हैं।
- अपने brand से बहुत मिलते-जुलते domains, suspicious TLDs (.xyz, .top, .click), या login/payment keywords वाले domains flag करें।
- Flag किए गए pages को proxy या sandbox के ज़रिए render करें — कभी भी employee browser से नहीं।
Thunderbit tie-in: Thunderbit का batch extract API प्रति job 100 तक suspicious URLs process कर सकता है, renderMode: "full" का इस्तेमाल करके JavaScript-heavy phishing clones render कर सकता है। आप उस data के लिए JSON Schema तय करते हैं जो वापस चाहिए — page title, login form मौजूद है या नहीं, form action domain, SSL issuer, redirect chain, final URL। CLI version cron-based monitoring में सहजता से फिट हो जाती है:
thunderbit batch extract --file suspicious-urls.txt --schema phishing-signals.json --render-mode full
Non-technical users के लिए, Thunderbit Chrome extension का इस्तेमाल कुछ clicks में suspicious pages को जल्दी scrape और review करने के लिए भी किया जा सकता है — जब आपको scheduled pipeline चलाने की बजाय बस कुछ URLs को आँखों से देखना हो, तब यह उपयोगी है।
अपेक्षित परिणाम: नई registered lookalike domains की daily या weekly report, structured metadata के साथ, ताकि triage किया जा सके।
संदिग्ध URL review के लिए Thunderbit आज़माएँ
Step 2: संदिग्ध लिंक्स को Datacenter Proxies के ज़रिए route करें
आपकी organization में कोई भी संदिग्ध लिंक क्लिक करने से पहले, उसे controlled path से analyze करें। यहाँ proxy IP दिखेगा, employee का device या corporate network नहीं।
कैसे करें:
- जल्दी जांच के लिए urlscan.io (एक web sandbox जिसमें scan country चुन सकते हैं) या VirusTotal (जो दर्जनों antivirus products और blocklists के खिलाफ़ URLs स्कैन करता है) का इस्तेमाल करें।
- Internal scripts या ज़्यादा volume analysis के लिए requests को datacenter proxy के ज़रिए route करें:
curl -x http://proxy.example.com:8080 -I "https://suspicious.example"
- Live phishing pages के लिए disposable VM या browser sandbox इस्तेमाल करें। Credentials entry बंद रखें। Redirect chain, page title, final destination, form posts, scripts, और screenshots capture करें।
- कभी भी असली corporate credentials सबमिट न करें। और public scans को सावधानी से handle करें — कुछ services submitted URLs को private या unlisted न होने पर expose कर देती हैं।
अपेक्षित परिणाम: किसी भी corporate exposure के बिना लिंक की destination, behavior, और indicators का safe assessment।
Step 3: Geo-Distributed Proxies से targeted phishing campaigns पकड़ें
कुछ phishing kits सिर्फ़ target country या language setting से आने वाले visitors को ही malicious content दिखाती हैं। Cofense बताता है कि geolocation filtering आम है: "गलत" region से आने वाले visitors को benign page या 404 दिखता है, जबकि target audience को credential-harvesting form मिलता है।
कैसे करें:
- Suspicious links को उन regions से test करें जहाँ आपके employees, customers, और finance teams वास्तव में काम करते हैं। अगर आपकी company US-based है और UK office भी है, तो दोनों जगह से test करें।
- Region के अनुसार final URLs, screenshots, page titles, forms, और HTTP response codes compare करें।
- QR-code या mobile-targeted lures की जांच करते समय user-agent और language settings rotate करें — कुछ kits इन्हें भी filter करती हैं।
- उन URLs को escalate करें जो एक जगह benign content और दूसरी जगह login form दिखाते हैं। यह strong phishing signal है।
अपेक्षित परिणाम: ऐसे geo-targeted campaigns की पहचान जो एक ही location scanning approach में दिखाई नहीं देतीं।
Step 4: अपनी domains के लिए Reverse Proxy या WAF deploy करें
अब outbound detection से inbound defense की तरफ़ बढ़ने का समय है। Reverse proxies और WAFs आपकी web properties के सामने रहते हैं और traffic को आपके servers तक पहुँचने से पहले inspect करते हैं।
कैसे करें:
- अपने domain की DNS को reverse proxy provider की ओर point करें। Cloudflare SMBs के लिए सबसे आसान विकल्प है — DNS, CDN, WAF, और rules एक ही interface में मिलते हैं। AWS-hosted applications के लिए, अगर आप पहले से CloudFront, ALB, या API Gateway इस्तेमाल कर रहे हैं तो AWS WAF अच्छा काम करता है।
- Managed WAF rules चालू करें। ये known malicious IPs को block करते हैं, bot traffic को फ़िल्टर करते हैं, और credential-stuffing patterns पहचानते हैं।
- Login, password reset, और contact forms पर rate limits चालू करें।
- High-risk endpoints के लिए bot या challenge rules जोड़ें।
- WAF events को weekly monitor करें — बस सेट करके भूल न जाएँ।
अपेक्षित परिणाम: Inbound malicious traffic आपके servers तक पहुँचने से पहले फ़िल्टर हो जाता है। Login pages पर credential-stuffing attempts block या challenge हो जाते हैं।
Step 5: Ongoing monitoring को automate और schedule करें
फ़िशिंग एक बार की audit नहीं है। नए domains, kits, और infrastructure रोज़ आते हैं — इसलिए monitoring का cadence होना चाहिए:
- Daily: CT lookalike scan और suspicious domain queue।
- Daily या hourly (high-risk brands के लिए): नए domains पर URL sandbox checks।
- Weekly: DMARC aggregate report review और spoofing pattern review।
- Weekly: Credential stuffing और bot spikes के लिए WAF event review।
- Monthly: Phishing-resistant MFA rollout progress check।
- Quarterly: Finance और HR workflows को realistic AiTM और BEC scenarios के खिलाफ़ test करें।
Thunderbit tie-in: Thunderbit के scheduled scraping और CLI/API workflows non-technical operations teams के लिए recurring monitoring में मदद कर सकते हैं। सबसे अच्छा use case यह नहीं है कि “Thunderbit खुद फ़िशिंग रोक देता है” — बल्कि यह है कि “Thunderbit operations teams को suspicious pages और domain-monitoring sources से structured signals collect करने में मदद करता है, बिना custom scraper शुरुआत से लिखे।” Results को team visibility के लिए Google Sheets या Airtable में, या simple integration के ज़रिए Slack में भेजा जा सकता है।
अपेक्षित परिणाम: एक continuous monitoring loop जो नई threats को हफ़्तों की बजाय घंटों में पकड़ ले।
प्रॉक्सी क्या नहीं पकड़ सकते: DMARC, SPF, और DKIM से email सुरक्षा
Proxy vendors यह हिस्सा शायद न बताएँ: प्रॉक्सी defense की सिर्फ़ एक layer हैं, लेकिन email-based phishing जो proxy layer को छूता ही नहीं, उसके लिए अलग protection चाहिए।
कई फ़िशिंग हमले spoofed email addresses के ज़रिए आते हैं। प्रॉक्सी उन्हें intercept नहीं करेगा।
SPF को Hard Fail के साथ सेट करना
SPF (Sender Policy Framework) एक DNS record है जो बताता है कि आपके domain की ओर से email भेजने के लिए किन IPs को अनुमति है। ~all (soft fail) की बजाय -all (hard fail) के साथ configure करें ताकि unauthorized senders को सीधे reject किया जा सके।
आम गलती: सभी legitimate sending services को शामिल करना भूल जाना — आपका CRM, marketing platform, transactional email provider, helpdesk। Record publish करने से पहले अपने sending sources audit करें।
DKIM Signing तैनात करना
DKIM (DomainKeys Identified Mail) outgoing emails में एक cryptographic signature जोड़ता है। Receiver यह verify करता है कि message transit के दौरान बदला नहीं गया। Google Workspace और Microsoft 365 दोनों में built-in DKIM setup guides हैं। इसमें लगभग 15 मिनट लगते हैं।
DMARC को Reject पर लागू करना
DMARC (Domain-based Message Authentication, Reporting & Conformance) receiving servers को बताता है कि SPF या DKIM fail होने पर क्या करना है। सबसे महत्वपूर्ण कदम जिसे ज़्यादातर organizations छोड़ देती हैं: legitimate email flows verify करने के बाद p=none (सिर्फ़ monitoring) से p=reject (fail होने वाले messages block) पर जाना।
कई organizations DMARC को अनिश्चितकाल तक p=none पर छोड़ देती हैं — protection के बिना visibility। यह security camera लगाकर दरवाज़ा खुला छोड़ने जैसा है।
Lookalike Domains की Defensive Registration
अपने brand के common misspellings और lookalike domains पहले से register करें। इन defensive domains पर DMARC reject policies लगाएँ ताकि इन्हें spoofed email के लिए इस्तेमाल न किया जा सके। प्रति domain सालाना $10–15 में, यह सबसे सस्ते और सबसे असरदार उपायों में से एक है — और ज़्यादातर छोटे बिज़नेस इसे पूरी तरह नज़रअंदाज़ कर देते हैं।
सबको एक साथ जोड़ना: फ़िशिंग के खिलाफ़ layered defense
कोई एक tool फ़िशिंग को नहीं रोकता। defense को मज़बूत बनाने वाली चीज़ संयोजन है। Practical checklist:
Outbound (threats की जाँच):
- संदिग्ध links के लिए proxy-based URL scanning
- CT logs और batch extraction के ज़रिए domain monitoring
- region-targeted campaigns के लिए geo-distributed testing
Inbound (अपनी properties की सुरक्षा):
- आपकी web domains के लिए reverse proxy / WAF
- email authentication के लिए DMARC/SPF/DKIM
- lookalike domains की defensive registration
Authentication (accounts की सुरक्षा):
- phishing-resistant MFA के लिए FIDO2 / passkeys
- Conditional Access policies (compliant devices, risk-based checks)
- session token monitoring और revocation procedures
People (आख़िरी safety net):
- खास तौर पर AiTM lures, QR codes, और BEC scenarios पर focused training
- स्पष्ट reporting culture — suspicious messages report करना आसान और non-punitive बनाइए
- finance और HR workflows की realistic phishing scenarios के खिलाफ़ नियमित testing
यह approach NIST Cybersecurity Framework के defense-in-depth principle से मेल खाती है: कई independent layers, ताकि एक layer fail हो जाए तो भी पूरा compromise न हो।
जिन teams को suspicious URLs की जांच, threat data scrape करने, या scale पर domains monitor करने की ज़रूरत है, उनके लिए Thunderbit का AI web scraper workflow को तेज़ कर सकता है — non-technical users के लिए Chrome extension, technical teams के लिए API/CLI। यह अपने आप में security product नहीं है, लेकिन analyst toolkit में इसकी जगह बनती है। आप coding के बिना web scraping के बारे में और जान सकते हैं या हमारे blog पर AI web scraping approaches देख सकते हैं।
Threat monitoring के लिए AI web scraping का उपयोग करें Get Started Free
FAQs
हमलावर फ़िशिंग attacks में प्रॉक्सी का इस्तेमाल कैसे करते हैं?
हमलावर residential और rotating proxies का इस्तेमाल अपनी असली IP छिपाने, भरोसेमंद addresses के बीच रोटेट करने, IP-based fraud detection को बायपास करने, और AiTM reverse proxies तैनात करने के लिए करते हैं ताकि authenticated sessions intercept किए जा सकें — victim के MFA complete करने के बाद भी। जनवरी 2026 में IPIDEA disruption ने दिखाया कि एक ही residential proxy network का इस्तेमाल 550 से ज़्यादा threat groups कर रहे थे।
Reverse proxy फ़िशिंग और website compromise से कैसे बचाता है?
Reverse proxy आपके web servers के सामने बैठता है और traffic को आपके infrastructure तक पहुँचने से पहले inspect करता है। यह known malicious IPs block करता है, bot traffic फ़िल्टर करता है, login attempts पर rate limit लगाता है, और credential-stuffing या phishing-related activity पहचानता है। लेकिन यह कर्मचारियों को outbound phishing links क्लिक करने से नहीं रोकता।
क्या proxies फ़िशिंग को पूरी तरह रोक सकते हैं?
नहीं। Proxies एक अहम layer हैं, लेकिन email-based phishing के लिए DMARC/SPF/DKIM चाहिए, और AiTM attacks के ज़रिए session hijacking को रोकने के लिए FIDO2/passkeys जैसे phishing-resistant MFA चाहिए। Proxies, email authentication, phishing-resistant credentials, और employee training को मिलाकर layered defense बनाना ज़रूरी है।
AiTM phishing क्या है और MFA इसे क्यों नहीं रोकता?
AiTM (Adversary-in-the-Middle) phishing victim और real login page के बीच reverse proxy का इस्तेमाल करता है, और MFA complete होने के बाद session token पकड़ लेता है। Traditional MFA इसे नहीं रोकती क्योंकि attacker password नहीं, बल्कि authenticated session चुराता है। FIDO2/passkeys इस attack से बचाते हैं क्योंकि cryptographic challenge legitimate domain से bound होता है और attacker के proxy के ज़रिए replay नहीं किया जा सकता।
फ़िशिंग detection के लिए कौन-सा proxy type सबसे अच्छा है?
Datacenter proxies bulk URL scanning के लिए सबसे अच्छे हैं (तेज़ और सस्ते)। Residential proxies geo-targeted testing के लिए सबसे अच्छे हैं (वास्तविक लगते हैं लेकिन महँगे होते हैं — provider की ethical sourcing ज़रूर जाँचें)। Reverse proxies/WAFs अपनी sites की रक्षा के लिए सबसे अच्छे हैं। सबसे मज़बूत तरीका अपनी ज़रूरत के हिसाब से इनका combination है।
Threat monitoring और AI scraping के लिए Thunderbit आज़माएँ Get Started Free
और जानें