OpenClaw जैसे नए AI एजेंट को शुरू करने में एक अलग ही रोमांच होता है—जब तक यह न समझ आए कि 2026 में “बस इंस्टॉल करो और चला दो” वाला तरीका सीधे मुसीबत को बुलावा देना है। मैंने टीमों को एक ही दोपहर में उत्साहित से घबराए हुए होते देखा है, बस इसलिए क्योंकि उनका OpenClaw इंस्टेंस ज़रूरत से ज़्यादा खुला था। सच यही है: OpenClaw आज के सबसे ताकतवर ऑटोमेशन प्लेटफॉर्म्स में से एक है, लेकिन अगर आप बुनियादी सुरक्षा कदम छोड़ दें, तो यही ताकत एक चमकता हुआ “SECURITY RISK” बोर्ड बन जाती है।
यह सिर्फ़ थ्योरी नहीं है। पिछले एक साल में OpenClaw की लोकप्रियता तेज़ी से बढ़ी है—338,000 से ज़्यादा GitHub stars और 66,200 forks ()—और इसी के साथ असली दुनिया में हमलों, खुले पड़े इंस्टेंस, और बड़े स्तर की कमजोरियों की एक लहर भी आई है ()। इसलिए, इससे पहले कि आप अपने AI एजेंट को अपने डिजिटल साम्राज्य की चाबियाँ दें, आइए एक सुरक्षा-प्रथम इंस्टॉलेशन प्रक्रिया देखें जो आपके बिज़नेस को सुरक्षित रखे, डेटा को निजी रखे, और आपके वीकेंड को इमरजेंसी कॉल्स से बचाए।
मैं OpenClaw की नई सुरक्षा आर्किटेक्चर को आसान भाषा में समझाऊँगा, practical hardening steps साझा करूँगा, और दिखाऊँगा कि जैसे टूल कैसे आपकी इंस्टॉलेशन की निगरानी और रखरखाव में मदद कर सकते हैं—वो भी AI को पूरा shell access दिए बिना (अभी के लिए)। तैयार हैं? चलिए, सिस्टम को लॉक डाउन करते हैं।
2026 में OpenClaw का सुरक्षा परिदृश्य समझें
OpenClaw एक tool-using AI agent platform है—इसे ऐसे AI “रोबोट” की तरह सोचिए जो वेब ब्राउज़ कर सकता है, shell commands चला सकता है, workflows automate कर सकता है, और plugins भी इंस्टॉल कर सकता है। यही flexibility इसे sales, operations, और IT teams के लिए इतना ताकतवर बनाती है। लेकिन यही वजह है कि OpenClaw deployments में सुरक्षा की एक छोटी-सी गलती भी बहुत भारी पड़ सकती है।
2026 की सुरक्षा आर्किटेक्चर: क्या नया है?
OpenClaw के नए releases ने सुरक्षा में काफ़ी सुधार किए हैं। अब platform में शामिल है:
- बेहतर encryption जो सभी gateway communications के लिए modern protocols और मजबूत cipher suites को सपोर्ट करता है ()।
- SecretRefs API keys और credentials के लिए, ताकि secrets plaintext config files में खुले न रहें ()।
- Exec approvals और allowlists, जिससे आप agent किन commands को चला सकता है, इस पर कड़ा control रख सकते हैं—और list से बाहर किसी भी चीज़ के लिए explicit approval ज़रूरी होती है ()।
- Sandboxing improvements, जो tool execution को अलग-थलग करती हैं, खासकर Docker और VM environments में ()।
लेकिन दिक्कत यह है: ये features तभी सुरक्षित हैं जब आप इन्हें सही ढंग से configure करें। Default install भी तब तक risk भरा रह सकता है जब तक आप उसे lock down न करें।
Shell access वाले AI agents इतने जोखिम भरे क्यों हैं?
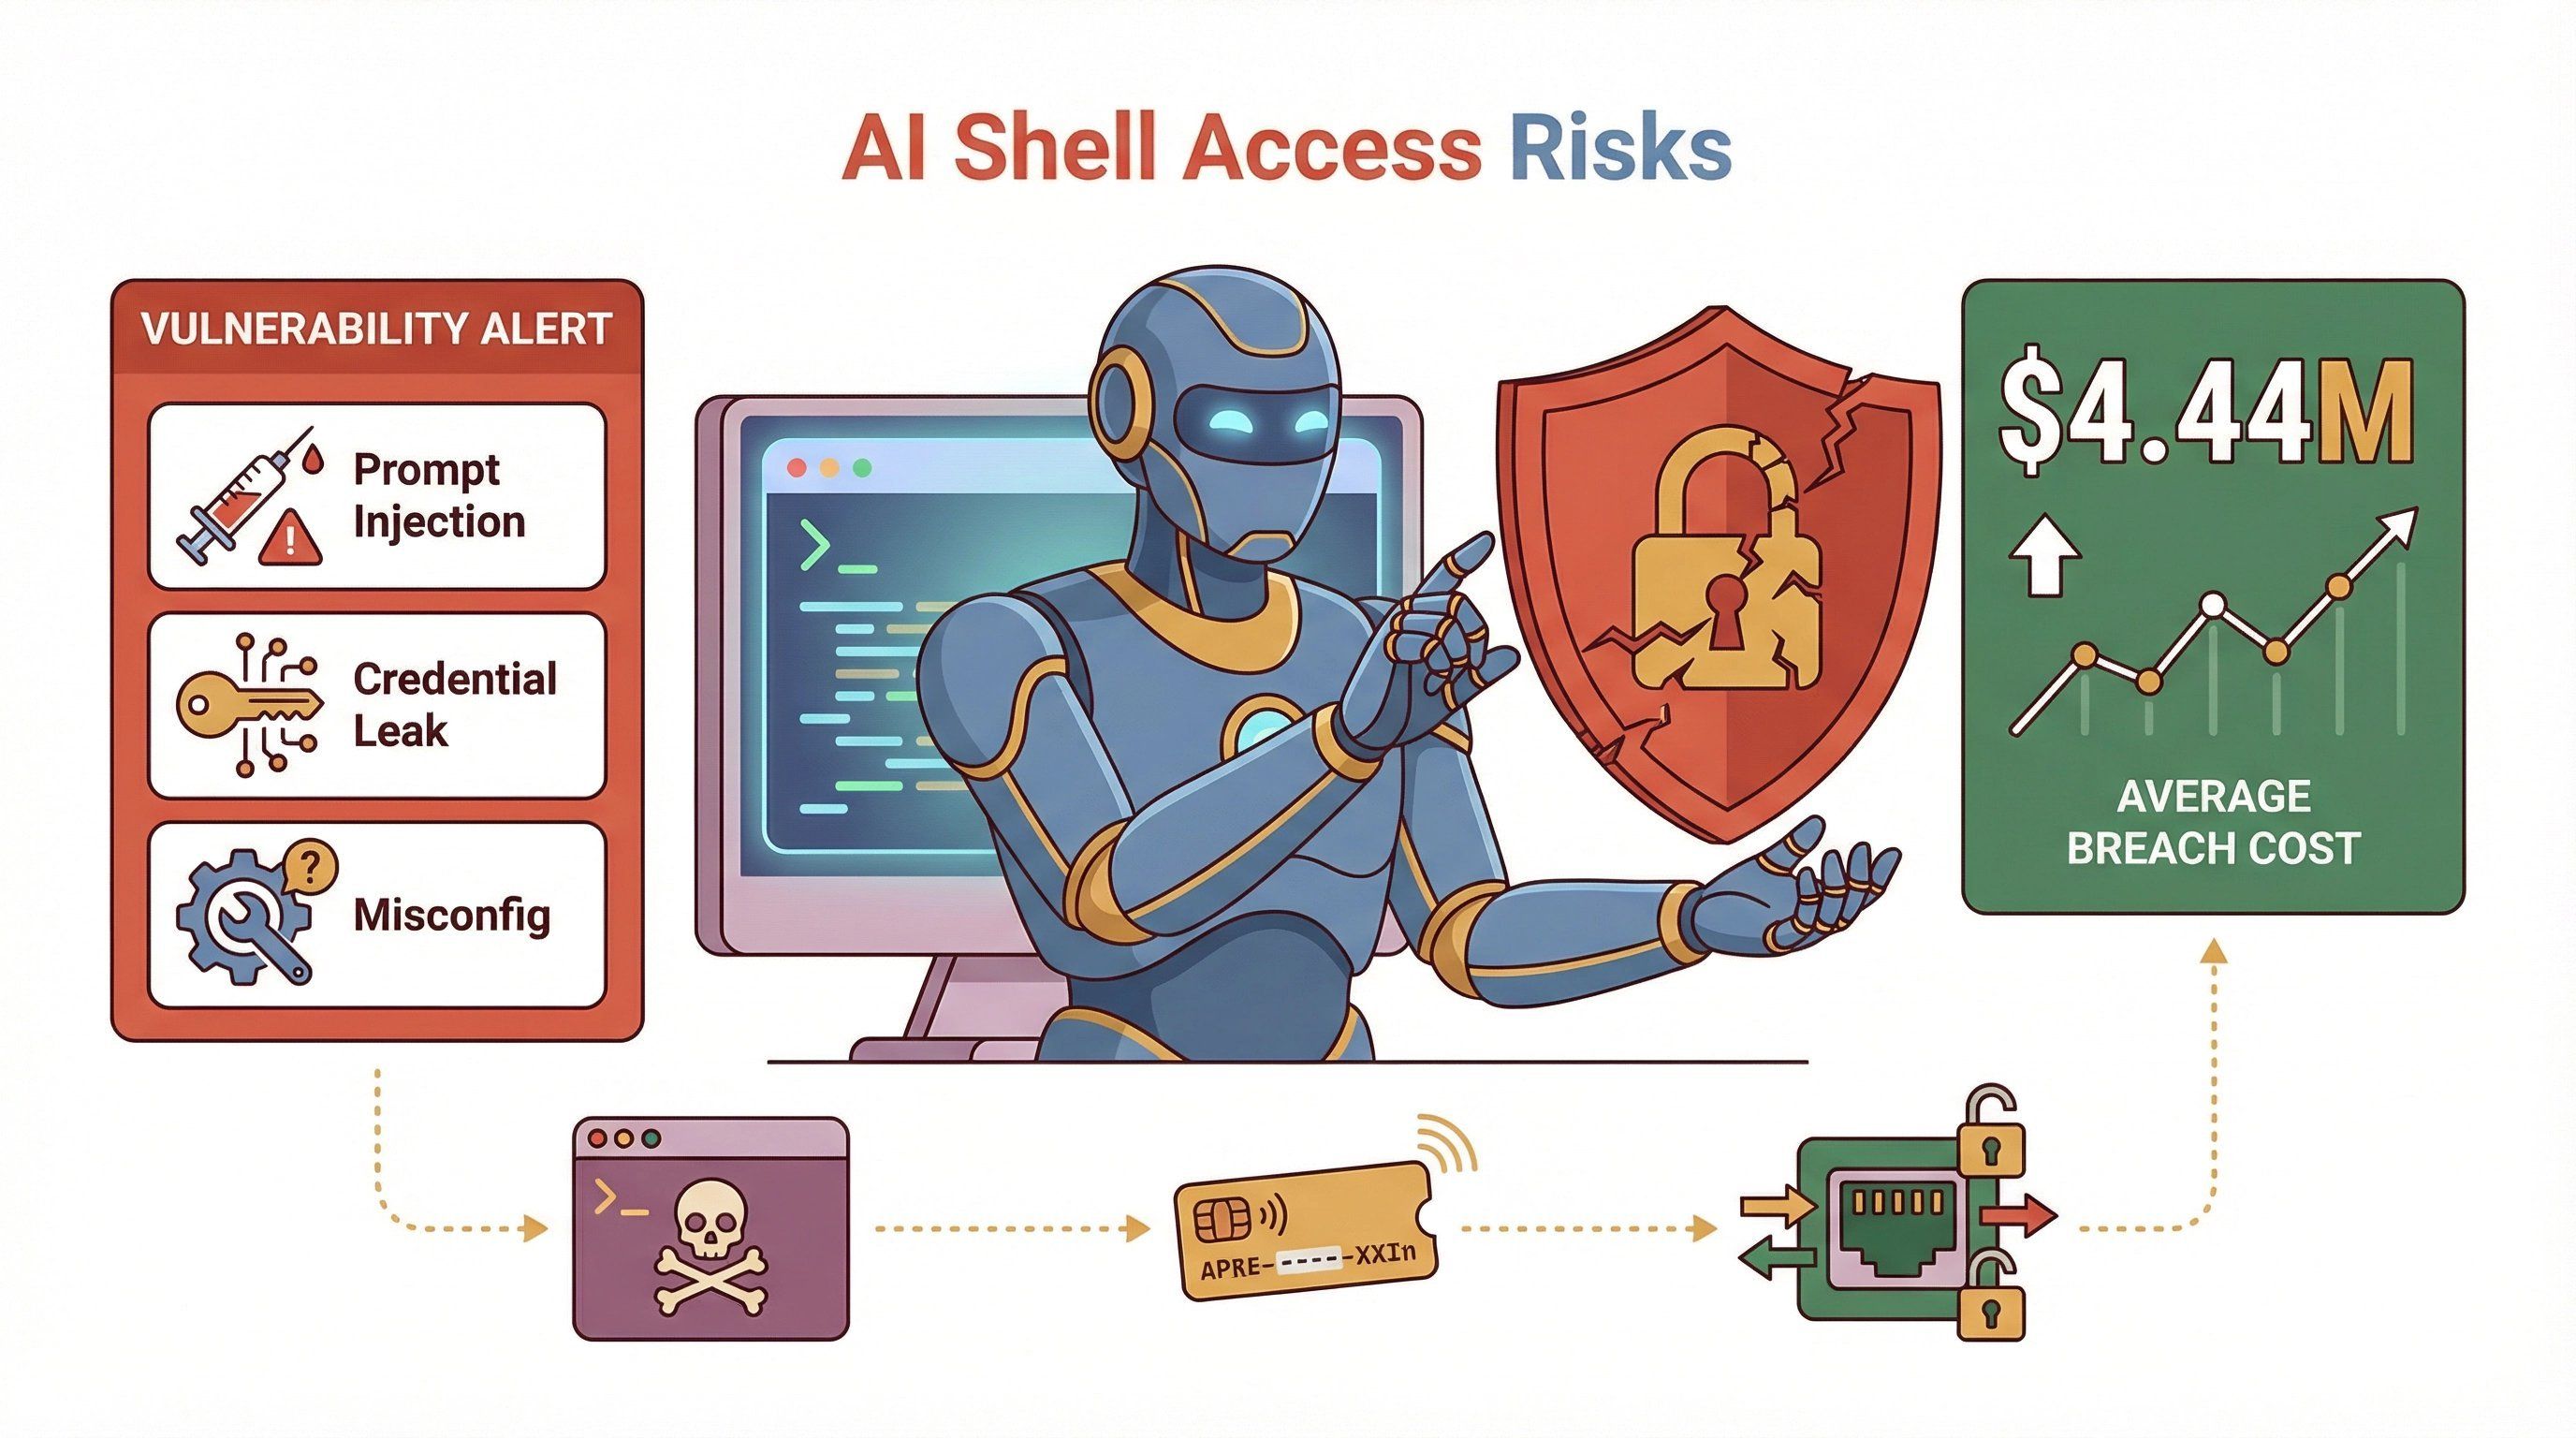 साफ़ कहें तो, AI agent को shell access देना ऐसे है जैसे किसी toddler को server room में माचिस की डिब्बी के साथ छोड़ देना। 2026 में सबसे बड़े risks हैं:
- Prompt injection attacks: खराब input (web pages, emails, या Slack messages तक से) agent को खतरनाक commands चलाने के लिए बहका सकता है ()।
- Credential leaks: खुले config या logs API keys, tokens, या cloud credentials बाहर निकाल सकते हैं ()।
- Misconfiguration: सिर्फ़ एक खुला port या कमज़ोर password आपके OpenClaw इंस्टेंस को attackers के लिए public playground बना सकता है ()।
हाल की CVEs भी यही कहानी कहती हैं: 2026 की शुरुआत में OpenClaw ने Docker sandboxing में एक command injection flaw (), एक WebSocket token leak (), और एक plugin path traversal bug () ठीक किया। इनमें से हर एक समस्या, अगर समय पर patch न की जाए, तो “अजीब output” से सीधे “पूरा सिस्टम compromise” तक पहुँच सकती है।
OpenClaw के लिए security-first installation क्यों ज़रूरी है
सीधी बात: insecure OpenClaw install सिर्फ़ तकनीकी समस्या नहीं है—यह business risk है। 2025 में data breach की औसत लागत $4.44 million थी (), और AI agent incidents कई महीनों तक पकड़ में नहीं आते (mean time to identify + contain: 241 days)।
ताकत बनाम जोखिम: असली उपयोग के मामले
यहाँ देखें कि OpenClaw एक साथ superpower भी हो सकता है और liability भी:
| उपयोग का मामला | बिज़नेस वैल्यू | गलत कॉन्फ़िगरेशन पर सुरक्षा जोखिम |
|---|---|---|
| Sales automation | Leads scrape करना, auto-email, CRM sync | Tokens का खुल जाना, mass email abuse |
| IT operations | Auto-patch, monitoring, apps restart करना | Shell access = संभावित RCE |
| Data analysis | Docs summarize करना, web data ingest करना | Prompt injection, data exfiltration |
| Plugin ecosystem | नए tools से विस्तार करना | Supply chain attacks, plugin exploits |
“Helpful AI” और “security nightmare” के बीच का फर्क पूरी तरह setup पर निर्भर करता है।
Cloud AI बनाम self-hosted agents: ज़िम्मेदारी किसकी?
Cloud AI services में provider ज़्यादातर security संभालता है। Self-hosted OpenClaw में, security team आप होते हैं। इसका मतलब:
- नेटवर्क exposure आप तय करते हैं (public, private, या सिर्फ़ tailnet)।
- secrets, updates, और plugins की vetting आप करते हैं।
- अगर कुछ गड़बड़ हुई, तो जवाबदेही भी आपकी है।
अगर यह थोड़ा भारी लग रहा है, चिंता न करें—मैं आपको सही तरीका बताऊँगा।
Pre-installation security checklist: नींव मज़बूत करें
openclaw install चलाने से पहले, चलिए आपका system तैयार करते हैं। अपने environment को harden करने के लिए मेरी go-to checklist यह है:
1. अपना OS और packages अपडेट करें
- अपने server या VM को latest stable release तक patch करें।
- सभी system packages अपडेट करें, खासकर Docker, Python, और Node.js अगर आप उन्हें इस्तेमाल करेंगे।
2. अनावश्यक services और ports बंद करें
- जिन services की ज़रूरत नहीं है, उन्हें बंद कर दें (FTP, telnet, आदि)।
- सभी unused ports बंद करें—OpenClaw सिर्फ़ वहीं listen करे जहाँ आप चाहते हैं।
3. Firewall सक्षम करें और सही से configure करें
- inbound और outbound traffic सीमित करने के लिए
ufwयाfirewalldका उपयोग करें। - सिर्फ़ trusted IPs या अपना tailnet allow करें।
4. Least privilege का सिद्धांत अपनाएँ
- OpenClaw के लिए अलग user account बनाएँ—कभी root के रूप में न चलाएँ।
- file और directory permissions को सिर्फ़ ज़रूरत भर तक सीमित रखें।
5. SSH और remote access harden करें
- password login बंद करें; SSH keys इस्तेमाल करें।
- default SSH port बदलें और brute-force protection के लिए fail2ban सेट करें।
6. Secrets management की तैयारी करें
- environment variables या secrets manager (HashiCorp Vault, AWS Secrets Manager, आदि) सेट करें।
- API keys या credentials को कभी plaintext files में न रखें।
7. शुरू करने से पहले audit करें
- एक baseline security scan चलाएँ (
lynis,clamav, या आपका पसंदीदा tool)। - अपनी शुरुआती स्थिति document करें—यकीन मानिए, बाद में काम आएगा।
Pro tip: अगर आप इस्तेमाल कर रहे हैं, तो आप system logs या firewall configs को scrape और summarize करके यह दोबारा जांच सकते हैं कि कहीं कोई open port या risky setting तो नहीं, इससे पहले कि आप कुछ इंस्टॉल करें।
OpenClaw को सुरक्षित तरीके से इंस्टॉल करने के व्यावहारिक चरण
अब असली काम करते हैं। मेरी सलाह है कि security को top priority मानकर OpenClaw इस तरह इंस्टॉल करें।
1. अपनी isolation चुनें: Docker, VM, या Bare Metal?
| तरीका | फायदे | नुकसान |
|---|---|---|
| Docker | आसान packaging, जल्दी reset, डिफ़ॉल्ट रूप से non-root | गलत कॉन्फ़िगरेशन पर networking ports खोल सकती है; root-in-container समस्याओं से सावधान रहें (docs.openclaw.ai) |
| Dedicated VM | मज़बूत isolation, snapshot/rollback आसान | ज़्यादा overhead, secrets hygiene फिर भी ज़रूरी |
| Bare Metal | सबसे तेज़, कम friction | सबसे ज़्यादा जोखिम—agent और personal data साथ में, blast radius बड़ा |
मेरी सलाह: ज़्यादातर teams के लिए Docker या dedicated VM सबसे अच्छा विकल्प है। अगर आपको bare metal इस्तेमाल करना ही पड़े, तो permissions और secrets को लेकर extra सावधानी रखें।
2. OpenClaw डाउनलोड करें और verify करें
- हमेशा official repo या registry से ही pull करें ()।
- अगर checksums या signatures उपलब्ध हों, तो उन्हें verify करें।
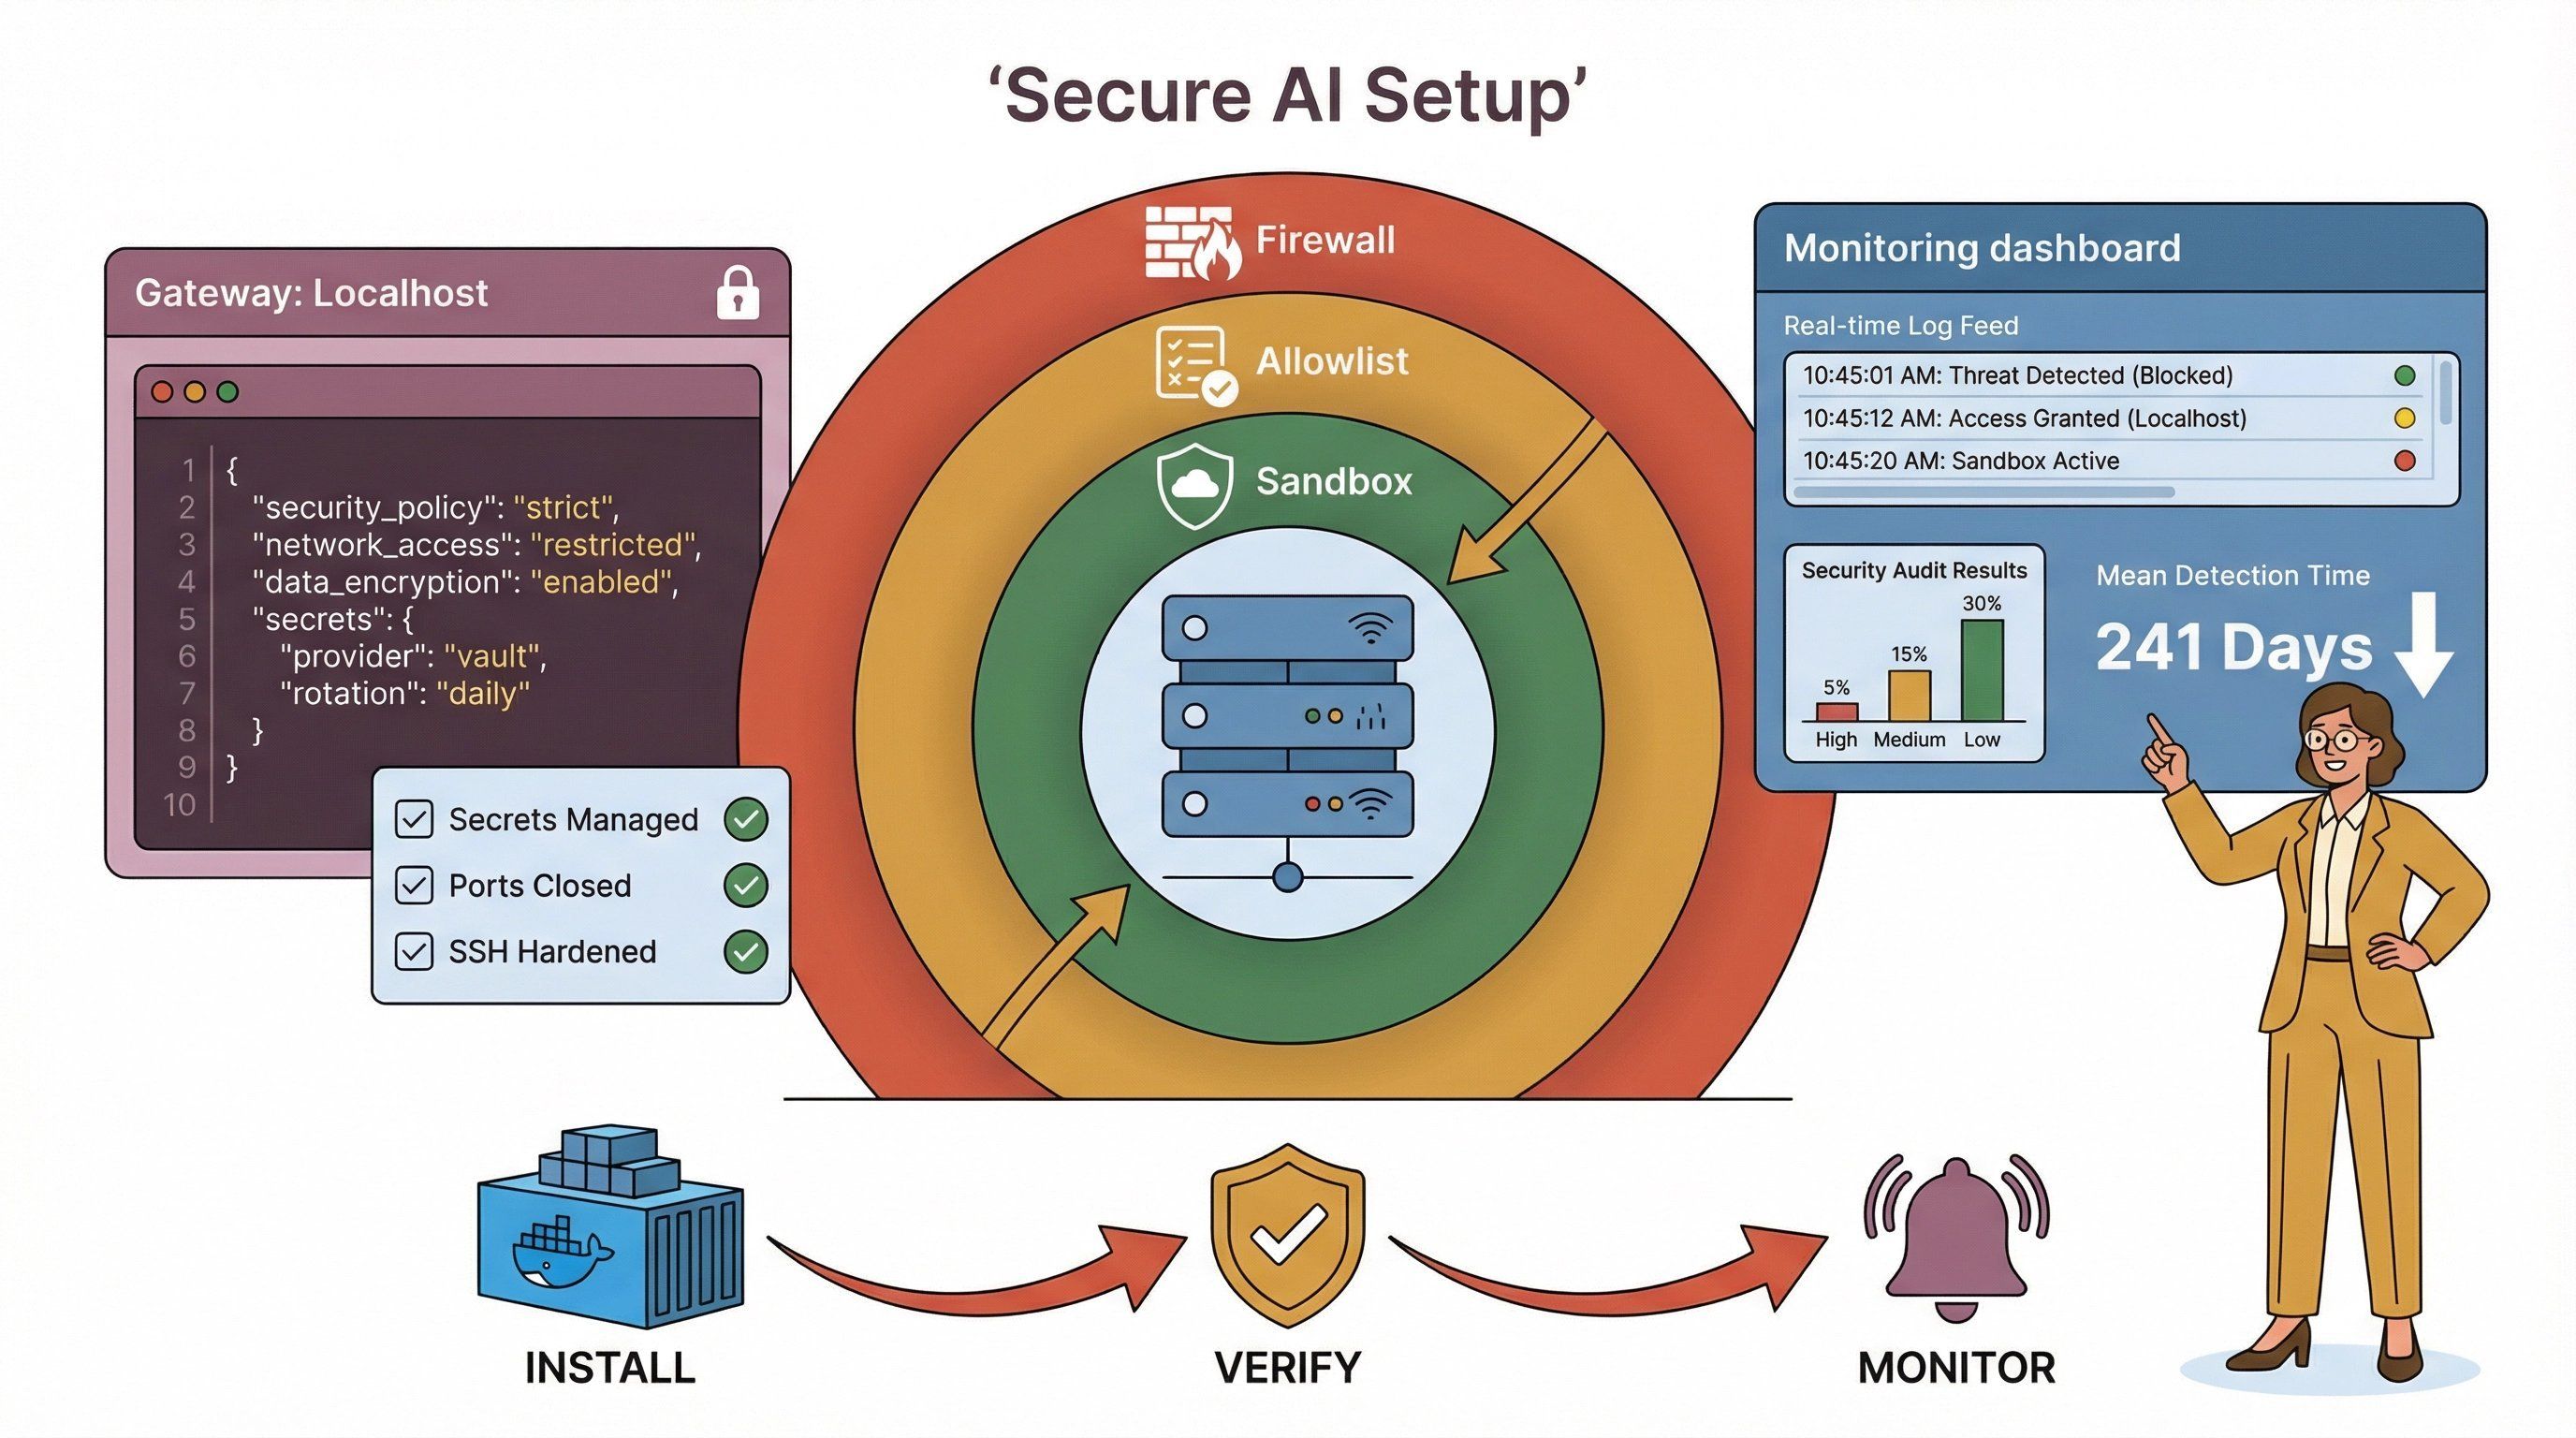
3. Gateway को localhost (या tailnet) पर bind करें
- अपनी config में gateway को संभव हो तो
127.0.0.1(loopback) पर bind करें। - अगर remote access चाहिए, तो Tailscale Serve या VPN इस्तेमाल करें—OpenClaw को सीधे public internet पर कभी expose न करें ()।
Sample config:
1{
2  "gateway": {
3    "bind": "loopback",
4    "tailscale": { "mode": "serve" },
5    "auth": {
6      "mode": "token",
7      "allowTailscale": false,
8      "token": { "source": "env", "provider": "default", "id": "OPENCLAW_GATEWAY_TOKEN" }
9    }
10  },
11  "secrets": {
12    "providers": { "default": { "source": "env" } }
13  }
14}
4. Strong authentication सेट करें
- gateway access के लिए लंबे, random tokens इस्तेमाल करें।
- tokens को environment variables या secrets manager में रखें—plaintext configs में कभी नहीं।
5. Sandboxing और exec approvals सक्षम करें
- सभी tool execution के लिए sandboxing चालू करें ()।
- exec approvals और allowlists configure करें (अगला section देखें)।
6. सिर्फ़ trusted plugins इंस्टॉल करें
- हर plugin को इंस्टॉल करने से पहले vet करें।
- official registry के plugins को प्राथमिकता दें; random GitHub gists या npm packages से बचें।
7. Security audits चलाएँ
- misconfigurations या leaked secrets चेक करने के लिए
openclaw security auditऔरopenclaw secrets auditचलाएँ ()।
2026 में OpenClaw के लिए ज़रूरी सुरक्षा कॉन्फ़िगरेशन गाइड
एक बार OpenClaw चालू हो जाए, तो अब बारी है बारीक settings को lock down करने की।
1. Command allowlists और exec approvals
- सुरक्षित commands की एक स्पष्ट allowlist बनाएँ (जैसे
/usr/bin/git,/usr/bin/curl)। - approvals को “ask on miss” पर सेट करें, और अगर approval UI उपलब्ध न हो तो fallback को “deny” रखें।
Sample config:
1{
2  "version": 1,
3  "defaults": {
4    "security": "deny",
5    "ask": "on-miss",
6    "askFallback": "deny",
7    "autoAllowSkills": false
8  },
9  "agents": {
10    "main": {
11      "security": "allowlist",
12      "ask": "on-miss",
13      "askFallback": "deny",
14      "autoAllowSkills": false,
15      "allowlist": [
16        { "bin": "/usr/bin/git" },
17        { "bin": "/usr/bin/curl" }
18      ]
19    }
20  }
21}()
2. Shell access सीमित करें
- सिर्फ़ वही shell commands allow करें जो सच में ज़रूरी हैं।
- जब तक आपके पास मज़बूत approval workflow न हो, तब तक blanket
bashयाshaccess न दें।
3. API key management लागू करें
- सभी credentials के लिए SecretRefs और environment variables इस्तेमाल करें।
- keys को नियमित रूप से rotate करें और unused या पुराने secrets का audit करें।
4. Prompt injection से बचाव
- सभी user input validate करें और output sanitize करें।
- जहाँ संभव हो, input/output restrictions और content filters का उपयोग करें।
- logs में असामान्य patterns पर नज़र रखें (जैसे ऐसे commands जो आपने expect नहीं किए थे)।
5. Audit logging और monitoring
- agent की सभी actions, approvals, और denials के लिए विस्तृत logging चालू करें।
- logs को एक सुरक्षित, tamper-evident location में रखें।
Thunderbit के साथ real-time installation log monitoring
यहीं पर काम आता है। इंस्टॉलेशन के दौरान और उसके बाद, Thunderbit आपकी मदद कर सकता है:
- OpenClaw logs को real time में scrape और analyze करना: Thunderbit की AI से log entries extract, summarize, और categorize करें—ताकि misconfigurations या suspicious activity जल्दी पकड़ी जा सके।
- Anomalies detect करना: AI-driven analysis unexpected errors, बार-बार failed authentications, या unusual command executions को flag कर सकती है।
- Critical events पर alert करना: अगर कोई संभावित security issue मिले, तो Thunderbit को Slack, email, या आपके पसंदीदा tool के माध्यम से notify करने के लिए सेट करें।
Workflow example:
- Thunderbit को अपने OpenClaw log dashboard या API से जोड़ें।
- “AI Suggest Fields” का इस्तेमाल करके key events निकालें (जैसे failed logins, denied approvals, plugin installs)।
- high-risk patterns के लिए custom alerts सेट करें।
- audit trail के लिए findings को Google Sheets या Notion में export करें।
Thunderbit एक full SIEM नहीं है, लेकिन यह OpenClaw deployment पर नज़र रखने का एक lightweight, AI-powered तरीका है—खासकर छोटी teams के लिए जिनके पास dedicated security stack नहीं है।
Ongoing maintenance: updates, patching, और security policy optimization
Security एक बार का काम नहीं है। OpenClaw तेज़ी से बदल रहा है, और threats भी।
1. नियमित updates और rolling reviews
- अपने OpenClaw config files की weekly या monthly review schedule करें।
openclaw updateसे updates लागू करें—security releases को तुरंत लागू किया जाना चाहिए ()।- किसी भी update के बाद
openclaw doctorऔरopenclaw security auditदोबारा चलाएँ।
2. सुरक्षित patch application
- बड़े updates से पहले VM snapshots या Docker image backups लें।
- संभव हो तो staging environment में updates test करें।
3. Thunderbit से update checks automate करें
- Thunderbit का उपयोग करके OpenClaw release feed या अपनी deployment status pages scrape करें।
- नए security advisories या ज़रूरी patches के लिए alerts सेट करें।
4. नई vulnerabilities पर नज़र रखें
- OpenClaw की security advisories और CVE feeds subscribe करें।
- सिर्फ़ core OpenClaw releases ही नहीं, plugin और dependency updates पर भी ध्यान दें।
OpenClaw के लिए मज़बूत security response plan बनाना
सबसे अच्छे defenses के बावजूद incidents हो सकते हैं। तैयारी ऐसे करें:
1. Incident response playbook
- containment के लिए स्पष्ट steps तय करें (जैसे gateway बंद करना, tokens revoke करना)।
- भूमिकाएँ बाँटें: कौन जांच करेगा, कौन संवाद करेगा, कौन सेवा बहाल करेगा।
- forensic data collection के लिए checklist रखें (logs, configs, snapshots)।
2. तेज़ response के लिए Thunderbit का उपयोग करें
- incident के तुरंत बाद सभी relevant logs scrape और export करें।
- Thunderbit की AI से घटना का सार समझें और संदिग्ध events पहचानें।
- compliance और सीखने के लिए timeline और actions document करें।
3. अभ्यास और अपडेट
- साल में कम से कम दो बार tabletop exercises या simulated incidents चलाएँ।
- जैसे-जैसे OpenClaw बदलता है या आपका environment बदलता है, response plan अपडेट करें।
Security-first automation: OpenClaw के साथ सुरक्षित शुरुआत
ताकतवर automations में सीधे कूद पड़ना आसान लगता है, लेकिन शुरुआत धीरे करें:
1. Read-only workflows से शुरू करें
- reporting, monitoring, और data summarization कम जोखिम वाले होते हैं।
- जब तक setup पर भरोसा न हो, write/delete operations या shell commands से बचें।
2. Permissions धीरे-धीरे बढ़ाएँ
- human approval steps के साथ एक-एक करके नई capabilities जोड़ें।
- हर बदलाव के बाद logs और alerts मॉनिटर करें।
3. Continuous monitoring
- Thunderbit या अपने पसंदीदा tool से agent behavior पर नज़र रखें।
- privileges बढ़ने या unexpected actions के लिए alerts सेट करें।
Safe automations के उदाहरण:
- सार्वजनिक sales leads scrape करके CRM में export करना (read-only)।
- server uptime या disk usage मॉनिटर करना।
- news articles या internal documentation summarize करना।
मुख्य निष्कर्ष: 2026 में OpenClaw को सुरक्षित कैसे रखें
चलो ज़रूरी बातों को दोहरा लें:
- डिफ़ॉल्ट रूप से AI को पूरा shell access न दें—allowlists, approvals, और sandboxing का उपयोग करें।
- Gateway को localhost या tailnet पर bind करें—जब तक बहुत ज़रूरी न हो, public exposure से बचें।
- Strong authentication और secrets management अपनाएँ—credentials कभी plaintext में न रखें।
- OpenClaw और सभी plugins को up to date रखें—जल्दी patch करें, configs नियमित रूप से review करें।
- Logs मॉनिटर करें और alerts automate करें—Thunderbit जैसे tools यह काम छोटी teams के लिए भी आसान बनाते हैं।
- Security incident response plan रखें—अभ्यास करें, document करें, और समय के साथ बेहतर बनाते रहें।
- सुरक्षित, read-only automations से शुरुआत करें—और फिर लगातार monitoring के साथ धीरे-धीरे विस्तार करें।
Security एक यात्रा है, मंज़िल नहीं। OpenClaw ecosystem तेज़ी से बदल रहा है, और attackers भी। सुरक्षा-प्रथम सोच अपनाकर—और monitoring व automation के लिए जैसे tools का इस्तेमाल करके—आप अपने AI agent को अपने लिए काम करने देंगे, अपने खिलाफ़ नहीं।
और tips के लिए देखें और OpenClaw की security advisories के लिए subscribed रहें।
FAQs
1. इंस्टॉलेशन के दौरान मुझे OpenClaw को पूरा shell access क्यों नहीं देना चाहिए?
OpenClaw जैसे AI agent को पूरा shell access देने से prompt injection attacks, credential leaks, और system compromise का जोखिम बहुत बढ़ जाता है। डिफ़ॉल्ट रूप से, shell access को allowlists और approvals के साथ सीमित रखें, और केवल सावधानीपूर्वक review और monitoring के बाद ही broader permissions दें ()।
2. remote access के लिए OpenClaw को expose करने का सबसे सुरक्षित तरीका क्या है?
सुझाया गया तरीका यह है कि gateway को 127.0.0.1 (loopback) पर bind करें और secure remote access के लिए Tailscale Serve जैसे tailnet solution का उपयोग करें। जहाँ तक संभव हो public internet exposure से बचें, और हमेशा strong authentication ज़रूर रखें ()।
3. OpenClaw security में Thunderbit कैसे मदद कर सकता है?
Thunderbit OpenClaw logs scrape और analyze कर सकता है, misconfigurations पहचान सकता है, और real time में suspicious activity पर alert कर सकता है। यह खास तौर पर installation और configuration changes की monitoring के लिए उपयोगी है, भले ही आपके पास full SIEM setup न हो ()।
4. मुझे OpenClaw और उसके plugins कितनी बार अपडेट करने चाहिए?
कम से कम हर हफ्ते updates check करें, और security patches तुरंत लागू करें। किसी भी update के बाद openclaw doctor और openclaw security audit चलाकर सुनिश्चित करें कि configuration सुरक्षित बनी हुई है ()।
5. अगर मुझे शक हो कि मेरा OpenClaw instance compromise हो गया है, तो मुझे क्या करना चाहिए?
तुरंत gateway बंद करके और credentials revoke करके incident को contain करें। forensics के लिए logs और configs इकट्ठा करें, और क्या हुआ यह समझने के लिए Thunderbit या समान tools का उपयोग करें। अपने incident response plan का पालन करें और सीख के आधार पर उसे अपडेट करें ()।
सुरक्षित रहें, smart automation करें, और याद रखें: 2026 में security-first सिर्फ़ best practice नहीं है—यही एकमात्र तरीका है जिससे आपका AI agent आपकी तरफ़ बना रहता है।
और जानें