कुछ महीने पहले, मैंने Thunderbit में अपनी टीम के लिए Hacker News की टॉप कहानियों का एक रोज़ाना डाइजेस्ट बनाने का सोचा। पहली सोच यही थी कि साइट को बुकमार्क कर लूँ और हर सुबह खुद ही स्क्रॉल करके देख लूँ। यह तरीका लगभग तीन दिन चला, फिर मुझे समझ आया कि मैं हर दिन 20 मिनट सिर्फ हेडलाइन पढ़ने और लिंक स्प्रेडशीट में कॉपी-पेस्ट करने में खर्च कर रहा हूँ।
Hacker News इंटरनेट पर टेक्नोलॉजी से जुड़ी सबसे समृद्ध और सबसे केंद्रित सूचनाओं के स्रोतों में से एक है — हर महीने लगभग , रोज़ करीब 1,300 नई कहानियाँ, और लगभग 13,000 टिप्पणियाँ। चाहे आप उभरते टेक ट्रेंड्स ट्रैक कर रहे हों, अपने ब्रांड पर नज़र रख रहे हों, "Who's Hiring" थ्रेड्स से रिक्रूटिंग पाइपलाइन बना रहे हों, या बस यह जानना चाहते हों कि डेवलपर दुनिया किस चीज़ की परवाह कर रही है — सब कुछ मैन्युअली फॉलो करना एक हारने वाली लड़ाई है।
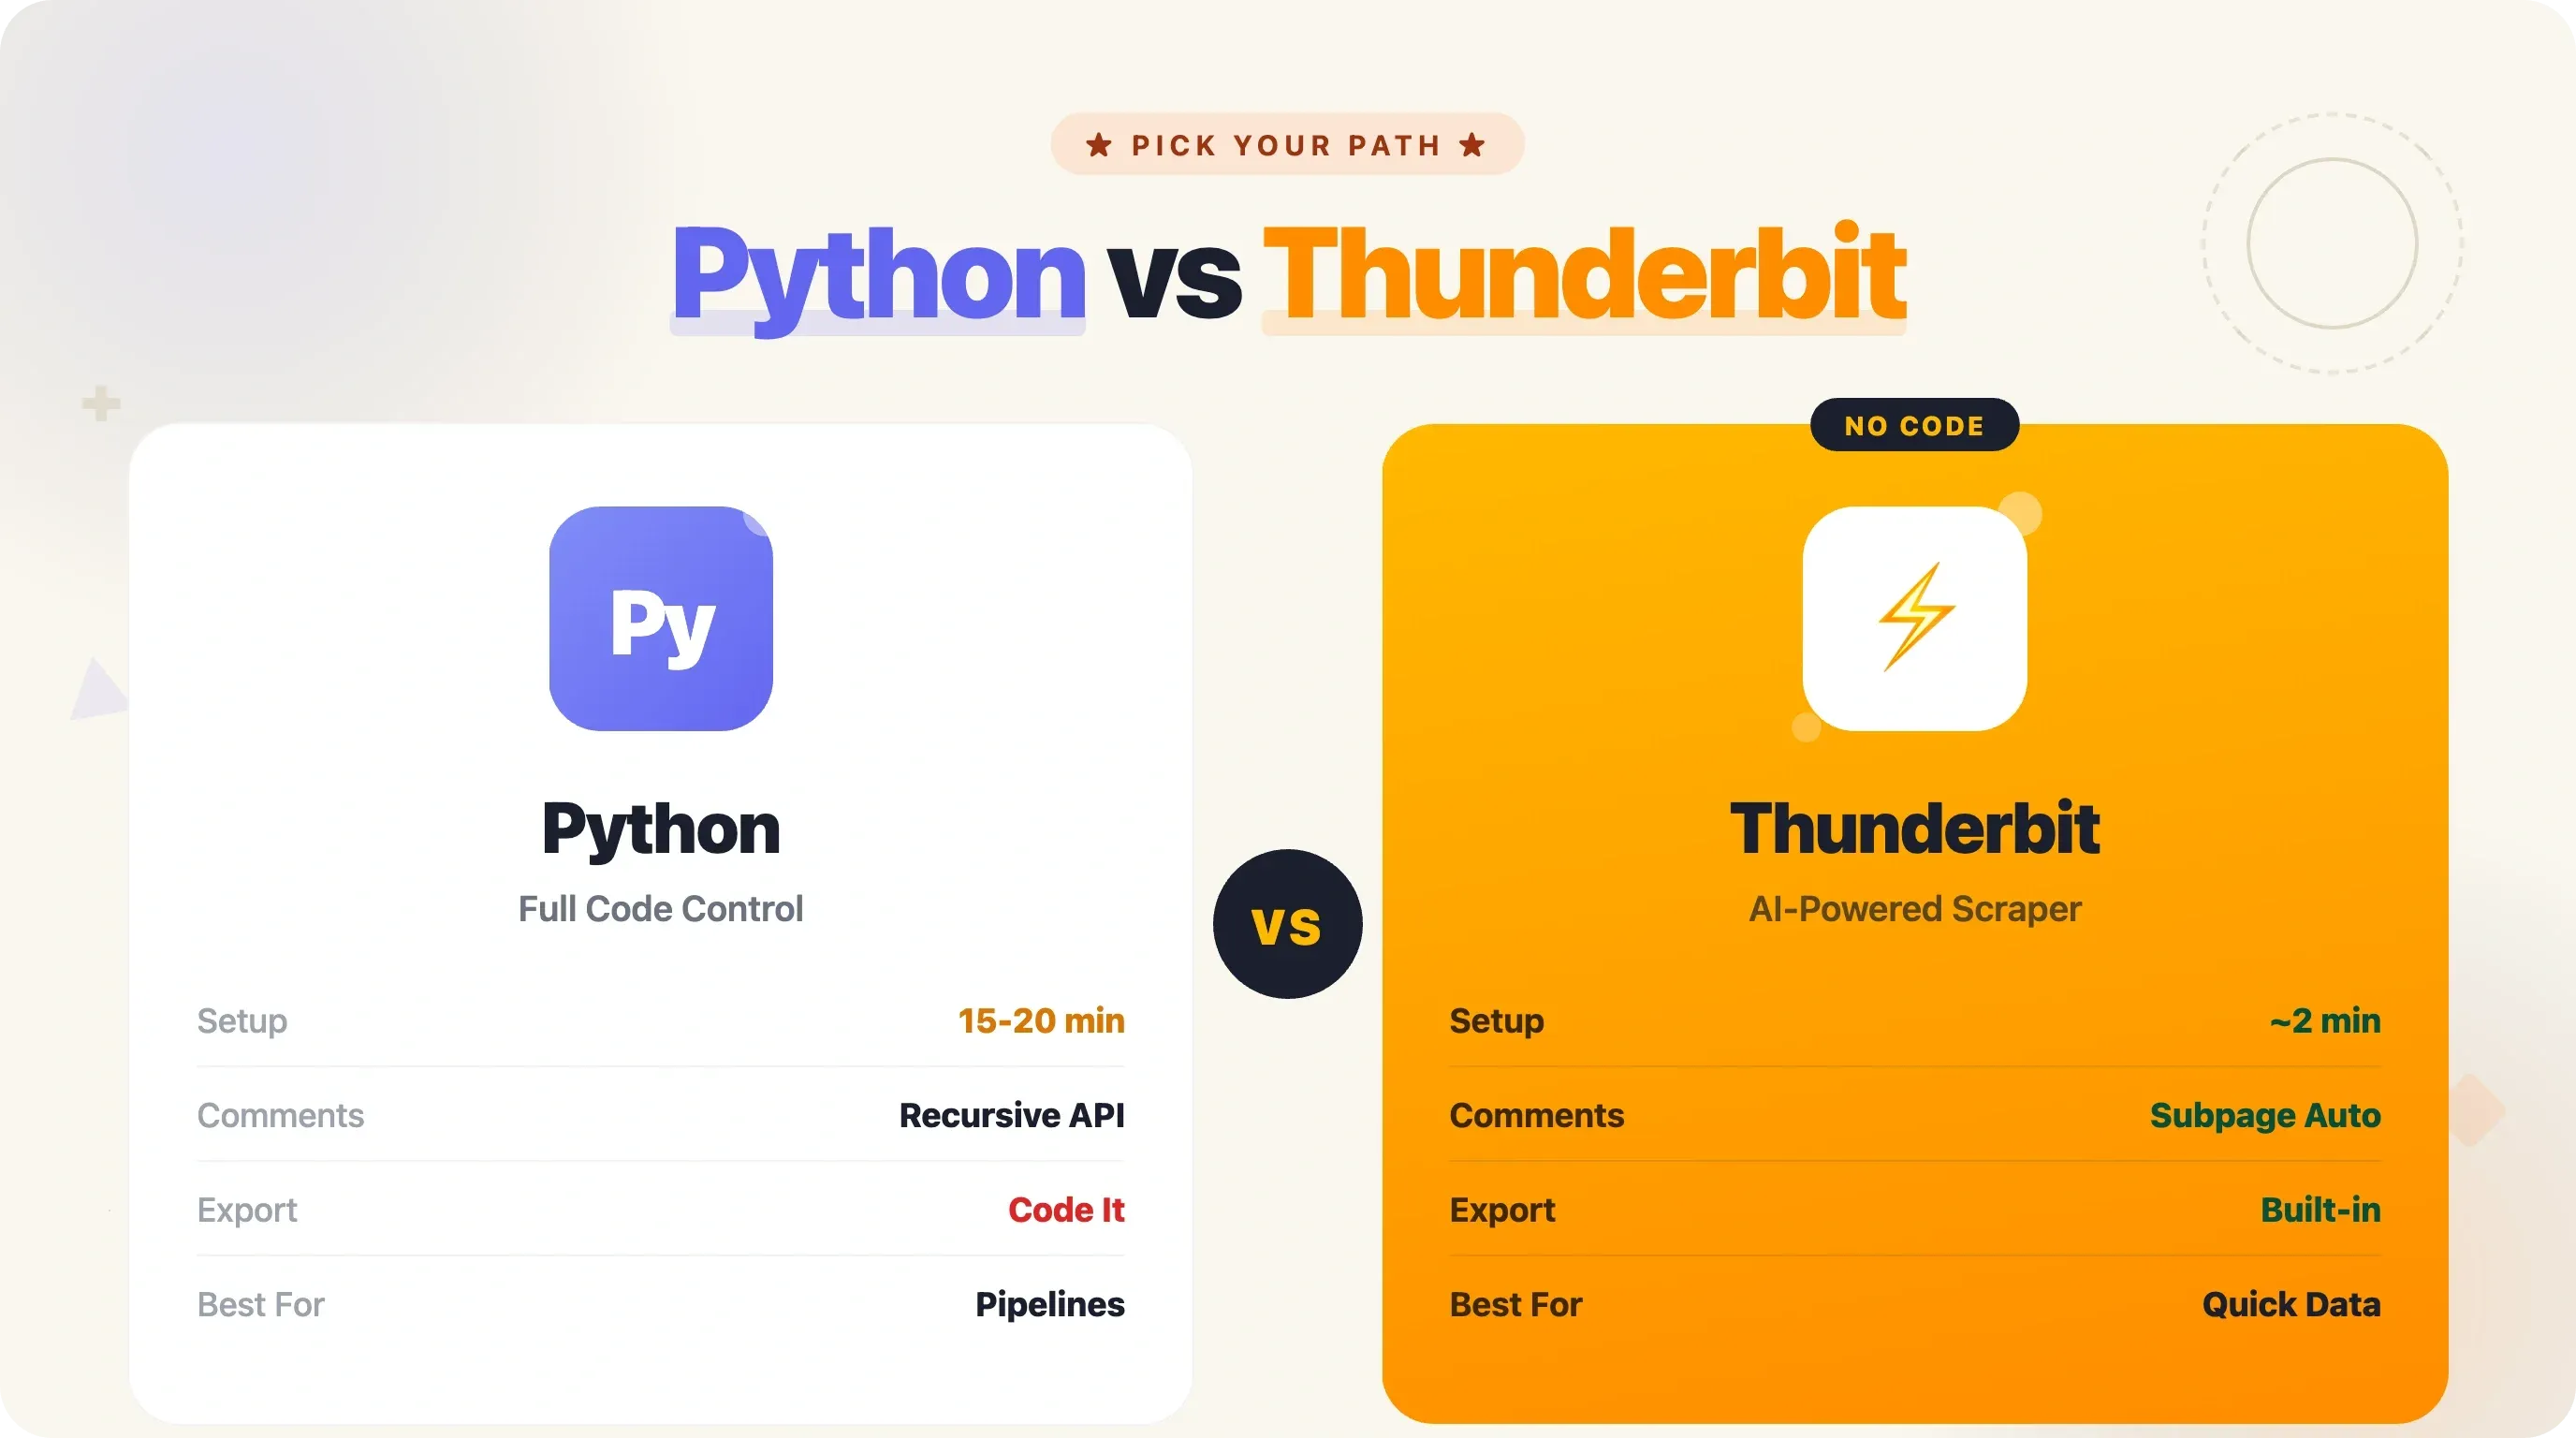
अच्छी खबर यह है कि Python से Hacker News स्क्रैप करना काफ़ी आसान है। इस गाइड में, मैं आपको दो पूरी तरह काम करने वाले तरीके दिखाऊँगा — BeautifulSoup से HTML स्क्रैपिंग और आधिकारिक HN Firebase API — साथ में pagination, डेटा export, production-ready patterns, और एक no-code shortcut भी, उन मौकों के लिए जब Python ज़रूरत से ज़्यादा लगे।
Python से Hacker News स्क्रैप क्यों करें?
Hacker News सिर्फ़ एक और लिंक एग्रीगेटर नहीं है। यह एक curated, community-driven feed है, जहाँ upvotes और सक्रिय चर्चा के ज़रिए सबसे दिलचस्प टेक कहानियाँ ऊपर आती हैं। इसका audience मुख्यतः टेक प्रोफेशनल्स की ओर झुका हुआ है (लगभग ), और साइट का 66% direct traffic rate बताता है कि यह एक वफ़ादार, नियमित readership है — casual visitors नहीं।
HN data को स्क्रैप करने के कुछ आम कारण:
| Use Case | आपको क्या मिलता है |
|---|---|
| रोज़ाना टेक डाइजेस्ट | टॉप स्टोरीज़, स्कोर, और लिंक सीधे आपके inbox या Slack में |
| ब्रांड/प्रतिद्वंद्वी मॉनिटरिंग | जब आपकी कंपनी या प्रोडक्ट का ज़िक्र हो, तो अलर्ट |
| ट्रेंड एनालिसिस | समय के साथ कौन-सी टेक्नोलॉजी, भाषाएँ, या विषय लोकप्रिय हो रहे हैं, इसे ट्रैक करें |
| रिक्रूटिंग | "Who's Hiring" थ्रेड्स से नौकरी, tech stack, और salary संकेत निकालें |
| कंटेंट रिसर्च | लिखने या शेयर करने के लिए high-performing टॉपिक्स खोजें |
| Sentiment analysis | प्रोडक्ट, लॉन्च, या इंडस्ट्री बदलावों पर समुदाय की राय समझें |
Stripe, Dropbox, Airbnb जैसी मिलाकर 400 अरब डॉलर से अधिक मूल्य वाली कंपनियाँ Hacker News को शुरुआती feedback और users का अहम स्रोत मानती हैं। Drew Houston ने अप्रैल 2007 में Dropbox का demo HN पर पोस्ट किया, वह #1 पर पहुँचा, और beta waitlist एक ही दिन में 5,000 से बढ़कर 75,000 users तक पहुँच गई। यानी HN data सिर्फ़ दिलचस्प नहीं, बल्कि business के लिए काफ़ी कीमती भी है।
यह data सार्वजनिक रूप से उपलब्ध है, लेकिन साइट की संरचना इसे manually इकट्ठा करना थका देने वाला बनाती है। इस काम के लिए Python automation सबसे व्यावहारिक समाधान है।
Python से Hacker News स्क्रैप करने के दो तरीके: एक नज़र में
यह गाइड दो पूरी, चलने योग्य approaches कवर करती है:
requests+ BeautifulSoup से HTML scraping — news.ycombinator.com का raw HTML लाएँ और उसे parse करके story data निकालें। यह scraping की बुनियाद सीखने और पेज पर जो दिख रहा है, वही निकालने के लिए बढ़िया है।- आधिकारिक Hacker News Firebase API — सीधे JSON endpoints hit करें, HTML parsing की ज़रूरत नहीं। यह भरोसेमंद data pipelines, comments access, और historical data के लिए बेहतर है।
आपके लिए कौन-सा तरीका सही है, यह समझने के लिए side-by-side तुलना देखें:
| Criteria | HTML Scraping (requests + BS4) | HN Firebase API | Thunderbit (No-Code) |
|---|---|---|---|
| Setup complexity | Medium (HTML selectors parse करने होते हैं) | Low (JSON endpoints) | None (2-click Chrome extension) |
| Data freshness | Real-time front page | Real-time (ID के आधार पर कोई भी item) | Real-time |
| Rate limit risk | Medium (robots.txt में 30s crawl delay) | Low (official, generous) | Thunderbit द्वारा managed |
| Comments access | Hard (nested HTML) | Easy (recursive item IDs) | Subpage scraping feature |
| Historical data | Limited | Algolia Search API के ज़रिए | N/A |
| Best for | Scraping fundamentals सीखना | Reliable data pipelines | Non-developers, quick exports |
दोनों तरीकों में पूरा, runnable Python code दिया गया है। और अगर आप बिना code लिखे सिर्फ़ data चाहते हैं, तो वह भी शामिल है।
शुरू करने से पहले
- Difficulty: Beginner से Intermediate
- Time Required: हर method के लिए लगभग 15–20 मिनट
- आपको क्या चाहिए:
- Python 3.11+ installed
- Terminal या code editor
- Chrome browser (अगर आप HN का HTML inspect करना चाहते हैं या no-code option आज़माना चाहते हैं)
- (optional, no-code method के लिए)

अपना Python environment सेट करें
HN data पर काम करने से पहले environment तैयार कर लेते हैं। मैं virtual environment बनाने की सलाह देता हूँ ताकि project dependencies साफ़ रहें।
1# Create and activate a virtual environment
2python3 -m venv hn-scraper
3# macOS/Linux:
4source hn-scraper/bin/activate
5# Windows:
6hn-scraper\Scripts\activate
7# Install the packages we'll need for both methods
8pip install requests==2.33.1 beautifulsoup4==4.14.3 pandas==3.0.2 openpyxl==3.1.5
बाद में production patterns के लिए (caching, retries), यह भी चाहिए होगा:
1pip install requests-cache==1.3.1 tenacity==9.1.4कोई special API key नहीं, कोई authentication token नहीं। HN का data खुला है।
Method 1: BeautifulSoup का उपयोग करके Python से Hacker News स्क्रैप करें
यह classic तरीका है — HTML लाओ, parse करो, और ज़रूरी data निकालो। अधिकांश लोग web scraping यहीं से सीखते हैं, और HN की साधारण table-based layout इसे practice के लिए आदर्श बनाती है।
Step 1: Hacker News front page लाएँ
Editor खोलें और scrape_hn_bs4.py नाम की file बनाइए। शुरुआत का code यह है:
1import requests
2from bs4 import BeautifulSoup
3> This paragraph contains content that cannot be parsed and has been skipped.
4print(f"Status: {response.status_code}, Page length: {len(response.text)} chars")
इसे चलाएँ। आपको Status: 200 और लगभग 40,000–50,000 characters की page length दिखेगी। यानी HN front page का raw HTML memory में आ चुका है, parse होने के लिए तैयार।
Step 2: HTML structure समझें
HN table-based layout इस्तेमाल करता है — modern CSS grid या flexbox नहीं। हर कहानी page पर दो मुख्य <tr> rows में होती है:
- Story row (
<tr class="athing submission">): rank, title, और link रखती है - Metadata row (अगली
<tr>): points, author, time, और comment count रखती है
महत्वपूर्ण selectors:
span.titleline > a— कहानी का title और URLspan.score— vote count (जैसे, "118 points")a.hnuser— author usernamespan.age— पोस्ट का समय.subtextमें आख़िरी<a>जिसमें text के भीतर "comment" हो — comment count
अगर आप Chrome में किसी story title पर right-click करके "Inspect" चुनेंगे, तो कुछ ऐसा दिखाई देगा:
1<span class="titleline">
2  <a href="https://darkbloom.dev">Darkbloom – Private inference on idle Macs</a>
3</span>
और नीचे metadata row:
1<span class="score" id="score_47788542">118 points</span>
2by <a href="user?id=twapi" class="hnuser">twapi</a>
3<span class="age" title="2026-04-16T04:06:39 1776312399">
4 <a href="item?id=47788542">2 hours ago</a>
5</span>
6| <a href="item?id=47788542">65 comments</a>इन selectors को समझना ज़रूरी है — अगर कभी HN का markup बदल गया, तो आपको इन्हें अपडेट करना होगा। (साफ़ बात: API method इस समस्या से बचा लेता है।)
Step 3: Titles, links, और scores निकालें
अब असली काम। हम हर story row पर loop करेंगे, story row से title और link निकालेंगे, फिर उसके ठीक नीचे वाली metadata row से score लेंगे।
1import requests
2from bs4 import BeautifulSoup
3from pprint import pprint
4> This paragraph contains content that cannot be parsed and has been skipped.
5stories = []
6story_rows = soup.select("tr.athing")
7for row in story_rows:
8    # Title and URL from the story row
9    title_tag = row.select_one("span.titleline > a")
10    if not title_tag:
11        continue
12    title = title_tag.get_text()
13    link = title_tag.get("href", "")
14    # Metadata from the next sibling row
15    meta_row = row.find_next_sibling("tr")
16    score = 0
17    author = ""
18    comments = 0
19> This paragraph contains content that cannot be parsed and has been skipped.
20> This paragraph contains content that cannot be parsed and has been skipped.
21# Filter to stories with 50+ points, sorted by score
22top_stories = sorted(
23    [s for s in stories if s["score"] >= 50],
24    key=lambda x: x["score"],
25    reverse=True,
26)
27pprint(top_stories[:10])
Code के बारे में कुछ बातें:
- Walrus operator (
:=) Python 3.8+ में काम करता है। यह optional elements जैसेspan.scoreके लिए एक ही लाइन में assign और check करने देता है। - HN में number और "comments" के बीच
\xa0(non-breaking space) आता है, इसलिए हम उसी पर split करते हैं। - जो stories HN की दूसरी pages पर ले जाती हैं (जैसे "Ask HN" posts), उनके URLs relative हो सकते हैं, जैसे
item?id=। ऐसे में आपhttps://news.ycombinator.com/जोड़ना चाह सकते हैं।
Step 4: चलाएँ और परिणाम देखें
Save करें और run करें:
1python scrape_hn_bs4.pyआपको कुछ ऐसा output दिखेगा:
1[{'author': 'twapi',
2  'comments': 65,
3  'score': 118,
4  'title': 'Darkbloom – Private inference on idle Macs',
5  'url': 'https://darkbloom.dev'},
6 {'author': 'sebg',
7  'comments': 203,
8  'score': 247,
9  'title': 'Show HN: I built an open-source Perplexity alternative',
10  'url': 'https://github.com/...'},
11 ...]
यानी page 1 की 30 stories मिल गईं। लेकिन HN पर किसी भी समय सैकड़ों active stories हो सकती हैं। pagination हम बाद में देखेंगे।
Method 2: आधिकारिक API से Python में Hacker News स्क्रैप करें
HN Firebase API Hacker News data access करने का आधिकारिक तरीका है। न authentication, न API keys, न HTML parsing। आपको साफ़ JSON responses मिलते हैं। प्रोडक्शन में भरोसेमंद काम के लिए मैं इसी method का उपयोग करता हूँ।
ज़रूरी API endpoints
Base URL है https://hacker-news.firebaseio.com/v0/. काम के endpoints ये हैं:
This paragraph contains content that cannot be parsed and has been skipped.
Story item कुछ ऐसा दिखता है:
1{
2  "by": "twapi",
3  "descendants": 65,
4  "id": 47788542,
5  "kids": [47789171, 47788769, 47788762],
6  "score": 118,
7  "time": 1776312399,
8  "title": "Darkbloom – Private inference on idle Macs",
9  "type": "story",
10  "url": "https://darkbloom.dev"
11}
kids field में direct child comments की IDs होती हैं। हर comment खुद एक item होता है, जिसके अपने kids भी हो सकते हैं — इसी तरह comment tree बनती है।
Step 1: Top story IDs लाएँ
scrape_hn_api.py नाम की file बनाइए:
1import requests
2import time
3from pprint import pprint
4API_BASE = "https://hacker-news.firebaseio.com/v0"
5# Fetch top story IDs
6response = requests.get(f"{API_BASE}/topstories.json")
7story_ids = response.json()
8print(f"Got {len(story_ids)} top story IDs")
9# Output: Got 500 top story IDs
एक ही request में 500 story IDs — न parsing, न selectors, बस एक JSON array।
Step 2: Story details ID से लाएँ
अब हमें actual story data चाहिए। यहीं fan-out समस्या आती है: 500 stories मतलब 500 अलग-अलग API calls। मेरे benchmark में sequential requests के साथ हर item request लगभग 1.2 seconds लेती है। 500 stories के लिए यह लगभग 10 मिनट बन जाता है।
अधिकांश use cases में आपको सभी 500 की ज़रूरत नहीं होती। यहाँ top 30 fetch करने का code है:
1def fetch_story(story_id):
2    """HN API से एक story की details लाएँ."""
3    resp = requests.get(f"{API_BASE}/item/{story_id}.json")
4    return resp.json()
5> This paragraph contains content that cannot be parsed and has been skipped.
6# Sort by score, show top 10
7top = sorted(stories, key=lambda x: x["score"], reverse=True)[:10]
8pprint(top)
time.sleep(0.1) एक छोटा courtesy delay जोड़ता है। Firebase API के लिए कोई स्पष्ट rate limit नहीं बताई गई, लेकिन किसी भी API पर बिना pause के लगातार hit करना अच्छी practice नहीं है।
Step 3: Comments स्क्रैप करें (recursive tree walk)
यहीं API, HTML scraping की तुलना में सचमुच बेहतर साबित होती है। HN comments बहुत गहराई तक nested होते हैं — replies के भीतर replies। HTML में इसका मतलब जटिल nested table structures parse करना है। API के साथ हर comment के kids field में उसके बच्चों की IDs मिल जाती हैं, और आप tree को बस recursively walk कर लेते हैं।
1def fetch_comments(item_id, depth=0, max_depth=3):
2    """Recursively fetch comments up to max_depth."""
3    item = requests.get(f"{API_BASE}/item/{item_id}.json").json()
4    if not item or item.get("type") != "comment":
5        return []
6> This paragraph contains content that cannot be parsed and has been skipped.
7    if depth < max_depth and item.get("kids"):
8        for kid_id in item["kids"]:
9            comments.extend(fetch_comments(kid_id, depth + 1, max_depth))
10            time.sleep(0.05)
11    return comments
12# Example: fetch comments for the top story
13if stories:
14    top_story = stories[0]
15    top_story_full = requests.get(f"{API_BASE}/item/{top_story['id']}.json").json()
16    if top_story_full.get("kids"):
17        print(f"\nComments for: {top_story['title']}")
18        all_comments = []
19        for kid_id in top_story_full["kids"][:5]:  # First 5 top-level comments
20            all_comments.extend(fetch_comments(kid_id, depth=0, max_depth=2))
21            time.sleep(0.1)
22        for c in all_comments[:15]:
23            indent = "  " * c["depth"]
24            preview = c["text"][:80].replace("\n", " ") if c["text"] else "[no text]"
25            print(f"{indent}[{c['author']}] {preview}...")
यह recursive तरीका nested HTML comment threads को parse करने से बहुत आसान है। अगर आपको full comment trees चाहिए, तो API सही रास्ता है।
Step 4: चलाएँ और परिणाम देखें
1python scrape_hn_api.pyआपको structured story data और फिर एक nested comment preview मिलेगा। Data ज़्यादा साफ़ है, comments access आसान है, और यह खतरा नहीं कि HN ने कोई CSS class बदल दी और आपका scraper टूट गया।
Page 1 से आगे: Pagination और Historical Data
अधिकांश HN scraping tutorials page 1 — यानी 30 stories — तक ही रुक जाते हैं। Quick demo के लिए यह ठीक है, लेकिन असली use cases में अक्सर ज़्यादा depth चाहिए होती है।
BeautifulSoup के साथ कई pages scrape करना
HN pagination एक आसान URL pattern इस्तेमाल करती है: ?p=2, ?p=3, आदि। हर page पर 30 stories मिलती हैं, और साइट लगभग page 20 तक content देती है (लगभग 600 stories कुल)। इसके बाद pages खाली होने लगते हैं।
1import time
2def scrape_hn_pages(num_pages=5):
3    """Scrape multiple pages of HN front page stories."""
4    all_stories = []
5    for page in range(1, num_pages + 1):
6        url = f"https://news.ycombinator.com/news?p={page}"
7        response = requests.get(url, headers=headers)
8        soup = BeautifulSoup(response.text, "html.parser")
9        story_rows = soup.select("tr.athing")
10        if not story_rows:
11            print(f"Page {page}: no stories found, stopping.")
12            break
13        for row in story_rows:
14            title_tag = row.select_one("span.titleline > a")
15            if not title_tag:
16                continue
17            meta_row = row.find_next_sibling("tr")
18            score = 0
19            if meta_row and (score_tag := meta_row.select_one("span.score")):
20                score = int(score_tag.get_text().replace(" points", ""))
21> This paragraph contains content that cannot be parsed and has been skipped.
22        print(f"Page {page}: scraped {len(story_rows)} stories")
23        # Respect the robots.txt crawl-delay of 30 seconds
24        if page < num_pages:
25            time.sleep(30)
26    return all_stories
27stories = scrape_hn_pages(5)
28print(f"\nTotal stories scraped: {len(stories)}")
यह time.sleep(30) बहुत महत्वपूर्ण है। HN की साफ़ तौर पर 30-second crawl delay माँगती है। इसे ignore करने पर आपको rate limit (HTTP 429) या अस्थायी block मिल सकता है। पाँच pages को 30-second interval पर scrape करने में लगभग 2.5 मिनट लगेंगे — तुरंत नहीं, लेकिन शिष्ट और सुरक्षित।
जो लोग pagination code खुद नहीं संभालना चाहते, उनके लिए click-based और infinite-scroll pagination को अपने आप संभालता है। यह HN pages के नीचे वाले "More" button को बिना किसी configuration के क्लिक करता है।
Algolia API से historical Hacker News data लेना
Firebase API वर्तमान data देता है। Historical analysis के लिए — जैसे "2023 में टॉप Python stories क्या थीं?" या "पिछले 5 साल में AI coverage कैसे बदली?" — आपको चाहिए।
1import requests
2ALGOLIA_BASE = "https://hn.algolia.com/api/v1"
3> This paragraph contains content that cannot be parsed and has been skipped.
4# Example: find Python scraping stories with 10+ points since Jan 2024
5results = search_hn(
6    query="python scraping",
7    tags="story",
8)
9print(f"Found {results['nbHits']} total results")
10for hit in results["hits"][:5]:
11    print(f"  [{hit.get('points', 0)} pts] {hit['title']}")
Date-filtered queries के लिए numericFilters इस्तेमाल करें:
1import calendar, datetime
2# Stories since January 1, 2024
3start_date = datetime.datetime(2024, 1, 1)
4start_ts = int(calendar.timegm(start_date.timetuple()))
5> This paragraph contains content that cannot be parsed and has been skipped.
6Algolia API तेज़ है (server processing time 5–9 ms), API key नहीं माँगती, और 500 pages तक pagination सपोर्ट करती है। बड़े historical analysis के लिए यह सबसे अच्छा option है।
7## Scraped Hacker News data को CSV, Excel, और Google Sheets में export करें
8मैंने जितने भी HN scraping tutorials देखे हैं, वे terminal में `pprint()` output पर खत्म हो जाते हैं। Debugging के लिए यह ठीक है, लेकिन अगर आप रोज़ाना digest बना रहे हैं या trend analysis कर रहे हैं, तो data file में चाहिए। यहाँ उसे वहाँ तक पहुँचाने का तरीका है।
9### Python से CSV में export करें
10```python
11import csv
12def export_to_csv(stories, filename="hn_stories.csv"):
13    """Scraped stories को CSV file में सेव करें."""
14    fieldnames = ["title", "url", "score", "author", "comments"]
15    with open(filename, "w", newline="", encoding="utf-8") as f:
16        writer = csv.DictWriter(f, fieldnames=fieldnames)
17        writer.writeheader()
18        writer.writerows(stories)
19    print(f"Saved {len(stories)} stories to {filename}")
20export_to_csv(stories)
Python से Excel में export करें
1import pandas as pd
2def export_to_excel(stories, filename="hn_stories.xlsx"):
3    """Scraped stories को Excel file में सेव करें."""
4    df = pd.DataFrame(stories)
5    df.to_excel(filename, index=False, engine="openpyxl")
6    print(f"Saved {len(stories)} stories to {filename}")
7export_to_excel(stories)
यह सुनिश्चित करें कि openpyxl installed हो — pandas Excel engine के रूप में इसी का उपयोग करता है। अगर यह नहीं होगा, तो ImportError आएगा।
Google Sheets में push करें (वैकल्पिक)
Automated workflows के लिए आप gspread library से data सीधे Google Sheets में भेजना चाह सकते हैं। इसके लिए Google Cloud service account सेट करना पड़ता है (एक बार का काम):
1import gspread
2gc = gspread.service_account(filename="service_account.json")
3sh = gc.open("HN Daily Digest")
4worksheet = sh.sheet1
5# Convert stories to rows
6header = list(stories[0].keys())
7rows = [list(s.values()) for s in stories]
8worksheet.clear()
9worksheet.update([header] + rows)
10print("Pushed to Google Sheets")
No-code export alternative
अगर service accounts सेट करना और export code लिखना, scraping से भी ज़्यादा काम लगे, तो मैं समझता हूँ। Thunderbit में हमने free data export बनाया है, जिससे आप scraped data सीधे Excel, Google Sheets, Airtable, या Notion में भेज सकते हैं — न code, न credentials, न maintain करने वाली pipeline। एक बार के data pull के लिए यह सचमुच तेज़ है। नीचे और जानकारी है।
अपने scraper को production-ready बनाना: error handling, caching, और scheduling
अगर आप scraper सिर्फ़ एक बार मज़े के लिए चला रहे हैं, तो ऊपर का code ठीक है। अगर आप इसे रोज़ाना किसी workflow के हिस्से के रूप में चला रहे हैं, तो कुछ चीज़ें और जोड़नी होंगी।
Error handling और retry logic
नेटवर्क fail होते हैं। Servers throttle करते हैं। एक खराब request से पूरा scrape नहीं गिरना चाहिए। यहाँ exponential backoff के साथ retry function है:
1from tenacity import retry, stop_after_attempt, wait_exponential_jitter
2import requests
3@retry(stop=stop_after_attempt(5), wait=wait_exponential_jitter(initial=1, max=60))
4def fetch_with_retry(url):
5    """Automatic retries और exponential backoff के साथ URL लाएँ."""
6    response = requests.get(url, timeout=10)
7    response.raise_for_status()
8    return response
9# Usage:
10try:
11    resp = fetch_with_retry("https://hacker-news.firebaseio.com/v0/topstories.json")
12    story_ids = resp.json()
13except Exception as e:
14    print(f"Failed after retries: {e}")
tenacity library retry logic को साफ़ तरीके से संभालती है। यह jittered exponential backoff के साथ 5 बार तक retry करेगी — 1 second से शुरू होकर, अधिकतम 60 seconds तक। इससे HTTP 429 (rate limited), 503 (service unavailable), और अस्थायी नेटवर्क errors को बेहतर तरीके से संभाला जा सकता है।
Re-crawl से बचने के लिए responses cache करें
Development के दौरान parsing logic बदलते हुए आप scraper को कई बार चलाएँगे। बिना caching के हर run फिर से HN servers को वही data के लिए hit करता है। requests-cache library यह काम दो lines में कर देती है:
1import requests_cache
2requests_cache.install_cache("hn_cache", expire_after=3600)  # Cache for 1 hour
स्क्रिप्ट के top पर ये lines जोड़ने के बाद, सभी requests.get() calls अपने आप local SQLite database में cache हो जाती हैं। एक घंटे में script 10 बार चलाएँ, तो सिर्फ़ पहली run network तक जाती है। यह एक tool है जिसे , और इसकी वजह वाजिब है।
Crawling और parsing को अलग रखें
अनुभवी scrapers जिस pattern पर भरोसा करते हैं: पहले raw data download करें, फिर parse करें। इससे parsing logic में bug हो तो आप उसे fix करके दोबारा parse कर सकते हैं, बिना फिर से fetch किए।
1import os, json
2def crawl_and_save(story_ids, output_dir="raw_data"):
3    """Story data लाएँ और raw JSON disk पर सेव करें."""
4    os.makedirs(output_dir, exist_ok=True)
5    for sid in story_ids:
6        filepath = os.path.join(output_dir, f"{sid}.json")
7        if os.path.exists(filepath):
8            continue  # पहले से fetch किए गए item को छोड़ दें
9        resp = fetch_with_retry(f"{API_BASE}/item/{sid}.json")
10        with open(filepath, "w") as f:
11            json.dump(resp.json(), f)
12> This paragraph contains content that cannot be parsed and has been skipped.
13यह two-phase approach खासकर तब उपयोगी है जब आप सैकड़ों items scrape कर रहे हों और data processing के तरीके पर जल्दी-जल्दी काम करना हो।
14### अपने scraper को schedule पर चलाएँ
15Daily HN digest के लिए scraper को अपने आप चलना चाहिए। दो सामान्य विकल्प:
16**Option 1: cron (Linux/Mac)**
17```bash
18# Run every day at 8:30 AM UTC
1930 8 * * * /usr/bin/python3 /home/user/scrape_hn.py >> /home/user/scrape.log 2>&1
Option 2: GitHub Actions (free, server की ज़रूरत नहीं)
1name: Scrape Hacker News
2on:
3  schedule:
4    - cron: '30 8 * * *'  # Daily at 8:30 AM UTC
5  workflow_dispatch:        # Manual trigger button
6jobs:
7  scrape:
8    runs-on: ubuntu-latest
9    steps:
10      - uses: actions/checkout@v4
11      - uses: actions/setup-python@v6
12        with:
13          python-version: '3.12'
14      - run: pip install requests beautifulsoup4 pandas openpyxl
15      - run: python scrape_hn.py
16      - run: |
17          git config user.name "GitHub Actions Bot"
18          git config user.email "actions@github.com"
19          git add -A
20          git diff --staged --quiet || git commit -m "Update HN data $(date -u +%Y-%m-%dT%H:%M:%SZ)"
21          git push
GitHub Actions scheduling के साथ कुछ बातें ध्यान में रखें: सभी cron times UTC में होते हैं, 15–60 मिनट की देरी आम है (इसलिए :00 की जगह :30 जैसे off-minute times बेहतर हैं), और अगर repo 60 दिन तक inactive रहे तो GitHub scheduled workflows बंद कर सकता है। Testing के लिए हमेशा workflow_dispatch शामिल करें ताकि आप manually trigger कर सकें।
एक आसान विकल्प के तौर पर, Thunderbit का Scheduled Scraper फीचर आपको plain English में schedule बताने देता है — जैसे "हर सुबह 8 बजे scrape करो" — बिना server या cron setup के।
जब Python ज़रूरत से ज़्यादा हो: Hacker News स्क्रैप करने का no-code तरीका
मैं यहाँ ईमानदार रहूँगा, भले ही मैं Python enthusiast हूँ और मेरी टीम developer tools बनाती है। अगर आपको सिर्फ़ आज की top 100 HN stories एक spreadsheet में चाहिए — अभी, एक बार के लिए — तो Python script लिखना, debug करना, और चलाना बेवजह का overhead है। Setup alone (virtual environment, packages install करना, selectors समझना) असली data collection से ज़्यादा समय ले सकता है।
यहीं काम आता है। Workflow यह है:
- Chrome में
news.ycombinator.comखोलें - Thunderbit extension icon पर क्लिक करें, फिर "AI Suggest Fields" चुनें
- AI page पढ़कर columns सुझाएगा: Title, URL, Score, Author, Comment Count, Time Posted
- चाहें तो fields adjust करें (rename, remove, या custom fields जोड़ें — आप "Categorize as AI/DevTools/Web/Other" जैसा AI prompt भी जोड़ सकते हैं)
- "Scrape" पर क्लिक करें — data structured table में आ जाएगा
- Excel, Google Sheets, Airtable, या Notion में export करें
Structured data तक बस दो clicks। न selectors, न code, न maintenance।
एक बड़ा फ़ायदा यह है कि Thunderbit का AI layout बदलने पर भी खुद को adapt कर लेता है। Traditional CSS-selector scrapers तब टूट जाते हैं जब site markup बदलता है — और भले ही HN का HTML काफ़ी स्थिर है, उसमें बदलाव हुए हैं (class="athing submission" अपडेट हुआ, span.titleline ने पुराने a.storylink को replace किया)। AI-powered scraper हर बार page को नए सिरे से पढ़ता है, इसलिए उसे class name changes से फर्क नहीं पड़ता।
Thunderbit pagination भी संभालता है (HN के "More" button को अपने आप क्लिक करके) और subpage scraping भी (हर story के comment page पर जाकर discussion data खींचकर)। use case के लिए यह Method 2 के recursive API code का no-code equivalent है — लेकिन एक भी line लिखे बिना।
फायदा-नुकसान सीधे हैं: जब आपको custom logic, complex data transformations, scheduled automation pipelines, या code सीखना हो, तब Python सही है। जब डेटा जल्दी चाहिए, code maintain नहीं करना, या आप developer नहीं हैं, तब Thunderbit सही है। अपनी स्थिति के हिसाब से टूल चुनें।
Python vs. API vs. No-Code: कौन-सा तरीका चुनें?
यहाँ पूरा decision framework है:
| Criteria | BeautifulSoup (HTML) | Firebase API | Algolia API | Thunderbit (No-Code) |
|---|---|---|---|---|
| Technical skill needed | Intermediate Python | Beginner Python | Beginner Python | None |
| Setup time | 10–15 min | 5–10 min | 5–10 min | 2 min |
| Maintenance burden | Medium (selectors break) | Low (stable JSON) | Low (stable JSON) | None |
| Data depth | Front page only | Any item, users | Search + historical | Front page + subpages |
| Comments | Hard | Easy (recursive) | Easy (nested tree) | Subpage scraping |
| Historical data | No | No | Yes (full archive) | No |
| Export options | Code it yourself | Code it yourself | Code it yourself | Built-in (Excel, Sheets, etc.) |
| Scheduling | cron / GitHub Actions | cron / GitHub Actions | cron / GitHub Actions | Built-in scheduler |
| Best for | Learning scraping | Reliable pipelines | Research & analysis | Quick data pulls |
अगर आप Python सीख रहे हैं या कुछ custom बना रहे हैं, तो Method 1 या 2 चुनें। अगर historical analysis चाहिए, तो Algolia API जोड़ें। अगर आपको सिर्फ़ data चाहिए, code नहीं, तो ।
निष्कर्ष और मुख्य सीख
अब आपके toolkit में यह सब है:
- Hacker News स्क्रैप करने के दो पूरे Python तरीके — HTML parsing के लिए BeautifulSoup और साफ़ JSON data के लिए Firebase API
- Pagination techniques page 1 से आगे scraping के लिए, साथ ही 2007 तक historical data के लिए Algolia API
- CSV, Excel, और Google Sheets के लिए export code — क्योंकि terminal में पड़ा data आपकी टीम के किसी और काम का नहीं
- Production patterns — retry logic, caching, crawl/parse separation, और cron या GitHub Actions से scheduled automation
- एक no-code विकल्प जब Python आपकी ज़रूरत से बड़ा tool लगे
मेरी सलाह: अधिकांश use cases के लिए Firebase API (Method 2) से शुरुआत करें। यह ज़्यादा साफ़, ज़्यादा भरोसेमंद है, और nested HTML parse करने की परेशानी के बिना comments access देता है। जब historical data चाहिए हो, तब Algolia API जोड़ें। और जब कभी बस जल्दी से एक spreadsheet चाहिए हो, पूरा Python project शुरू नहीं करना हो, तब के लिए को bookmark करके रखें।
अगर आप और गहराई में जाना चाहते हैं, तो sentiment analysis के लिए HN comments scrape करके देखें, GitHub Actions के साथ daily digest pipeline बनाएँ, या Algolia API से यह ट्रैक करें कि पिछले दशक में technology trends कैसे बदली हैं।
FAQs
क्या Hacker News को scrape करना legal है?
HN का data सार्वजनिक रूप से उपलब्ध है, और Y Combinator programmatic access के लिए आधिकारिक API भी देता है। साइट की read-only content (front page, item pages, user pages) को scrape करने की अनुमति देती है, लेकिन 30-second crawl delay माँगती है। delay का सम्मान करें, interactive endpoints (voting, login) को scrape न करें, और आप सुरक्षित क्षेत्र में रहेंगे। scraping ethics के बारे में अधिक जानने के लिए हमारी guide देखें।
क्या Hacker News का official API है?
हाँ। hacker-news.firebaseio.com/v0/ पर मौजूद मुफ़्त है, authentication नहीं माँगती, और stories, comments, user profiles, तथा सभी feed types (top, new, best, ask, show, jobs) तक पहुँच देती है। यह साफ़ JSON लौटाती है और कोई stated rate limit नहीं है, हालांकि request frequency में शालीनता रखना हमेशा बेहतर है।
Python से Hacker News comments कैसे scrape करें?
Firebase API का उपयोग करके पहले story item लाएँ और उसका kids field देखें (top-level comment IDs की array)। हर comment खुद एक item होता है और उसके अपने replies के लिए kids field होता है। एक function से tree को recursively walk करें जो हर comment और उसके बच्चों को fetch करे। पूरा code ऊपर के "Scrape Comments (Recursive Tree Walk)" section में देखें। वैकल्पिक रूप से, पूरे nested comment tree को एक ही request में लौटा देता है — comment-heavy stories के लिए यह काफी तेज़ है।
क्या मैं बिना code लिखे Hacker News scrape कर सकता हूँ?
हाँ। एक Chrome extension की तरह काम करता है — HN खोलें, "AI Suggest Fields" पर क्लिक करें, और यह अपने आप title, URL, score, और author जैसे columns पहचान लेता है। "Scrape" पर क्लिक करें और सीधे Excel, Google Sheets, Airtable, या Notion में export करें। यह pagination संभालता है और subpages पर जाकर comment data भी ला सकता है। न Python, न selectors, न maintenance।
Historical Hacker News data कैसे प्राप्त करें?
इस काम के लिए सबसे अच्छा टूल है। तारीख के आधार पर filter करने के लिए search_by_date endpoint के साथ numericFilters=created_at_i>TIMESTAMP इस्तेमाल करें। आप keyword से search कर सकते हैं, story type filter कर सकते हैं, और 500 pages तक results paginate कर सकते हैं। बड़े historical analysis के लिए public datasets (पूर्ण archive), (28 million records), और (4 million stories) पर भी उपलब्ध हैं।
Learn More