क्या कभी ऐसा हफ्ता आया है जब तुम्हारी to-do लिस्ट खरगोशों की तरह बढ़ती ही चली जाए—और मन करे कि काश कोई पर्सनल असिस्टेंट हो जो कभी सोए नहीं, कभी शिकायत न करे, और सबसे बढ़कर तुम्हारे स्नैक चुनाव पर जज भी न करे? 2026 में OpenClaw बिल्कुल वैसी ही “मैजिक” लेकर आता है। जैसे-जैसे self-hosted AI assistants की लोकप्रियता तेज़ी से बढ़ रही है, OpenClaw उन लोगों के लिए go-to टूल बन गया है जो workflows ऑटोमेट करना चाहते हैं, messaging apps मैनेज करना चाहते हैं, और अपना डेटा प्राइवेट रखना चाहते हैं—वो भी बिना कंप्यूटर साइंस में PhD किए या पूरा वीकेंड debugging में उड़ा दिए।
और मज़ेदार बात ये है: OpenClaw को सेटअप करने में उतना भी टाइम नहीं लगता जितना तुम्हारी सुबह की कॉफी खत्म होने में लगता है। हालिया adoption आँकड़े बताते हैं कि OpenClaw का यूज़र बेस तेज़ी से बढ़ा है—100,000+ repository stars और एक ही हफ्ते में 2 मिलियन से ज़्यादा विज़िटर्स (). ये सिर्फ हाइप नहीं—ये साफ संकेत है कि दुनिया अब ऐसे AI assistants चाहती है जिन पर तुम्हारा कंट्रोल हो, उल्टा नहीं।
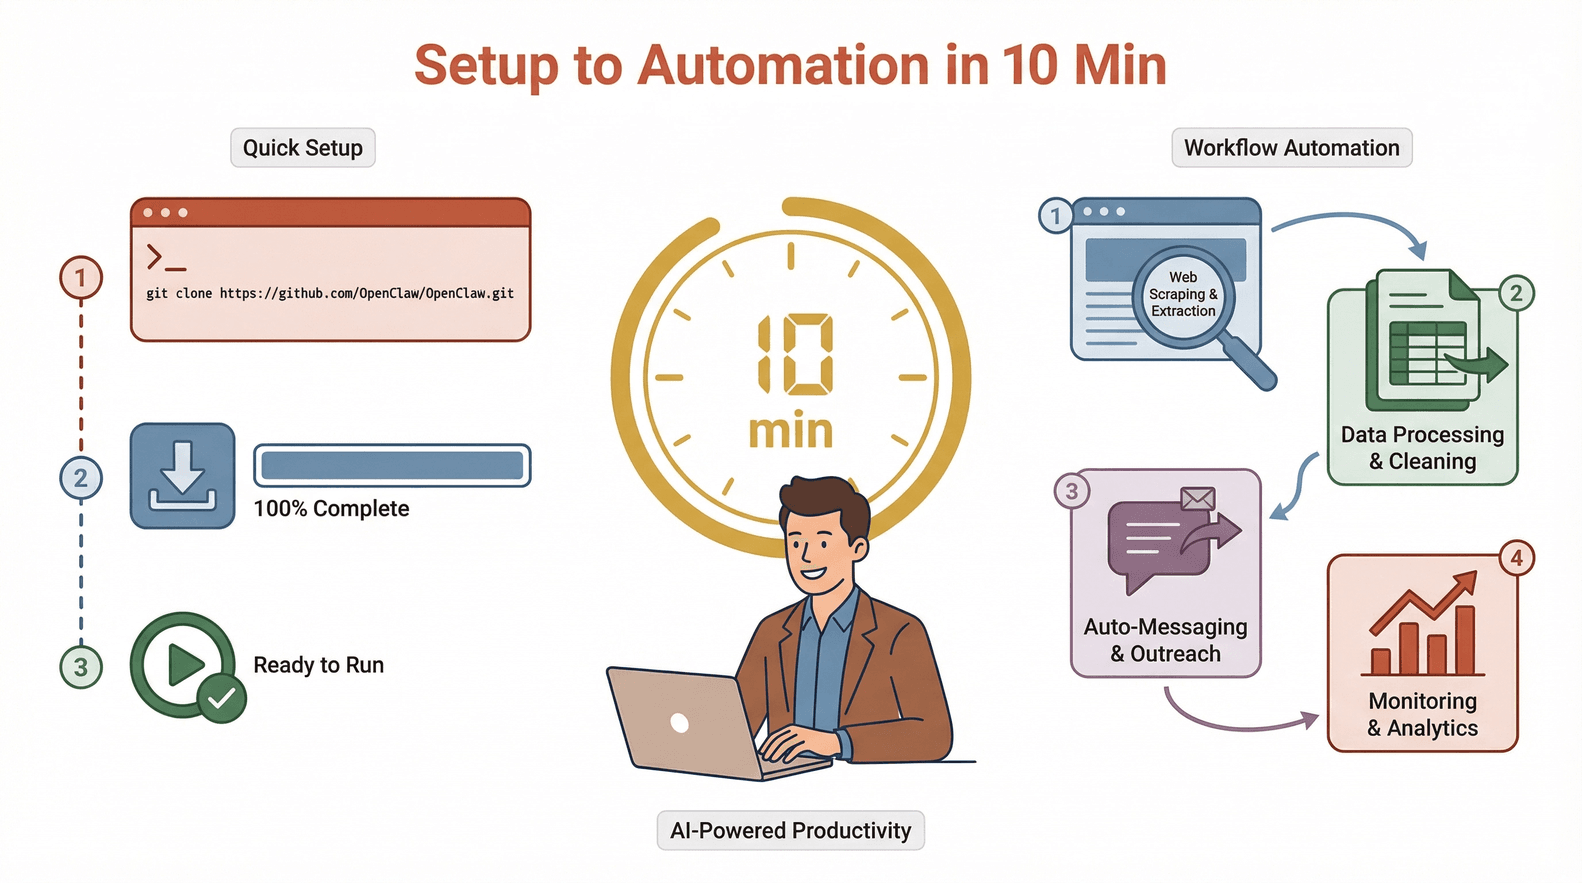
तो चलो 2026 के लिए बिना झंझट वाली, 10 मिनट की OpenClaw इंस्टॉलेशन गाइड में सीधे उतरते हैं। तुम sales प्रो हो, स्टूडेंट हो, या बस अपनी डिजिटल लाइफ को सलीके से रखना पसंद करते हो—ये गाइड तुम्हें AI-पावर्ड प्रोडक्टिविटी तक पहुँचाने का सबसे आसान रास्ता है—नो स्ट्रेस, नो मेस।
OpenClaw क्या है?
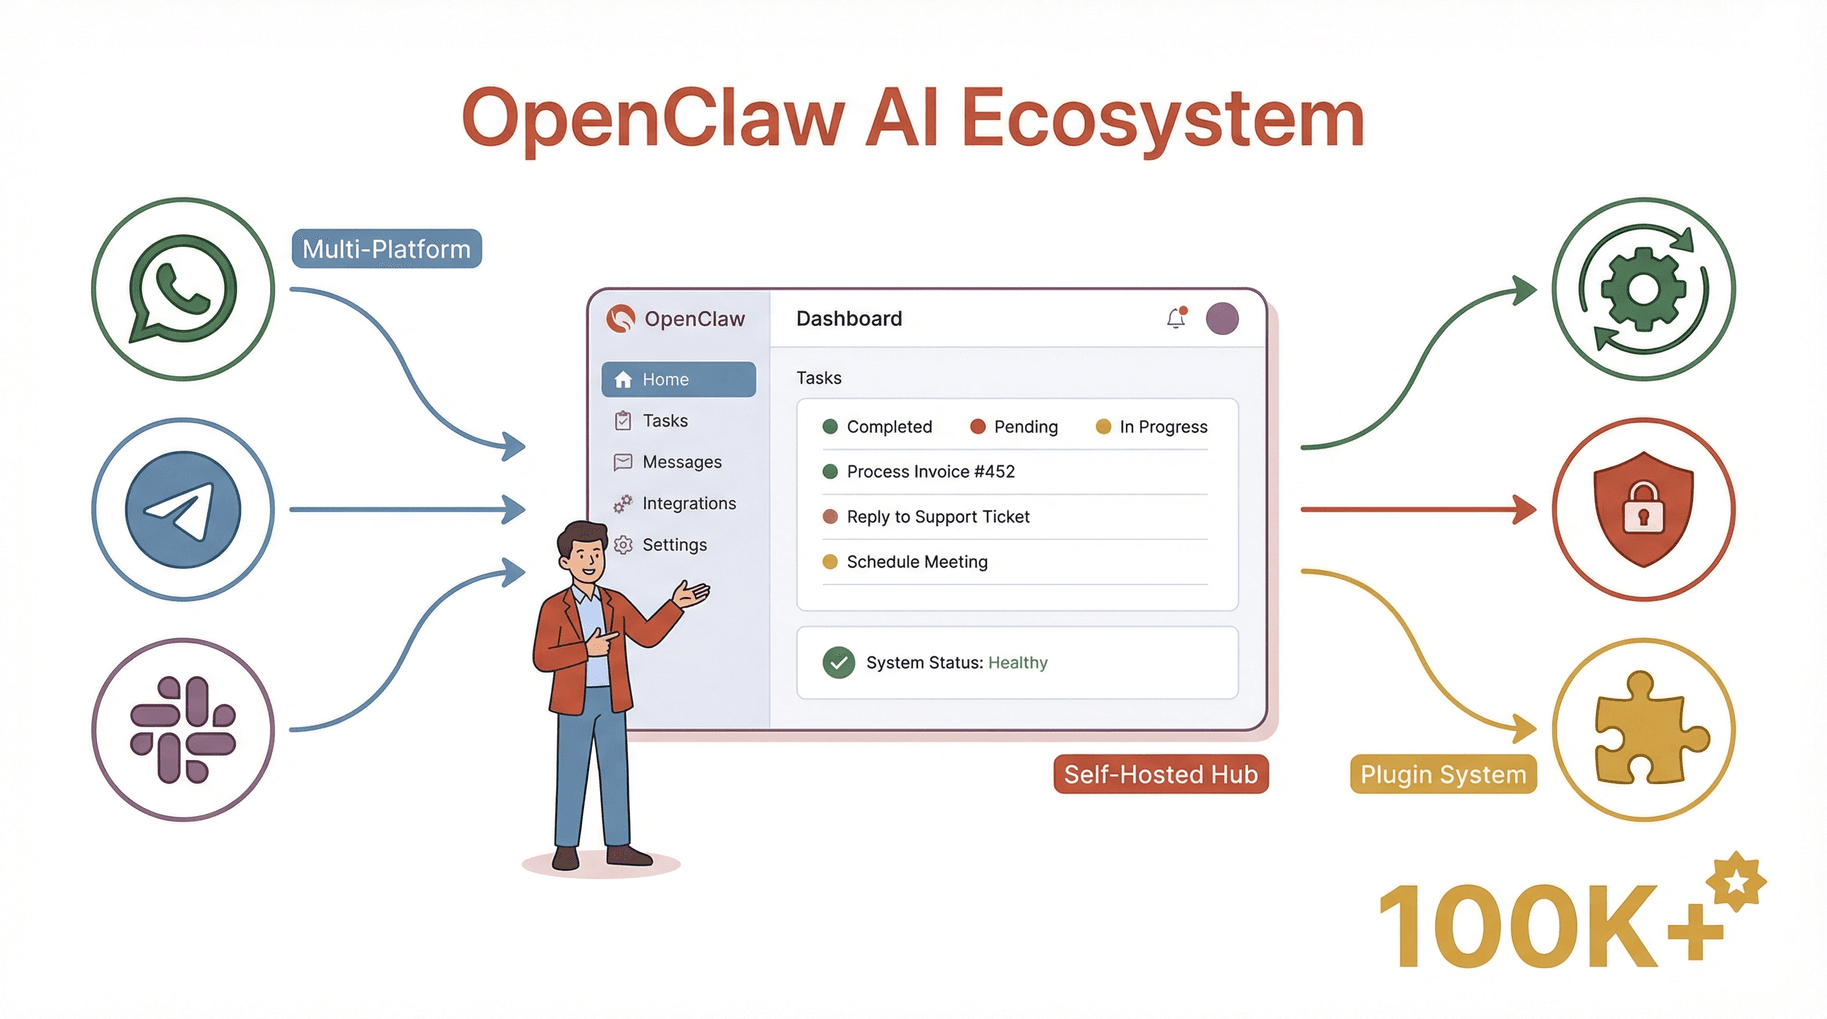
OpenClaw एक self-hosted AI assistant प्लेटफ़ॉर्म है, जो messaging apps, web tasks और कई डिजिटल workflows को ऑटोमेट करने के लिए बनाया गया है—और साथ ही तुम्हारा डेटा तुम्हारे ही कंट्रोल में रहता है। इसे अपना “प्राइवेट ChatGPT” समझ लो, लेकिन ऐसे हाथ (या कहें claws) के साथ जो Slack, WhatsApp, Telegram और दर्जनों दूसरे प्लेटफ़ॉर्म्स तक पहुँचकर काम कर सकते हैं।
मुख्य क्षमताएँ:
- Multi-agent सपोर्ट: कई AI agents चलाएँ—हर एक के अपने skills और integrations के साथ।
- Messaging app integration: WhatsApp, Telegram, Slack, Discord आदि से कनेक्ट करें।
- Automation engine: tasks शेड्यूल करें, workflows ट्रिगर करें, और repetitive काम ऑटोमेट करें।
- Privacy-first: तुम्हारा डेटा तुम्हारे सर्वर पर ही रहता है—कोई cloud vendor झाँक-झाँक कर नहीं देखता।
- Plugin ecosystem: plugins और skills की बढ़ती लाइब्रेरी से OpenClaw की ताकत बढ़ाएँ।
OpenClaw को cloud-only AI tools से अलग बनाती है इसकी flexibility और privacy। तुम तय करते हो कि ये कहाँ चलेगा, किस चीज़ तक पहुँच होगी, और इसका व्यवहार कैसा होगा। एक उत्साही यूज़र के शब्दों में: "OpenClaw पहला AI assistant है जो सच में मेरा लगता है—अब ये चिंता नहीं रहती कि कौन मेरे मैसेज पढ़ रहा है या मेरा डेटा बेच रहा है।"
OpenClaw इंस्टॉलेशन गाइड: 2026 में इसे ट्राय करना क्यों ज़रूरी है
जब बाज़ार में इतने AI tools हैं, तो OpenClaw इंस्टॉल करने की ज़रूरत क्यों? तीन बड़े कारण: कंट्रोल, लागत, और कस्टमाइज़ेशन।
- कंट्रोल: डेटा तुम्हारा है। कोई third-party cloud provider तुम्हारी बातचीत या workflows नहीं देख सकता।
- लागत: हर महीने की SaaS फीस से छुटकारा। OpenClaw चलने के बाद, तुम इसे अपनी ज़रूरत के हिसाब से इस्तेमाल और स्केल कर सकते हो।
- कस्टमाइज़ेशन: सिर्फ वही plugins जोड़ो जिनकी ज़रूरत है, जरूरी workflows ऑटोमेट करो, और सब कुछ अपने स्टाइल के मुताबिक ट्यून करो।
रियल-वर्ल्ड यूज़ केस
| यूज़र टाइप | उदाहरण यूज़ केस | फायदा |
|---|---|---|
| Sales | WhatsApp/Slack पर follow-ups ऑटोमेट; leads scrape करें | ज़्यादा डील्स, कम मैनुअल काम |
| Operations | रिपोर्ट शेड्यूल करें, सिस्टम मॉनिटर करें, टीम को auto-notify | कम गलतियाँ, तेज़ रिस्पॉन्स |
| Creators | सोशल पर batch-post, फीडबैक समरी, फैंस मैनेज करें | ज़्यादा कंटेंट, कम झंझट |
| Students | असाइनमेंट ऑर्गनाइज़, रीडिंग्स की auto-summary | स्मार्ट तरीके से पढ़ाई |
| IT/Developers | लॉग्स मॉनिटर, issues auto-remediate, APIs टेस्ट करें | समय बचे, outages कम हों |
और आँकड़े भी यही बोलते हैं: AI agents अपनाने वालों में 66% ने मापने योग्य productivity gains रिपोर्ट किए (), और अब 88% संगठन कम से कम एक बिज़नेस फ़ंक्शन में AI इस्तेमाल कर रहे हैं (). OpenClaw इसी मूवमेंट के सेंटर में है—AI automation को आसान और सुरक्षित बनाते हुए।
OpenClaw इंस्टॉलेशन आवश्यकताएँ: शुरू करने से पहले क्या चाहिए
अपने नए AI assistant को “रिलीज़” करने से पहले, चलो पक्का कर लें कि तुम्हारा environment रेडी है। भरोसा मानो, इस स्टेप को स्किप करना वैसा है जैसे ओवन प्रीहीट किए बिना केक बनाना—अक्सर नतीजा गड़बड़ ही निकलता है।
न्यूनतम हार्डवेयर और सॉफ़्टवेयर आवश्यकताएँ (2026)
- CPU: 4+ cores की सलाह (modern Intel/AMD/ARM)
- RAM: कम से कम 8GB (heavy workloads या multi-agent setup के लिए 16GB+)
- Storage: 20GB खाली डिस्क स्पेस (स्पीड के लिए SSD बेहतर)
- Operating System: Ubuntu 22.04+ (recommended), Debian 12+, macOS 13+, Windows 11, या compatible cloud Linux images
- Network: स्थिर broadband कनेक्शन (plugin updates, messaging integrations के लिए)
- Python: 3.10 या नया (
python3 --versionसे चेक करें)
Pro Tip: पर्सनल या छोटे टीम deployment के लिए एक बेसिक cloud VPS (जैसे DigitalOcean का $10/month droplet) या एक spare laptop भी काफी है। 24/7 और high-traffic bots के लिए ज़्यादा RAM/CPU वाले cloud servers चुनो।
Local बनाम Cloud Deployment
- Local: privacy, testing और hobby projects के लिए बढ़िया। बस डिवाइस ऑन रखना याद रखना!
- Cloud: 24/7 uptime, remote access और टीम यूज़ के लिए सबसे अच्छा। DigitalOcean, Tencent Cloud, Alibaba Cloud जैसे providers one-click OpenClaw images भी देते हैं।
Requirements को हल्के में मत लो: कमजोर सर्वर का मतलब slow responses, failed tasks और काफी सिर खुजाना। शुरू करने से पहले OS version और hardware ज़रूर चेक करो।
Step 1: OpenClaw इंस्टॉलेशन के लिए Environment तैयार करना
चलो तुम्हारी “डिजिटल किचन” सेट करते हैं। ये रहा pre-installation checklist:
सभी सिस्टम्स के लिए
-
OS अपडेट करें:
- Linux पर:
sudo apt update && sudo apt upgrade -y - macOS पर: Software Update इस्तेमाल करें
- Windows पर: Windows Update चलाएँ
- Linux पर:
-
Python 3.10+ इंस्टॉल करें:
- Linux:
sudo apt install python3 python3-pip - macOS:
brew install python - Windows: से डाउनलोड करें
- Linux:
-
Non-root user सेट करें (Linux):
sudo adduser openclawsudo usermod -aG sudo openclaw
-
Git इंस्टॉल करें:
- Linux:
sudo apt install git - macOS:
brew install git - Windows: से डाउनलोड करें
- Linux:
-
Security best practices:
- server access के लिए SSH keys इस्तेमाल करें (
ssh-keygen) - root के रूप में रन करने से बचें
- firewall enabled रखें
- server access के लिए SSH keys इस्तेमाल करें (
Cloud Server Setup
- भरोसेमंद provider चुनो (DigitalOcean, Tencent Cloud, Alibaba Cloud)
- Ubuntu 22.04+ या Debian 12+ image चुनो
- SSH access और strong password सेट करो
- जरूरी ports खोलो (आमतौर पर 80, 443, और dashboard के लिए एक custom port)
Checklist पूरा? अब तुम main event के लिए तैयार हो।
Step 2: OpenClaw इंस्टॉल करना—2026 के सबसे तेज़ तरीके
2026 में OpenClaw का installation पहले से कहीं ज़्यादा स्मूद हो गया है। तुम्हारे पास दो मुख्य ऑप्शन हैं: one-click cloud deployment या classic command-line installation।
One-Click Cloud Marketplaces से इंस्टॉल करना
ज़्यादातर यूज़र्स के लिए ये “easy button” है। तरीका ये है:
- अपने cloud provider में लॉगिन करो (जैसे DigitalOcean, Tencent Cloud, Alibaba Cloud)।
- Marketplace में "OpenClaw" सर्च करो।
- Latest official OpenClaw image चुनो।
- "Create" या "Deploy" पर क्लिक करो।
- 2–3 मिनट इंतज़ार करो, server spin up हो जाएगा।
- ब्राउज़र में server का public IP खोलो।
Pros:
- मैनुअल सेटअप नहीं
- security और performance के लिए pre-configured
- automatic updates (अगर enabled हों)
Cons:
- monthly cloud cost (आमतौर पर $5–$20/month)
- underlying OS पर थोड़ा कम कंट्रोल
Local या Custom Servers के लिए Command-Line Installation
अगर तुम्हें ज़्यादा कंट्रोल चाहिए (या बस hacker जैसा feel चाहिए), तो CLI method तुम्हारे लिए है।
1# Clone the OpenClaw repo
2git clone https://github.com/openclaw-ai/openclaw.git
3cd openclaw
4# Install dependencies
5pip install -r requirements.txt
6# Run the installer
7python3 setup.py install
8# Start OpenClaw
9openclaw start
Windows पर:
PowerShell इस्तेमाल करो और पक्का करो कि Python PATH में है।
Verification:
start करने के बाद ब्राउज़र में http://localhost:8080 (या server IP) खोलो। तुम्हें OpenClaw dashboard का login screen दिखना चाहिए।
Troubleshooting Tips:
- "command not found" दिखे तो Python और PATH सेटअप चेक करो।
- permission errors के लिए root से रन मत करो; dedicated user इस्तेमाल करो।
- dashboard लोड न हो तो firewall settings और port availability चेक करो।
Typical install time: 5–10 मिनट (सच में—जब तक तुम छुट्टी पर घोंघे की तरह टाइप न कर रहे हो)।
Step 3: शुरुआती OpenClaw सेटअप—Onboarding, Authentication, और Dashboard Access
अब आता है मज़ेदार हिस्सा: OpenClaw को अपना बनाना।
-
First Login:
ब्राउज़र में dashboard URL खोलो (http://localhost:8080या cloud IP)। onboarding wizard तुम्हारा स्वागत करेगा। -
Authentication सेट करें:
- admin username और strong password बनाओ।
- (Optional) extra security के लिए 2FA enable करो।
-
Gateways कॉन्फ़िगर करें:
- messaging apps कनेक्ट करो (WhatsApp, Telegram, Slack, Discord आदि)।
- चुने हुए platforms के लिए OpenClaw को authorize करो।
-
AI Model Providers चुनें:
- अपना पसंदीदा LLM चुनो (OpenAI, local Llama आदि)।
- जरूरत के अनुसार API keys या model paths डालो।
-
Dashboard Tour:
- main dashboard से task management, plugin marketplace, system status और logs एक्सेस होते हैं।
- quick navigation के लिए sidebar देखो।
-
Messaging Apps के साथ Pair करें:
- हर platform के लिए step-by-step pairing instructions फॉलो करो।
- "hello world" मैसेज भेजकर टेस्ट करो कि सब सही चल रहा है।
Common First-Time Issues:
- API key errors: keys और permissions दोबारा चेक करो।
- messaging app pairing: हर platform पर सही permissions enable हों, ये सुनिश्चित करो।
- dashboard लोड नहीं हो रहा: server firewall और port settings चेक करो।
Step 4: अधिकतम दक्षता के लिए OpenClaw Plugins और Extensions मैनेज करना
OpenClaw की असली ताकत उसका plugin (या "skill") सिस्टम है। Plugins तुम्हारे AI assistant की क्षमताएँ बढ़ाते हैं—और इन्हें तुम जरूरत के हिसाब से जोड़/हटा सकते हो।
Plugins कैसे काम करते हैं
- Browse: dashboard या CLI से available plugins देखो।
- Install: "Install" क्लिक करो या
openclaw plugin install <plugin-name>चलाओ। - Update:
openclaw plugin update --allसे plugins अपडेटेड रखो। - Remove: जो plugins काम के नहीं, उन्हें uninstall कर दो।
Best Practices:
- सिर्फ वही plugins इंस्टॉल करो जिनकी सच में जरूरत है।
- नियमित रूप से updates चेक करो—पुराने plugins compatibility या security issues ला सकते हैं।
- plugin performance मॉनिटर करो; बहुत ज़्यादा plugins सिस्टम को धीमा कर सकते हैं।
2026 के लोकप्रिय Plugins
| Plugin Name | काम | यूज़र टाइप |
|---|---|---|
| WhatsApp Gateway | WhatsApp से कनेक्ट करता है | Sales, Ops |
| Web Scraper | डेटा extraction ऑटोमेट करता है | Research, Sales |
| Scheduler | recurring tasks शेड्यूल करता है | Everyone |
| Notion Sync | डेटा को Notion में sync करता है | Creators, Ops |
| Email Notifier | email alerts भेजता है | IT, Ops |
| Slack Bot | Slack channels के साथ integrate | Teams |
| PDF Extractor | PDFs parse और summarize करता है | Students, Legal |
| CRM Connector | leads को CRM में push करता है | Sales |
Warning: गैर-ज़रूरी plugins से OpenClaw को ठूंस देने पर stability पर असर पड़ सकता है। इसे ऐसे समझो जैसे फोन में ढेर सारे unused apps—धीरे-धीरे सब sluggish हो जाता है।
Step 5: OpenClaw चलाना—अपने पहले Tasks बनाना और मैनेज करना
OpenClaw इंस्टॉल हो गया और plugins भी तैयार हैं—अब असिस्टेंट को काम पर लगाते हैं।
Task बनाना
-
Dashboard खोलें:
"Create Task" पर क्लिक करो। -
Task Type चुनें:
- web scraping
- automated messaging
- data sync
- custom script
-
Parameters सेट करें:
- target URLs, keywords, या message templates सेट करो।
- triggers तय करो (manual, scheduled, या event-based)।
-
Scheduling सेट करें:
- one-time या recurring (daily, weekly, custom cron)।
-
Progress मॉनिटर करें:
- real-time updates के लिए web console देखो।
- logs, error reports, और completion status चेक करो।
उदाहरण: Web Scraping Workflow
मान लो तुम हर सोमवार किसी public directory से नए leads scrape करना चाहते हो।
- "Web Scraping" task बनाओ।
- target URL और data fields डालो।
- सोमवार सुबह 9 बजे schedule करो।
- output को CSV export और email के जरिए भेजने के लिए सेट करो।
Pro Tip: तुम tasks को chain भी कर सकते हो—पहले डेटा scrape, फिर नए leads को auto-message, फिर CRM में sync।
Step 6: OpenClaw डेटा स्टोरेज और मैनेजमेंट स्ट्रैटेजीज़
OpenClaw डेटा स्टोर और मैनेज करने के कई तरीके देता है। सही विकल्प तुम्हारी security, access और backup जरूरतों पर निर्भर करता है।
Storage Options
-
Local Export:
डेटा सीधे server disk पर सेव करो। privacy और offline access के लिए बढ़िया। -
Cloud Sync:
Google Drive, Dropbox, या S3 buckets में डेटा push करो—sharing और backup आसान। -
Database Integration:
structured और queryable storage के लिए MySQL, PostgreSQL, या MongoDB से कनेक्ट करो।
सही तरीका कैसे चुनें
| Storage Type | किसके लिए बेहतर | Pros | Cons |
|---|---|---|---|
| Local Export | संवेदनशील डेटा, privacy | पूरा कंट्रोल | manual backup चाहिए |
| Cloud Sync | टीम sharing, backups | आसान access, सुरक्षित | cloud पर निर्भरता |
| Database | बड़े datasets, analytics | query, scale, secure | ज़्यादा setup चाहिए |
Tips:
- critical data के लिए automated backups (daily/weekly) सेट करो।
- sensitive exports encrypt करो।
- पुराने/unused डेटा को नियमित रूप से साफ करो ताकि space बचे।
Step 7: Troubleshooting और OpenClaw सेटअप को Optimize करना
सबसे smooth install में भी कभी-कभी अड़चन आ सकती है। इसे “well-oiled machine” की तरह चलाए रखने के तरीके:
Common Issues & Fixes
-
"Command not found" errors:
PATH और Python installation चेक करो। -
Dashboard लोड नहीं हो रहा:
सही port open है और firewall block नहीं कर रहा—ये सुनिश्चित करो। -
API errors:
API keys, permissions और network connectivity दोबारा चेक करो। -
Plugin conflicts:
सभी plugins अपडेट करो और compatibility notes देखो। -
Slow performance:
concurrent tasks कम करो, RAM/CPU upgrade करो, या cloud server पर शिफ्ट करो।
Optimization Tips
-
Context सीमित रखें:
tasks में गैर-ज़रूरी डेटा मत भरो—prompts और workflows को focused रखो। -
Resource usage मॉनिटर करें:
built-in monitors याhtopजैसे tools से CPU/RAM देखो। -
Regular updates:
security और नए features के लिए OpenClaw और plugins को latest रखो।
Maintenance Checklist
- Weekly: updates चेक करो, logs रिव्यू करो, डेटा backup करो।
- Monthly: plugins audit करो, backups टेस्ट करो, user permissions रिव्यू करो।
- Quarterly: server specs रिव्यू करो; usage बढ़े तो scaling पर विचार करो।
Thunderbit: AI के साथ OpenClaw की Web Scraping को और पावरफुल बनाना
अब बात करते हैं OpenClaw की web scraping को next level पर ले जाने की। OpenClaw का built-in scraper मजबूत है, लेकिन कभी-कभी complex sites, subpages और messy data के लिए ऐसा टूल चाहिए जो घंटों के सेटअप के बिना काम कर दे। यहीं काम आता है।
Thunderbit क्या है?
Thunderbit एक है, जो natural language prompts के जरिए किसी भी वेबसाइट से structured data निकालने देता है। यह बिज़नेस यूज़र्स के लिए बनाया गया है—ना coding, ना templates; बस बताओ क्या चाहिए और AI बाकी संभाल लेगा।
Key Features:
- AI Suggest Fields: एक क्लिक में Thunderbit सबसे अच्छे columns सुझाता है।
- Subpage Scraping: linked subpages पर जाकर अपने-आप डेटा निकालता है।
- Instant Templates: popular sites (Amazon, Zillow, Shopify आदि) के लिए one-click scraping।
- Free Data Export: results को Excel, Google Sheets, Notion, या Airtable में भेजो।
- Scheduled Scraping: recurring projects के लिए नियमित data pulls ऑटोमेट करो।
Thunderbit, OpenClaw को कैसे Extend करता है
- Complex Data Extraction: tricky sites के लिए Thunderbit इस्तेमाल करो, फिर डेटा OpenClaw में लाकर आगे automation चलाओ।
- Natural Language Setup: scripts लिखने की जरूरत नहीं—बस Thunderbit को बताओ।
- Seamless Export: CSV/Excel में export करो, फिर OpenClaw task से उसे process या distribute करो।
उदाहरण Workflow: Thunderbit + OpenClaw
- Thunderbit से किसी directory से leads की लिस्ट scrape करो।
- डेटा CSV में export करो।
- OpenClaw task सेट करो जो CSV import करे और हर lead को WhatsApp या Slack पर auto-message भेजे।
- responses मॉनिटर करो और follow-ups schedule करो—सब ऑटोमेटेड।
ये कॉम्बो productivity का पावरहाउस है। Thunderbit messy web संभालता है, और OpenClaw automation व messaging।
Thunderbit के features के बारे में और जानने के लिए या हमारा देखो।
निष्कर्ष और मुख्य बातें: आपका AI Assistant 10 मिनट में तैयार
संक्षेप में:
- OpenClaw एक privacy-first, self-hosted AI assistant है—जो messaging, workflows और बहुत कुछ ऑटोमेट कर सकता है।
- इंस्टॉलेशन तेज़ और आसान है: local hardware हो या cloud, ज़्यादातर यूज़र्स 10 मिनट में शुरू कर देते हैं।
- Plugins OpenClaw को बेहद flexible बनाते हैं: जरूरत के हिसाब से जोड़ो, अपडेटेड रखो, और productivity बढ़ते देखो।
- Thunderbit web scraping को सुपरचार्ज करता है: complex data extraction और seamless workflow automation के लिए OpenClaw के साथ इस्तेमाल करो।
2026 में AI assistants सिर्फ techies या बड़े enterprises तक सीमित नहीं हैं। OpenClaw (और Thunderbit की मदद) के साथ कोई भी अपनी डिजिटल लाइफ को ज़्यादा स्मार्ट और efficient बना सकता है—बिना ड्रामा, सिर्फ रिज़ल्ट्स।
ट्राय करने के लिए तैयार हो? OpenClaw डाउनलोड करो, Thunderbit इंस्टॉल करो, और देखो कि अगले 10 मिनट में तुम कितना ऑटोमेट कर सकते हो। तुम्हारा future self तुम्हें धन्यवाद देगा।
FAQs
1. 2026 में OpenClaw इंस्टॉल करने के लिए minimum requirements क्या हैं?
तुम्हें कम से कम 4 CPU cores, 8GB RAM, 20GB खाली disk space, और Python 3.10+ वाला server/PC चाहिए। Supported OS में Ubuntu 22.04+, Debian 12+, macOS 13+, और Windows 11 शामिल हैं। Cloud deployment के लिए ज़्यादातर VPS providers compatible images देते हैं।
2. क्या OpenClaw इस्तेमाल करना सुरक्षित है, और plugin risks से कैसे बचें?
OpenClaw open-source और privacy-focused है, लेकिन plugins हमेशा trusted sources से ही इंस्टॉल करो। plugins नियमित रूप से अपडेटेड रखो, security advisories पर नज़र रखो, और गैर-ज़रूरी extensions से बचो। Enterprise use के लिए फॉलो करो।
3. क्या मैं OpenClaw को business automation के लिए इस्तेमाल कर सकता हूँ, या ये सिर्फ personal use के लिए है?
बिल्कुल कर सकते हो। Sales teams, operations, creators और IT departments इसे messaging, lead generation, reporting आदि ऑटोमेट करने के लिए इस्तेमाल करते हैं। इसकी flexibility और plugin system इसे personal और business—दोनों workflows के लिए फिट बनाते हैं।
4. Thunderbit, OpenClaw के साथ कैसे integrate होता है?
Thunderbit advanced web scraping संभालता है—complex sites से structured data निकालता है। scraped data (CSV, Excel आदि) export करके OpenClaw में import करो और आगे automation, messaging या analytics चलाओ। दोनों tools एक-दूसरे को complement करते हैं और साथ में बढ़िया काम करते हैं।
5. अगर installation या runtime issues आएँ तो क्या करें?
system requirements चेक करो, OS और Python अपडेट करो, और firewall/port settings रिव्यू करो। plugin issues के लिए plugins अपडेट करो या conflicting plugins हटा दो। फिर भी समस्या रहे तो OpenClaw community forums या GitHub issues में troubleshooting देखो।
web scraping, AI automation, या productivity बढ़ाने के बारे में और जानना है? और गाइड्स के लिए देखो, या tutorials और tips के लिए हमारे को subscribe करो।
Learn More