

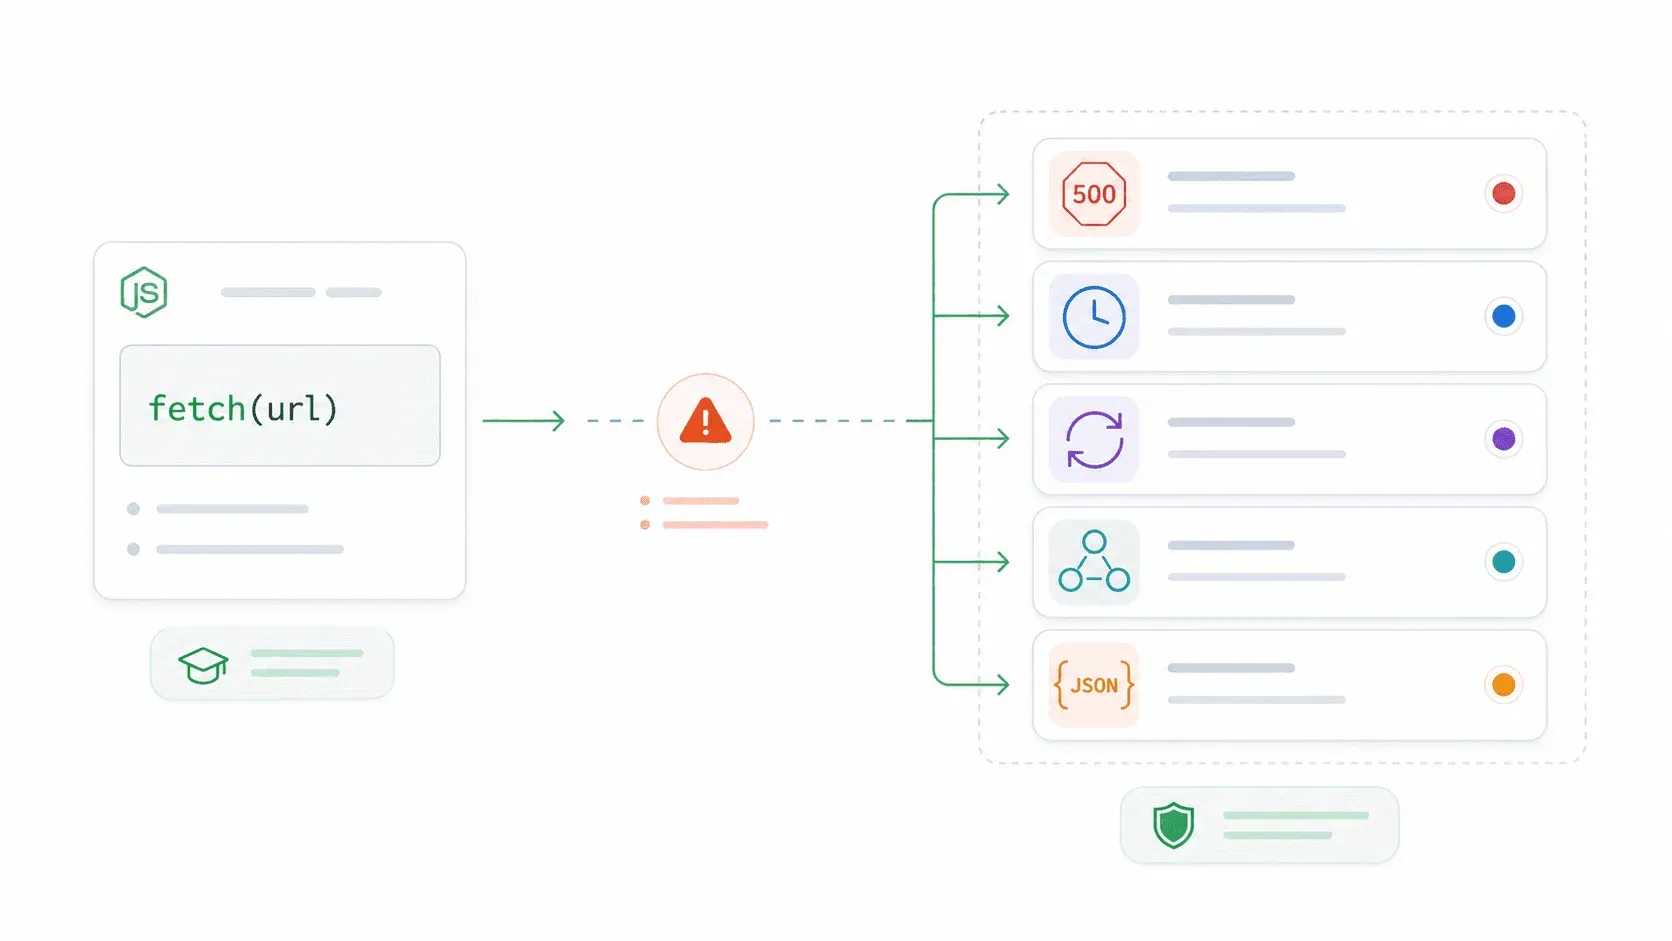
每一篇 Node.js fetch 教學都在教你 await fetch(url),然後就結束了。接著你的正式環境應用程式默默吞掉一個 500 錯誤,某個請求卡了 90 秒卻沒有逾時,最後你在星期五晚上為了本該很明顯的問題除錯。
我在 Thunderbit 做內部工具和資料管線已經有一段時間了,可以很肯定地說:從「我的教學能跑 fetch」到「fetch 在正式環境也能穩定運作」之間的落差,正是大多數痛苦的來源。Reddit 上有位開發者說得很到位:「一旦進入正式環境,你就會發現自己需要比原生 fetch 更可靠的東西。」
還有另一位坦白說,「當了 3 年網頁開發者,我才知道 fetch API 的 catch 區塊不是用來處理 HTTP 錯誤的。」 這份指南會涵蓋大多數教學會跳過的五件事——錯誤陷阱、AbortController 逾時、重試邏輯、連線重用,以及什麼時候該超越 fetch 去做結構化資料擷取。如果你曾經在正式環境中遇過 fetch 呼叫默默失敗,這篇就是為你寫的。
什麼是 Node.js Fetch API?
Node.js Fetch API 是 Node.js 內建、相容瀏覽器的 HTTP 請求方式(GET、POST、PUT、DELETE 等),不需要安裝 Axios、node-fetch 或任何其他套件。如果你在瀏覽器裡用過 fetch(),你已經知道語法了。現在同一套 API 也能在伺服器端使用。
先看一下它的版本演進:
| 里程碑 | Node 版本 | 發生了什麼事 |
|---|---|---|
| 實驗性 fetch 標記 | v17.5.0 / v16.15.0 | fetch 以 --experimental-fetch 形式加入 |
| 預設全域 fetch | v18.0.0 | 實驗性 fetch 可全域使用,由 Undici 驅動 |
| 穩定版 fetch | v21.0.0 | 不再是實驗功能 |
| 2026 生產環境基準 | v22 LTS / v24 LTS | 建議用於正式環境;v20 已進入 EOL |
在底層,Node 的 fetch 由 Undici 驅動——這是一個專為 Node.js 設計的高效能 HTTP 用戶端。它不依賴較舊的內建 http 模組。實際好處是:你可以在瀏覽器程式碼、Express 後端、無伺服器函式,以及 CLI 腳本中,用同樣的方式使用現代化、基於 Promise 的 HTTP API。
為什麼 Node.js Fetch API 對你的專案很重要
在 Node 18 以前,每個新專案幾乎都從同一個流程開始:npm install axios 或 npm install node-fetch。到了 2026,如果你的專案跑在受維護的 Node LTS 版本上,基本 HTTP 請求已經不需要任何依賴。這對 bundle 大小、供應鏈安全,以及新手上手都是實際的好消息(前端與後端開發者終於能共用同一套 API)。
原生 fetch 的強項在這些情境:
| 情境 | 為什麼原生 fetch 很適合 | 正式環境注意事項 |
|---|---|---|
| Express/Fastify 後端呼叫 REST API | 熟悉的 async/await,沒有依賴 | 加上逾時與 response.ok 檢查 |
| 無伺服器函式(Lambda、Vercel 等) | 冷啟動面積小,免安裝套件 | 逾時要低於平台最大執行時間 |
| CLI 腳本與自動化 | 簡單 GET/POST,不用做專案初始化 | 為不穩定的 API 加上重試/退避 |
| Webhook 傳送或轉發 | 標準 HTTP 方法與標頭 | 不要盲目重試非冪等 POST |
| 報表與儀表板 | 很適合從 API 抓 JSON | 迴圈中使用分頁與連線池 |
| 微服務通訊 | 適合簡單的內部 HTTP 呼叫 | 若需要重試、hooks 或 HTTP/2,考慮直接用 Got 或 Undici |
對新的 Node 22+ 專案來說,原生 fetch 是合理的預設選項——除非你知道自己需要它不提供的功能(interceptors、內建重試、HTTP/2 等)。npm 下載量也說明了這個正在轉變的生態:node-fetch 每週仍有約 1.449 億次下載,但其中很多是舊專案與轉相依套件。Axios 約 1.086 億、Undici 約 1.06 億、Got 約 3600 萬、Ky 約 560 萬。趨勢很清楚:原生 fetch 已成新基準,而第三方用戶端則用於特定需求。
原生 Fetch vs node-fetch vs Axios vs Got vs Ky:2026 決策矩陣
我在開發者論壇最常看到的問題是:「在 Node.js 裡我該用哪個 HTTP 用戶端?」 有位 Reddit 使用者總結得很好:「既然語言/框架本身就有功能,為什麼還要再引入一個函式庫?」 這很合理——但答案還是要看你的需求。
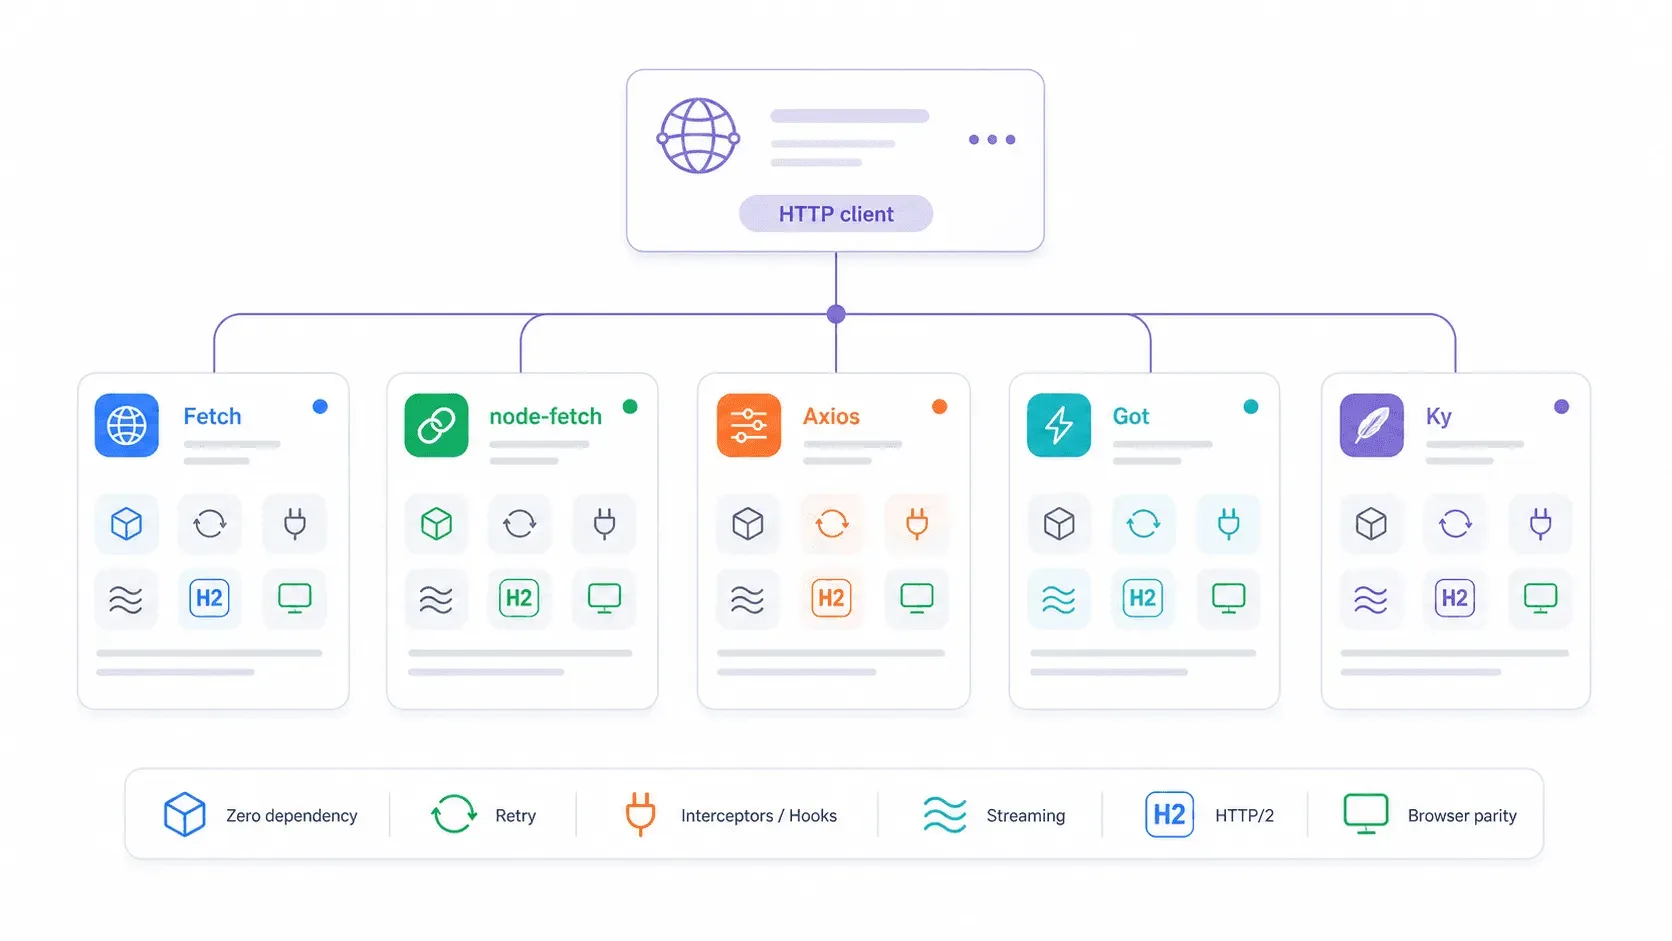
| 功能 | 原生 fetch | node-fetch v3 | axios | got v15 | ky v2 |
|---|---|---|---|---|---|
| Node.js 版本 | ≥18(建議 22/24 LTS) | ≥12.20 | 廣泛 | ≥22 | ≥22 |
| 是否需要安裝 | 否 | 是 | 是 | 是 | 是 |
| ESM + CJS 支援 | 兩者皆可(全域) | 僅 ESM(v3) | 兩者皆可 | 僅 ESM | 僅 ESM |
| 4xx/5xx 自動拒絕 | 否 | 否 | 是 | 是 | 是 |
| 內建重試 | 否 | 否 | 否 | 是 | 是 |
| Request interceptors | 否 | 否 | 是 | 是(hooks) | 是(hooks) |
| 串流支援 | Web ReadableStream | 是 | 有限 | 強大的 Node streams | 基於 fetch |
| Bundle/安裝體積 | 0 KB | 約 107 KB,3 個依賴 | 約 2.8 MB,4 個依賴 | 約 355 KB,12 個依賴 | 約 405 KB,0 個依賴 |
| HTTP/2 支援 | 透過 Undici dispatcher | 否 | 否 | 是 | 否(fetch wrapper) |
順帶一提 ESM/CJS 的麻煩:node-fetch v3 只支援 ESM,這讓很多使用 require() 的專案直接受影響。原生 fetch 是全域的——不管是 CJS 還是 ESM 檔案都能用,不需要任何 import 技巧。如果你因為 CommonJS 還卡在 node-fetch v2,原生 fetch 可以直接解掉這個問題。
至於早期穩定性疑慮:沒錯,Node 18 初期的 fetch 實作確實有過真實 bug。有位開發者在 Reddit 提到:「最近遇到 native node 18 fetch 的怪 bug,所以只好把我們的應用程式改掉。」 那是 2023 年的事。到了 2026,在 Node 22 與 24 LTS 之下,這些問題已經解決。原生 fetch 已可用於正式環境。
什麼時候應該繼續用原生 Fetch
當以下情況成立時,選原生 fetch:
- 你的專案跑在 Node 22 LTS 或 Node 24 LTS。
- 請求很單純,是標準 REST 呼叫(GET、POST、PUT、DELETE)。
- 你願意自己加一層小包裝處理
response.ok、JSON 解析、逾時與重試。 - 你希望完全沒有依賴,降低供應鏈風險。
- 你重視瀏覽器/伺服器 API 的一致性。
- 你在無伺服器或邊緣環境中,偏好使用內建 API。
什麼時候 Axios、Got 或 Ky 更適合
Axios 適合團隊依賴 request/response interceptors 的情境(例如自動刷新驗證 token、tenant 標頭、集中式記錄),當你希望 HTTP 錯誤預設就拒絕,或需要與較舊 Node 執行環境相容時。
Got 是為高吞吐量 Node 服務打造的,內建重試、hooks、進階逾時階段、串流、分頁輔助、Unix sockets、proxy/caching 工作流程,還有 HTTP/2 支援。它是 Node-only HTTP 工作的瑞士刀。
Ky 則是 fetch 簡潔性的甜蜜點:如果你喜歡 fetch 的寫法,但希望少一點樣板碼,Ky 會補上重試、逾時、hooks,以及 HTTPError,而且套件很小、零依賴。
如何用 Node.js Fetch API 發送 GET 請求
用 async/await 發送 GET 請求大概像這樣:
const response = await fetch('https://jsonplaceholder.typicode.com/posts/1');
const post = await response.json();
console.log(post.title);
// → "sunt aut facere repellat provident occaecati excepturi optio reprehenderit"
如果你偏好 .then() 串接,也可以這樣寫:
fetch('https://jsonplaceholder.typicode.com/posts/1')
  .then(response => response.json())
  .then(post => console.log(post.title))
  .catch(error => console.error(error));
兩種都能用。但目前都還不算適合正式環境(這點等一下會說明)。
你應該認識的 response 讀取方法:
| 方法 | 使用時機 |
|---|---|
response.json() | 伺服器回傳 JSON |
response.text() | 伺服器回傳 HTML、純文字、CSV、Markdown |
response.arrayBuffer() | 需要二進位資料(圖片、檔案) |
response.body | 需要串流/分塊處理 |
更好的模式是這樣——真的會檢查錯誤:
async function getPost(id) {
  const response = await fetch(`https://jsonplaceholder.typicode.com/posts/${id}`);
  if (!response.ok) {
    throw new Error(`HTTP ${response.status} ${response.statusText}`);
  }
  return response.json();
}

const post = await getPost(1);
console.log(post.title);
這一行 if (!response.ok),就是教學範例和正式程式碼的差別。這也帶我們進入最大的陷阱。
如何用 Node.js Fetch API 發送 POST 請求
POST 請求的結構一樣——只是設定 method、headers 和 body:
const response = await fetch('https://jsonplaceholder.typicode.com/posts', {
  method: 'POST',
  headers: {
    'Content-Type': 'application/json',
  },
  body: JSON.stringify({
    title: 'Node fetch guide',
    body: '正式環境的 fetch 需要錯誤處理。',
    userId: 1,
  }),
});

if (!response.ok) {
  throw new Error(`HTTP ${response.status}`);
}

const created = await response.json();
console.log(created.id); // → 101
發送其他請求類型(PUT、DELETE、PATCH)
PUT、PATCH 和 DELETE 只是 method 的值不同,其餘結構完全相同:
// PUT — 完整取代
await fetch('https://jsonplaceholder.typicode.com/posts/1', {
  method: 'PUT',
  headers: { 'Content-Type': 'application/json' },
  body: JSON.stringify({ id: 1, title: 'Replaced', body: 'Full replacement', userId: 1 }),
});

// PATCH — 部分更新
await fetch('https://jsonplaceholder.typicode.com/posts/1', {
  method: 'PATCH',
  headers: { 'Content-Type': 'application/json' },
  body: JSON.stringify({ title: 'Partial update' }),
});

// DELETE
await fetch('https://jsonplaceholder.typicode.com/posts/1', {
  method: 'DELETE',
});
Express 的 body-parser 陷阱: 如果你把 JSON POST 到 Express 伺服器,而 req.body 回傳 undefined,通常修正方式都一樣:用 express.json(),不要用 express.urlencoded()。伺服器需要在路由之前先加上 express.json() middleware,才能解析 Content-Type: application/json 的請求內容。這是關於 Express 最常見的 Stack Overflow 問題之一,而且每次都會有人踩雷。
import express from 'express';
const app = express();
app.use(express.json()); // ← JSON POST body 需要這個
app.post('/api/posts', (req, res) => {
  res.json({ received: req.body });
});
會讓正式環境應用程式出問題的 fetch() 錯誤陷阱
大多數正式環境的 fetch bug 都來自這裡。
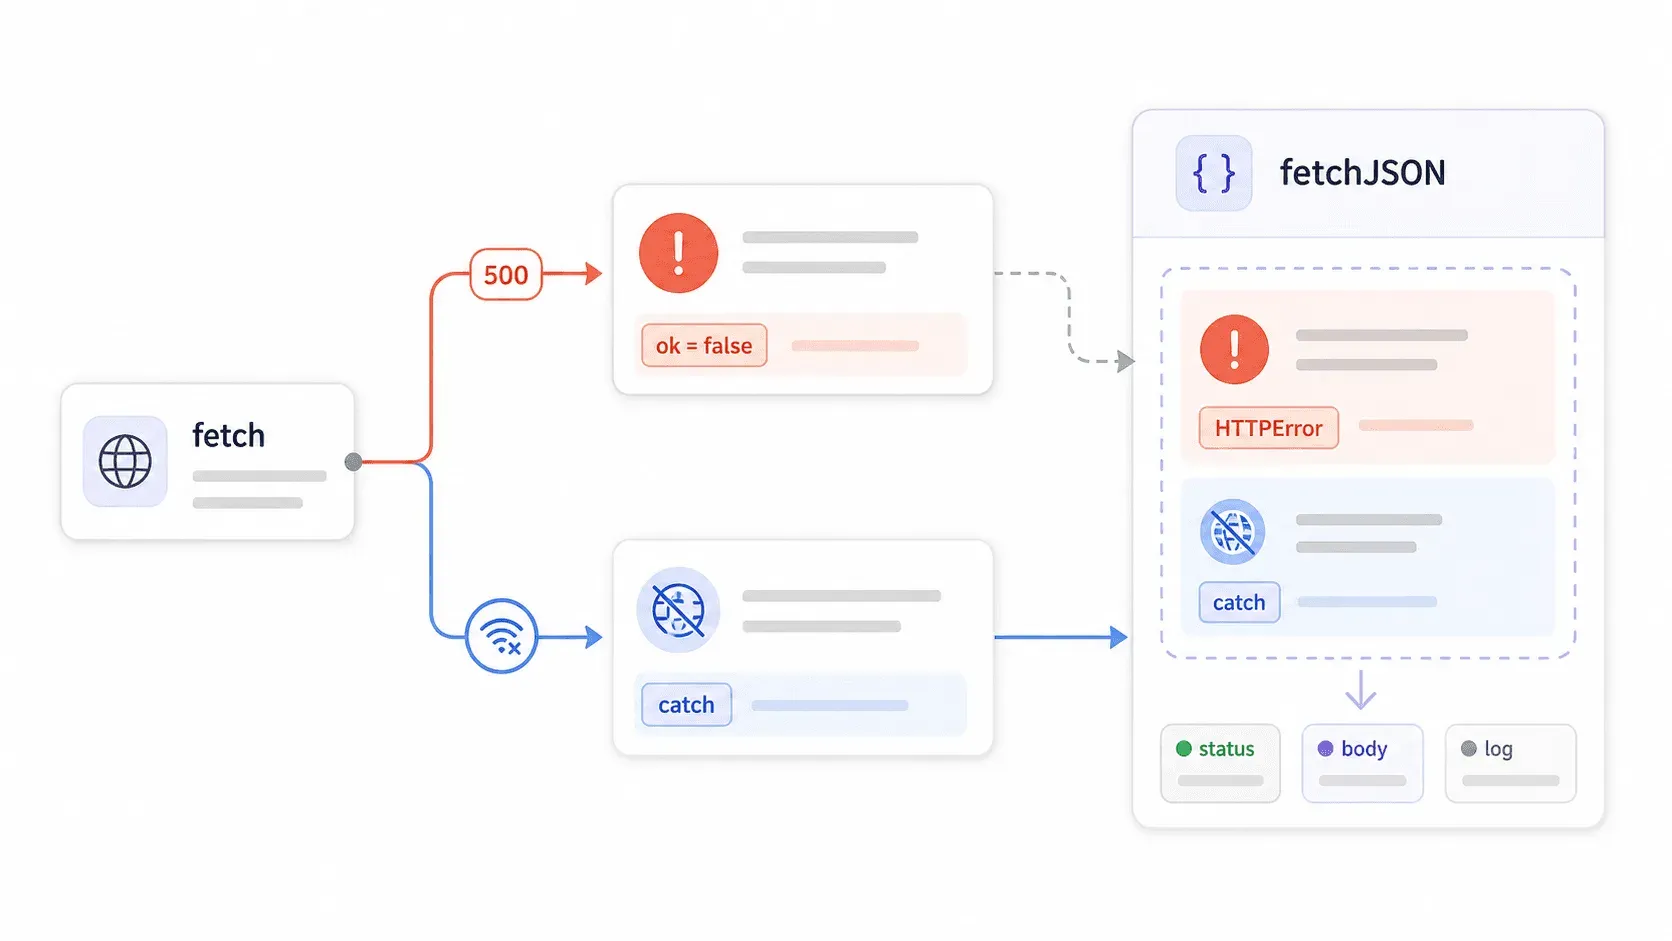
fetch() 不會在 HTTP 4xx 或 5xx 錯誤時拒絕它的 promise。 它只會在網路層級失敗時拒絕——像是 DNS 錯誤、沒有網路、請求被中止。如果伺服器回傳 403 Forbidden 或 500 Internal Server Error,fetch 仍然把它視為 成功 的回應。你的 .catch() 區塊不會執行。你的 try/catch 也抓不到。你的程式會很開心地處理伺服器送回來的任何內容。
MDN 文件把這件事寫得很清楚,但大多數教學都輕描淡寫。結果就是?像下面這種程式看起來沒問題,卻會默默吞掉錯誤:
try {
  const response = await fetch('https://api.example.com/private');
  const data = await response.json(); // ← 即使是 403 這行也會執行
  console.log('看起來成功了:', data);
} catch (error) {
  // 只有網路層級失敗才會進到這裡
  console.error('捕捉到:', error);
}
快速拆解一下每種寫法實際能抓到什麼:
| 模式 | 能抓到網路錯誤 | 能抓到 4xx/5xx | 能安全解析 JSON | 可重複使用 |
|---|---|---|---|---|
原始 .then(res => res.json()) | 是(透過 .catch()) | 否 | 沒有 content-type 保護 | 否 |
搭配 await fetch() 的 try/catch | 是 | 否 | 沒有 content-type 保護 | 否 |
每次手動寫 if (!res.ok) | 是 | 是 | 取決於每個呼叫 | 部分 |
自訂 fetchJSON() 包裝 | 是 | 是 | 是 | 是 |
建立可重複使用的 fetchJSON() 包裝器
做一個包裝器,然後到處引用它。不要再把 if (!response.ok) 複製貼到每個檔案:
export class HTTPError extends Error {
  constructor(message, { status, statusText, url, body }) {
    super(message);
    this.name = 'HTTPError';
    this.status = status;
    this.statusText = statusText;
    this.url = url;
    this.body = body;
  }
}

export async function fetchJSON(url, options = {}) {
  const response = await fetch(url, {
    headers: {
      Accept: 'application/json',
      ...options.headers,
    },
    ...options,
  });

  const contentType = response.headers.get('content-type') || '';
  const isJSON = contentType.includes('application/json');
  const body = isJSON ? await response.json().catch(() => null) : await response.text();

  if (!response.ok) {
    throw new HTTPError(`HTTP ${response.status} ${response.statusText}`, {
      status: response.status,
      statusText: response.statusText,
      url: response.url,
      body,
    });
  }

  return body;
}
現在,當伺服器回傳 403 時:
try {
  const data = await fetchJSON('https://api.example.com/private');
} catch (error) {
  if (error instanceof HTTPError) {
    console.error(`伺服器回傳 ${error.status}:`, error.body);
  } else {
    console.error('網路或其他失敗:', error);
  }
}
這個錯誤物件會帶有狀態碼、回應內容和 URL——記錄、告警或對使用者顯示訊息時需要的資訊都有了。只要匯入一次,到處都能用。
AbortController 與逾時:Node.js Fetch API 的正式環境寫法
如果沒有逾時,當遠端伺服器沒有回應時,fetch 呼叫就會無限期卡住。你的 Express 路由被阻塞。你的 Lambda 把執行額度燒光。你的腳本就這樣……停在那裡。
我查了前幾個搜尋結果:沒有任何一篇專門講 Node.js 的 fetch 教學有涵蓋請求取消或逾時。但逾時正是很多開發者還是選 Axios 或 Got 的原因之一。甚至有個 Reddit 討論串標題就叫 「Node fetch does not timeout」。
使用 AbortSignal.timeout()(Node 18.11+)
最簡單的方法——只多一個選項:
try {
  const response = await fetch('https://api.example.com/data', {
    signal: AbortSignal.timeout(5000), // 5 秒
  });

  if (!response.ok) throw new Error(`HTTP ${response.status}`);
  const data = await response.json();
  console.log(data);
} catch (error) {
  if (error.name === 'TimeoutError') {
    console.error('請求在 5 秒後逾時。');
  } else {
    throw error;
  }
}
注意:AbortSignal.timeout() 丟出的是 TimeoutError,不是 AbortError。這是連一些有經驗的開發者都可能搞錯的細節。
使用 AbortController 手動設定逾時
如果你需要更多控制,或是要根據使用者操作取消請求,而不只是單純靠計時器:
const controller = new AbortController();
const timeout = setTimeout(() => controller.abort(), 5000);

try {
  const response = await fetch('https://api.example.com/data', {
    signal: controller.signal,
  });
  const data = await response.json();
  console.log(data);
} catch (error) {
  if (error.name === 'AbortError') {
    console.error('請求已被手動中止。');
  } else {
    throw error;
  }
} finally {
  clearTimeout(timeout);
}
處理 AbortError 與 TimeoutError 的差異
這個區別對記錄與使用者訊息都很重要:
| 中止路徑 | catch 區塊中的錯誤名稱 |
|---|---|
AbortSignal.timeout(ms) | TimeoutError |
controller.abort() | AbortError |
| DNS/網路失敗 | 通常是 TypeError: fetch failed |
下面是一個實際情境——Express 路由呼叫外部 API,且必須在 3 秒內回應:
app.get('/dashboard', async (req, res, next) => {
  try {
    const data = await fetchJSON('https://api.example.com/report', {
      signal: AbortSignal.timeout(3000),
    });
    res.json(data);
  } catch (error) {
    if (error.name === 'TimeoutError') {
      res.status(504).json({ error: '上游 API 逾時' });
      return;
    }
    next(error);
  }
});
沒有這種寫法,緩慢的上游 API 會把你的整個路由卡住,直到客戶端放棄為止。
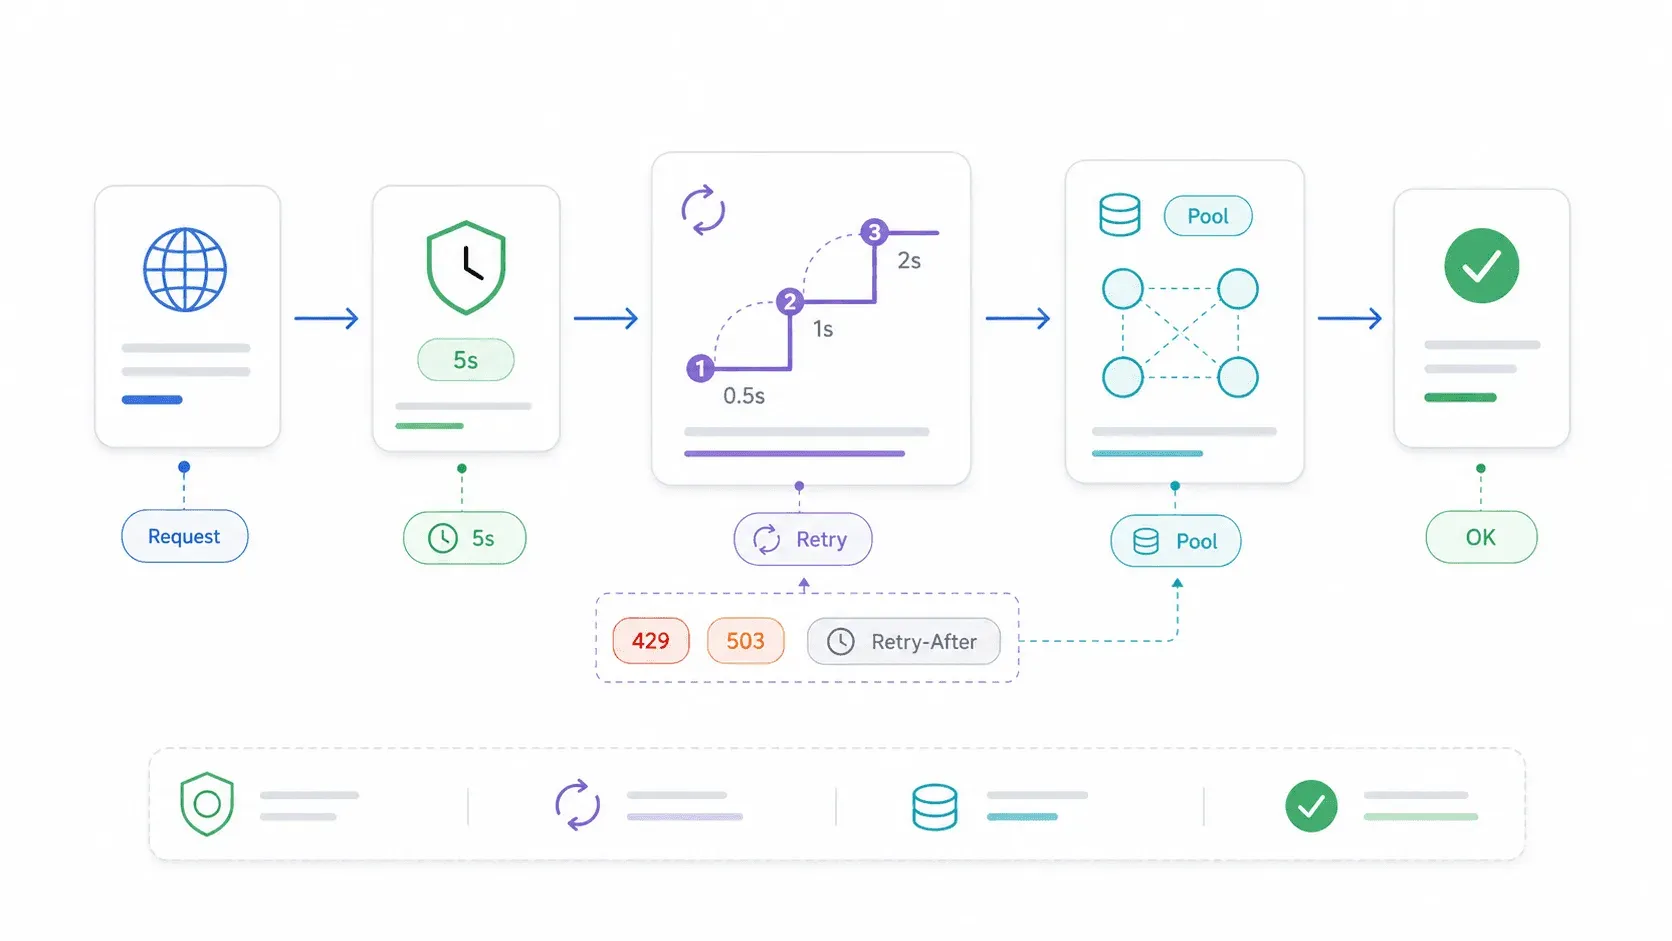
重試邏輯與連線重用:把 Node.js Fetch API 提升到正式環境等級
原生 fetch 沒有內建重試。一次短暫網路抖動或臨時的 503,就會讓請求直接失敗。對正式環境中大多數讀取操作來說,這是不能接受的。
可組合的重試包裝器,搭配指數退避
這段刻意寫得很短——實際邏輯大概只有 10 行:
const wait = ms => new Promise(resolve => setTimeout(resolve, ms));

export async function fetchWithRetry(url, options = {}, retries = 2) {
  for (let attempt = 0; ; attempt++) {
    try {
      const response = await fetch(url, options);
      if (response.ok || ![408, 429, 500, 502, 503, 504].includes(response.status)) {
        return response;
      }
      if (attempt >= retries) return response;
    } catch (error) {
      if (attempt >= retries) throw error;
    }
    await wait(250 * 2 ** attempt); // 250ms、500ms、1000ms...
  }
}
什麼時候該重試,什麼時候不該
- 應該重試: 冪等的 GET 與 HEAD 請求、短暫性狀態碼(408、429、500、502、503、504)、短暫網路抖動。
- 不應該重試: 會建立紀錄、扣款、或觸發副作用的非冪等 POST 請求——除非你有使用 idempotency key。
- 尊重 Retry-After: 對 429(速率限制)和 503(服務不可用),在退避之前先檢查
Retry-After標頭。
如果你不想自己寫重試邏輯,Ky 是一個輕量級的 fetch 包裝器,內建重試、逾時、hooks 和 HTTPError,而且零依賴。
使用 Undici 的 Agent 與 Pool 做連線重用
對高吞吐量迴圈——抓取數百個頁面、批次呼叫 API、輪詢服務——重用 TCP 連線可以省下很多時間。每建立一條新連線,就代表要重新做 DNS 查詢、TCP 握手,以及(對 HTTPS 而言)TLS 協商。
因為 Node 的 fetch 是由 Undici 驅動,所以你可以傳入自訂 dispatcher:
import { Agent } from 'undici';

const agent = new Agent({
  keepAliveTimeout: 10_000,
  keepAliveMaxTimeout: 60_000,
});

const response = await fetch('https://api.example.com/data', {
  dispatcher: agent,
});
如果要針對特定來源做更細的控制:
import { Pool } from 'undici';

const pool = new Pool('https://api.example.com', { connections: 10 });

const response = await fetch('https://api.example.com/data', {
  dispatcher: pool,
});

// 用完後:
await pool.close();
Undici README 的基準測試 顯示,連線重用與池化能大幅提升吞吐量——他們本地測試中 undici - dispatch 約 22,234 req/sec,而 undici - fetch 約 5,904 req/sec。實際數字會不同,但方向很明確:如果你對同一個來源發送大量請求,pooling 很重要。
還有一件事:一定要消耗或取消 response body。未被消耗的 body 可能會讓 Node 的 HTTP 內部資源洩漏。
使用 Node.js Fetch API 處理串流回應
大檔下載、分塊 JSON 資料流、server-sent events、LLM 輸出——這些情境如果一定要等整個回應完成才處理,會浪費時間和記憶體。串流可以讓你在資料到達時就開始處理。
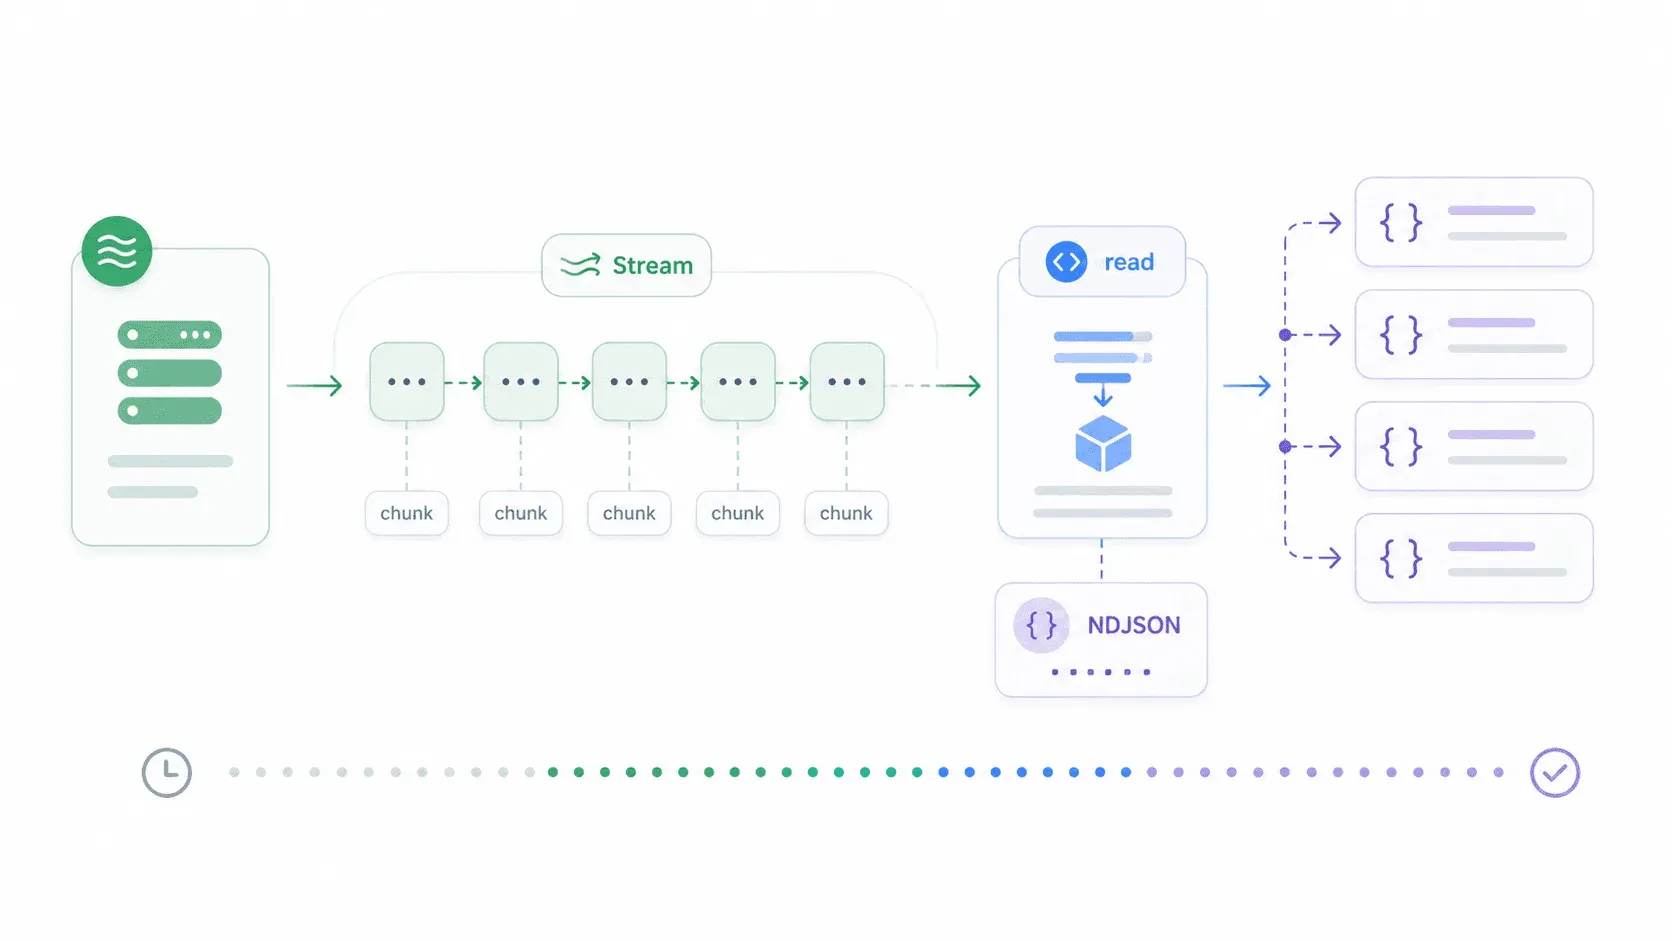
Node 18+ 已包含與瀏覽器相容的 ReadableStream。下面示範如何串流一個以換行分隔的 JSON 回應,並在每一行到達時立即處理:
const response = await fetch('https://example.com/large-file.ndjson');
if (!response.ok) throw new Error(`HTTP ${response.status}`);

const reader = response.body.getReader();
const decoder = new TextDecoder();
let buffer = '';

while (true) {
  const { value, done } = await reader.read();
  if (done) break;

  buffer += decoder.decode(value, { stream: true });

  let newlineIndex;
  while ((newlineIndex = buffer.indexOf('\n')) >= 0) {
    const line = buffer.slice(0, newlineIndex).trim();
    buffer = buffer.slice(newlineIndex + 1);
    if (line) {
      const item = JSON.parse(line);
      console.log('已處理:', item.id);
    }
  }
}
如果只是想串流純文字(例如把 LLM 輸出直接接到 stdout):
const response = await fetch('https://example.com/stream');
const reader = response.body.getReader();
const decoder = new TextDecoder();

for (;;) {
  const { value, done } = await reader.read();
  if (done) break;
  process.stdout.write(decoder.decode(value, { stream: true }));
}
串流是原生 fetch 和 Got 都表現很好的地方。Axios 的串流支援則相對有限。
當 fetch() 遇到限制:用 API 做結構化網頁爬取
總有一天,fetch 不再是瓶頸。真正的問題會變成:「我拿到 HTML 了,接下來呢?」
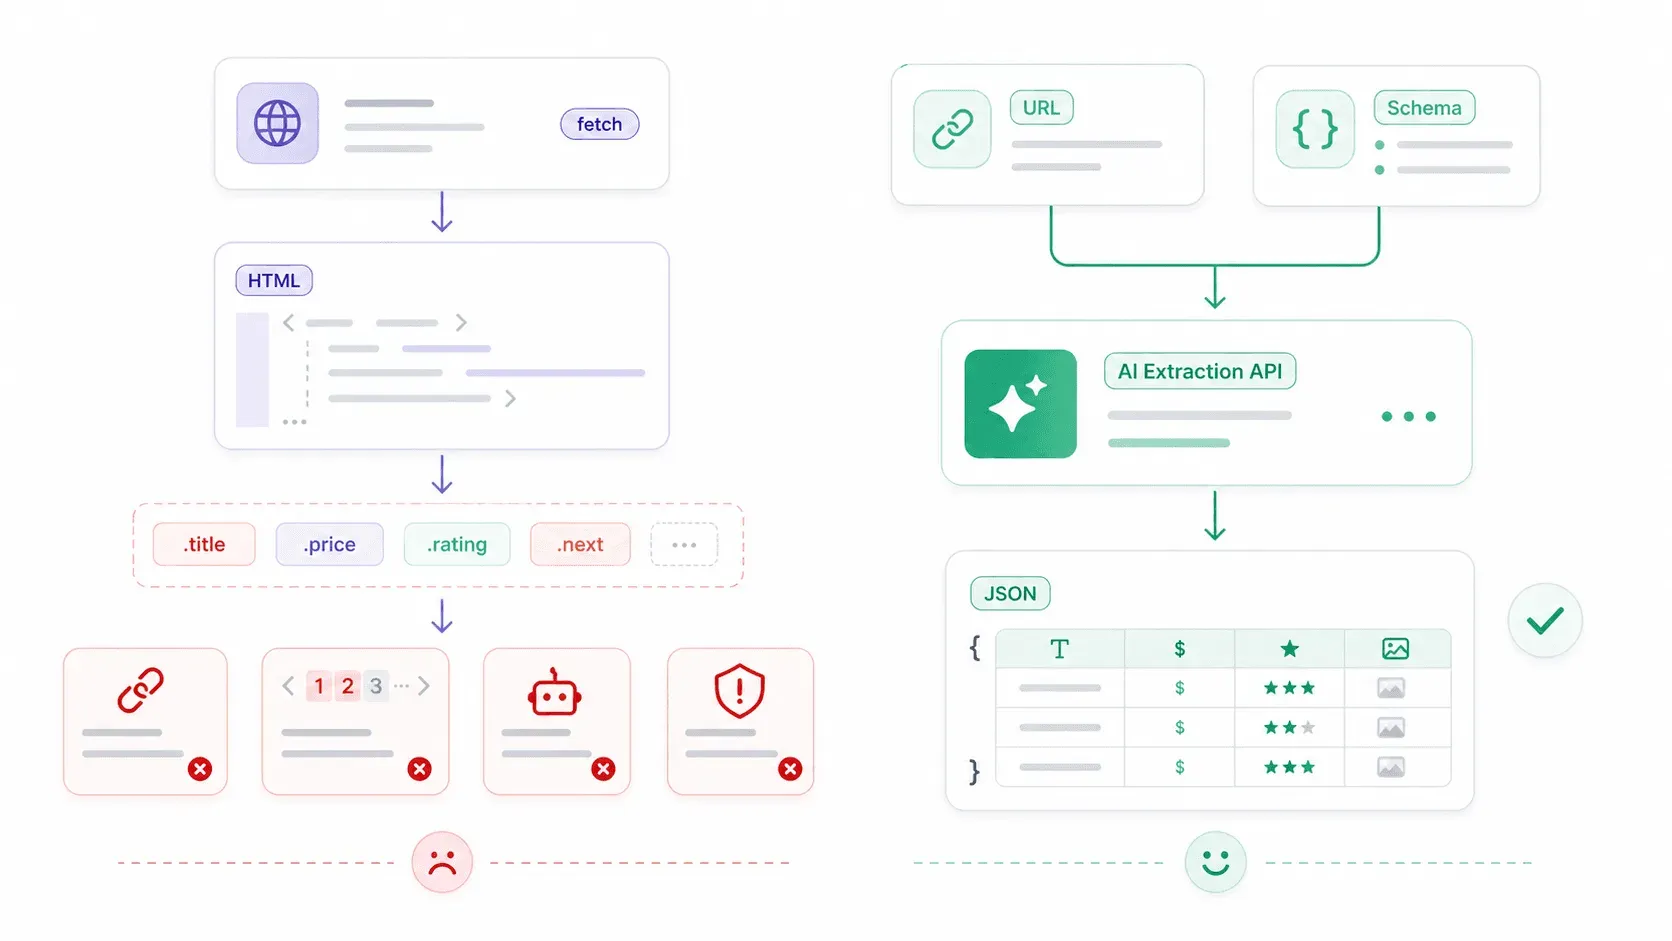
Fetch 是 HTTP 用戶端——它只會取回 bytes、文字、JSON 或 HTML。它不懂商品卡片、價格、評分,或聯絡人表格。對結構化網頁爬取來說,典型的原始技術棧長這樣:
- 用
fetch()下載 HTML - 用 Cheerio(或類似工具)以 CSS selector 選取元素
- 自訂分頁邏輯
- 當頁面由前端 JavaScript 渲染時,還要處理 JS 執行
- 處理 proxy/反爬蟲/CAPTCHA
- 每次網站版型改變都要維護 selector
下面是一個典型的 fetch + Cheerio 範例——大約 15 行就能爬出商品標題:
import * as cheerio from 'cheerio';

const response = await fetch('https://example-store.com/products');
if (!response.ok) throw new Error(`HTTP ${response.status}`);

const html = await response.text();
const $ = cheerio.load(html);

const products = $('.product-card')
  .map((_, el) => ({
    name: $(el).find('.product-title').text().trim(),
    price: $(el).find('.price').text().trim(),
    url: new URL($(el).find('a').attr('href'), response.url).href,
  }))
  .get();

console.log(products);
這個方法適合 HTML 穩定、結構可預測的頁面。但它很快就會變得脆弱——JavaScript 渲染內容、class 名稱變動、反爬措施和分頁,全部都會增加複雜度。
Thunderbit 的開放 API:一次呼叫,從原始 HTML 到結構化資料
這就是另一種工具開始變得有用的地方。在 Thunderbit ,我們做了一層 API,幫你處理那些麻煩事——JavaScript 渲染、反爬保護、版型變動——讓你專注於真正想要的資料。
Distill API(POST /distill):把任何 URL 轉成乾淨的 Markdown。適合餵給 LLM、建立知識庫或做內容分析——不需要 HTML parser。
Extract API(POST /extract):定義一份描述你要的結構化資料的 JSON Schema(商品名稱、價格、評分),AI 就會幫你抽取。沒有 CSS selector,也不會因為版型變動而壞掉。
下面是同一個商品爬取任務,改用 Thunderbit 的 Extract API——透過原生 fetch 呼叫:
const response = await fetch('https://openapi.thunderbit.com/openapi/v1/extract', {
  method: 'POST',
  headers: {
    Authorization: `Bearer ${process.env.THUNDERBIT_API_KEY}`,
    'Content-Type': 'application/json',
  },
  body: JSON.stringify({
    url: 'https://example-store.com/products',
    renderMode: 'basic',
    schema: {
      type: 'object',
      properties: {
        products: {
          type: 'array',
          items: {
            type: 'object',
            properties: {
              name: { type: 'string', description: '商品名稱' },
              price: { type: 'string', description: '顯示的商品價格' },
              rating: { type: 'number', description: '平均顧客評分' },
            },
            required: ['name', 'price'],
          },
        },
      },
      required: ['products'],
    },
  }),
});

if (!response.ok) throw new Error(`Thunderbit API: ${response.status}`);
const result = await response.json();
console.log(result.data);
對比很明顯:大約 15 行 fetch + Cheerio(外加脆弱的 selector),和一次回傳乾淨 JSON 的 API 呼叫。對批次工作而言,Thunderbit 支援每次批次 extract 最多 50 個 URL、每次批次 distill 最多 100 個 URL。
Thunderbit 不是 fetch 的替代品——fetch 是傳輸層。當原始 HTML 解析本身變成真正的問題時,你會需要 Thunderbit 這一層擷取工具。如果你對價格有興趣,免費方案 提供 600 個 API 單位可供試用,付費方案則從每月 6 美元起。你也可以直接看 Thunderbit Chrome Extension ,在瀏覽器中無程式碼擷取資料。
若想更深入了解結構化爬取方法,我們關於 最佳資料擷取工具、如何建立網頁爬蟲 以及 將網站資料抓取到 Excel 的指南,會更詳細地介紹不同工作流程。
快速參考:Node.js Fetch API 備忘表
這一段很適合加書籤。需要可直接複製貼上的範例時再回來看。
| 模式 | 範例 |
|---|---|
| 基本 GET | const res = await fetch(url); const data = await res.json(); |
| 基本 POST | await fetch(url, { method: 'POST', headers: { 'Content-Type': 'application/json' }, body: JSON.stringify(payload) }); |
| HTTP 錯誤檢查 | if (!res.ok) throw new Error(\\HTTP ${res.status}\); |
| 逾時(簡單) | await fetch(url, { signal: AbortSignal.timeout(5000) }); |
| 手動中止 | const c = new AbortController(); setTimeout(() => c.abort(), 5000); await fetch(url, { signal: c.signal }); |
| 重試狀態碼 | 重試 408、429、500、502、503、504。不要盲目重試 POST。 |
| JSON 包裝器 | 使用 fetchJSON() 檢查 ok、解析 content type、丟出 HTTPError。 |
| 連線池 | import { Pool } from 'undici'; const pool = new Pool(origin, { connections: 10 }); fetch(url, { dispatcher: pool }); |
| 串流分塊 | const reader = res.body.getReader(); loop over await reader.read() |
| 結構化擷取 | 當目標是網頁欄位而不是原始 HTML 時,使用 Thunderbit Extract API。 |
結論與重點整理
到了 2026,Node.js 的原生 fetch 已經可用於正式環境——新專案不需要 node-fetch,也不一定要預設依賴 Axios。但單靠原始 fetch(),本身還稱不上完整的正式環境 HTTP 策略。
大多數教學會跳過的五件事——也正是這份指南涵蓋的內容:
- 錯誤陷阱:
fetch()不會在 4xx/5xx 時丟錯。務必檢查response.ok,或使用像fetchJSON()這樣的包裝器。 - 逾時: 單純情境可用
AbortSignal.timeout()。AbortSignal.timeout()會丟出TimeoutError;手動controller.abort()會丟出AbortError。 - 重試邏輯: 不是內建的。對冪等請求與短暫失敗加上指數退避;或者直接用 Ky,開箱即有 fetch 風格的重試。
- 連線重用: 對高吞吐量迴圈,透過
dispatcher選項使用 Undici 的Agent或Pool。 - 結構化擷取: 當你要的是網頁中的資料欄位,而不只是原始 HTML,與其維護脆弱的 CSS selector,不如考慮像 Thunderbit 這樣的擷取 API。
一句話的決策矩陣:大多數專案用原生 fetch;需要 interceptors 用 Axios;需要內建重試與 HTTP/2 用 Got;想要 fetch 但預設更好用就選 Ky;而當你的 fetch 型爬取腳本複雜到難以維護時,就用 Thunderbit 的 API。
試試這份指南中的寫法。如果你想看看 Thunderbit 如何處理結構化擷取,免費方案 是很好的起點——或者也可以到 Thunderbit YouTube 頻道 看操作示範。
試用 Thunderbit 進行 AI 網頁爬蟲 Get Started Free
常見問題
1. Node.js 內建 fetch 嗎?還是需要安裝?
Fetch 自 Node.js 18 之後就已內建——不需要安裝。它在 Node 21 變成穩定版,並且在 Node 22 LTS 與 Node 24 LTS 中完整支援。如果你用的是更舊的 Node 版本,可以安裝 node-fetch npm 套件,但新專案應該以受維護的 LTS 版本為目標。
2. fetch 遇到 404 或 500 會丟錯嗎?
不會。Fetch 只會在網路層級失敗時拒絕 promise(DNS 錯誤、沒有連線、請求中止)。像 404、403、500 這類 HTTP 回應會正常 resolve,但 response.ok === false。你必須明確檢查 response.ok 或 response.status——或者使用本指南展示的 fetchJSON() 包裝器。
3. 要怎麼在 Node.js 的 fetch 加上逾時?
最簡單的做法是使用 AbortSignal.timeout(ms),Node 18.11 起可用:await fetch(url, { signal: AbortSignal.timeout(5000) })。如果請求超過 5 秒,它會丟出 TimeoutError。若要更多控制,可以手動建立 AbortController,再用 setTimeout 呼叫 controller.abort()。手動模式請捕捉 AbortError;AbortSignal.timeout() 則對應 TimeoutError。
4. 可以在 Node.js 用 fetch 做網頁爬蟲嗎?
可以,但 fetch 只會回傳原始 HTML。你還需要像 Cheerio 這樣的 parser 來擷取特定元素,另外也要自己處理分頁、由 JavaScript 渲染的頁面,以及反爬措施。如果要大規模擷取結構化資料——例如乾淨的 JSON 商品名稱、價格或聯絡資訊——可以考慮 Thunderbit 的 Extract API,它會用 AI 回傳結構化資料,不需要 CSS selector 或依賴版型的程式碼。
5. 到了 2026,我應該從 Axios 轉成原生 fetch 嗎?
對於 Node 22+ 的新專案,原生 fetch 是很強的預設選項。它零依賴、基於 Promise,而且和瀏覽器 fetch 使用相同 API。如果你依賴 request/response interceptors、預設 HTTP 錯誤拒絕,或需要與舊版 Node 相容,就保留 Axios。兩者都合理——關鍵在於你的專案實際用了哪些功能。
了解更多