
Let’s face it: nobody dreams of spending their day copying and pasting leads from a website into Salesforce. Yet, for years, that’s exactly what sales and operations teams have been stuck doing—losing precious time, risking typos, and sometimes watching hot leads go cold before anyone even picks up the phone. I’ve seen firsthand how a slow lead response can kill deals. In fact, the average lead response time is , and only 27% of leads ever get contacted at all. But here’s the kicker: if you can reach out within just one minute, you’re looking at nearly .
That’s why automating web-to-lead capture is such a big deal. In this guide, I’ll walk you through exactly what Salesforce Web to Lead is, how to set it up step by step (with tips from the trenches), how to design forms that actually convert, and how AI tools like can take your lead capture to a whole new level—no more manual entry, no more lost opportunities.
What is Salesforce Web to Lead and How Does It Work?
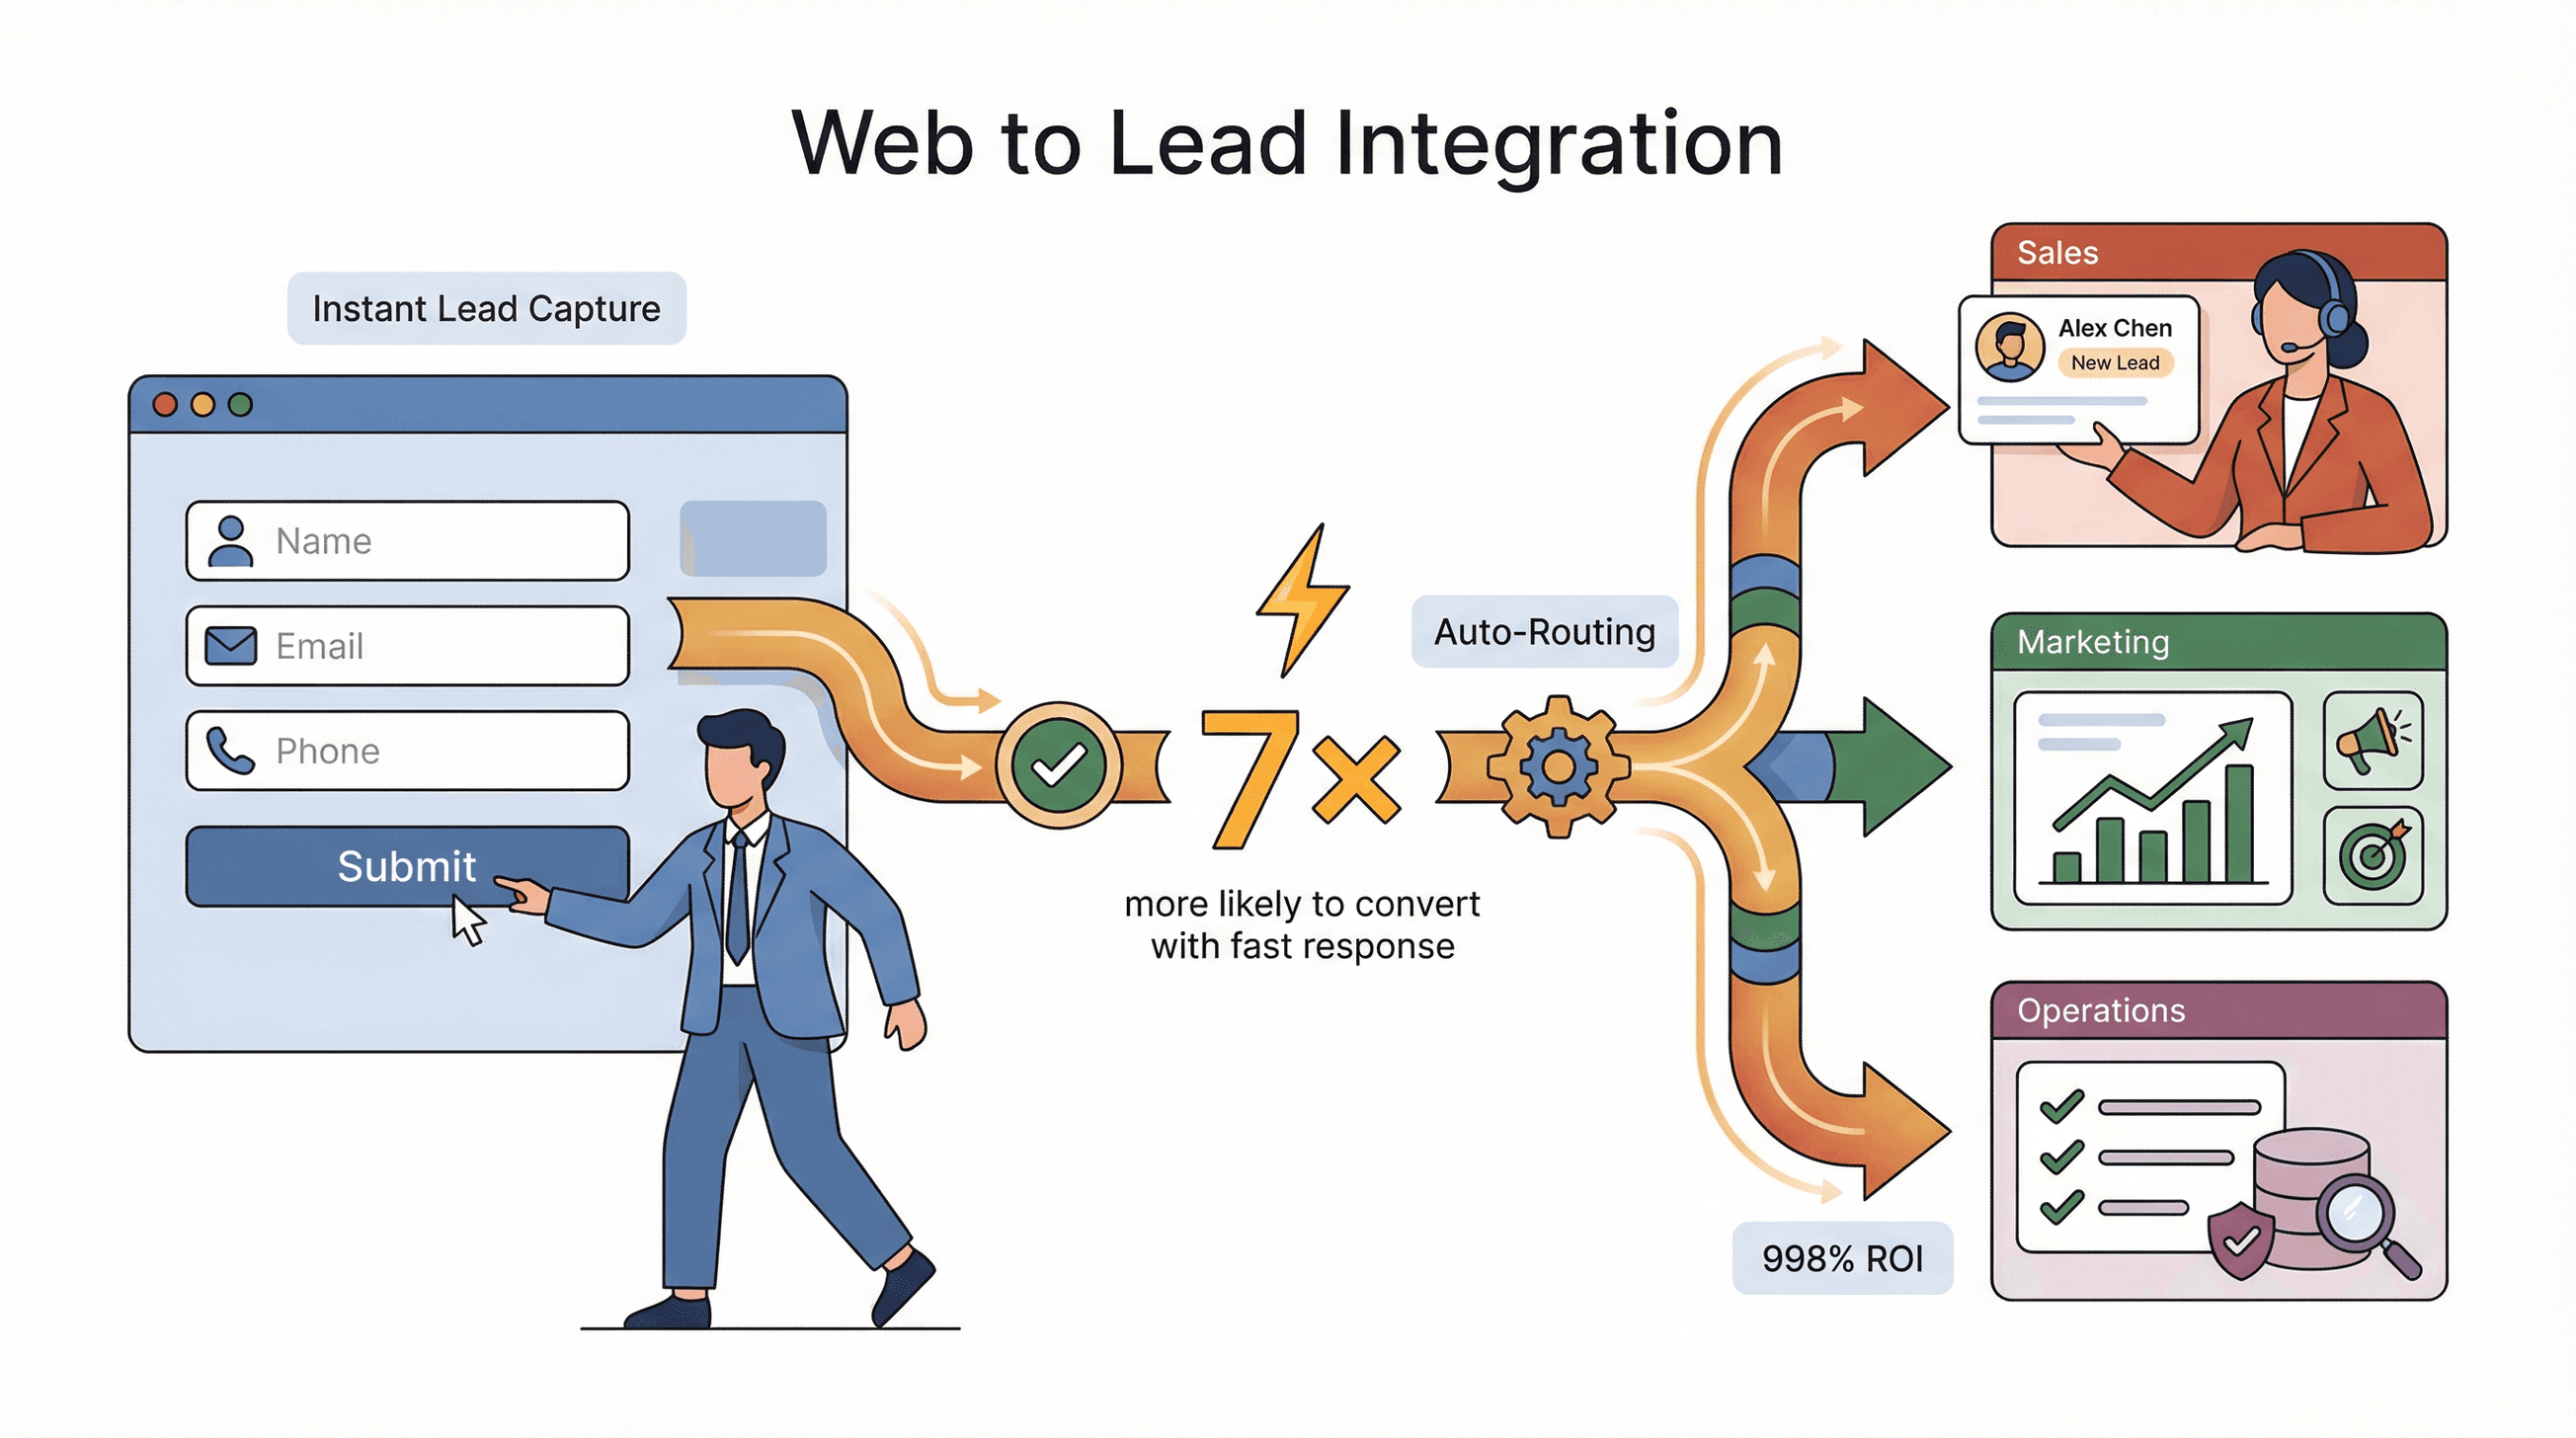
Let’s start with the basics. Salesforce Web to Lead is a built-in feature that lets you automatically turn website form submissions into Salesforce leads—no copy-paste required. You generate an HTML form in Salesforce, embed it on your site, and every time someone fills it out, their info is sent straight to your CRM as a new lead record (). This is a huge upgrade from the old-school method of collecting inquiries via email or spreadsheets and then manually entering them into Salesforce.
Here’s a simple analogy: imagine your website as a fishing net, and Salesforce Web to Lead as a conveyor belt that instantly delivers every fish (lead) you catch straight to your sales team—clean, sorted, and ready to go.
How it works:
- Visitor fills out your website form.
- The form POSTs data directly to Salesforce.
- A new Lead record is created instantly, triggering assignment rules, auto-responses, and workflows.
No more bottlenecks, no more “Did anyone follow up with this lead?” moments.
Why Web to Lead Integration Matters for Sales and Operations Teams
 The ROI here is real. Automating web-to-lead capture means:
- Faster lead response: Companies that reply within an hour are to have meaningful sales conversations.
- Fewer errors: Manual entry is notorious for typos, duplicates, and missing info. Automation ensures every field is captured, every time.
- Improved follow-up: Leads are routed instantly to the right rep or queue, so nobody slips through the cracks.
Let’s put it in perspective:
| Aspect | Manual Entry | Salesforce Web to Lead | AI-Powered (Thunderbit) |
|---|---|---|---|
| Speed | Slow (avg. 47 hrs to respond) | Instant lead creation | Instant, plus scheduled scraping |
| Accuracy | Prone to typos, missing fields | Structured, but limited validation | AI cleans, labels, and enriches data |
| Resource Needs | High (staff time, burnout risk) | Moderate (setup, then low maintenance) | Low (AI handles mapping, validation, exports) |
| Scalability | Limited by human bandwidth | Up to 500 leads/day | Cloud-based, thousands of leads at once |
Use cases:
- Sales: Immediate, pre-qualified leads from web campaigns.
- Marketing: End-to-end campaign tracking (lead source to CRM outcome).
- Operations: Consistent data entry, less time spent on cleanup.
One after enabling web-to-lead, and another reported a after adopting CRM and web-to-lead automation.
Web to Lead vs. Traditional Sales Processes: What’s the Difference?
Let’s break it down with a before-and-after:
Before (Traditional):
- A visitor fills out a generic form or emails your team.
- Someone (usually a sales admin or rep) copies the info into Salesforce.
- There’s a delay—sometimes hours, sometimes days.
- Typos, missed fields, and duplicate entries are common.
- Leads get cold, and marketing can’t track which campaigns worked.
After (Web to Lead):
- The form submits directly to Salesforce.
- A Lead record is created instantly, routed by assignment rules.
- Sales reps get notified right away and can follow up while the lead is still hot.
- Data is consistent, complete, and ready for reporting.
It’s like trading in your old flip phone for a smartphone—suddenly, everything is faster, smarter, and more reliable.
Step-by-Step Guide: How to Manually Create a Salesforce Web to Lead Form
 Ready to set it up? Here’s how to create a Salesforce Web to Lead form, step by step:
-
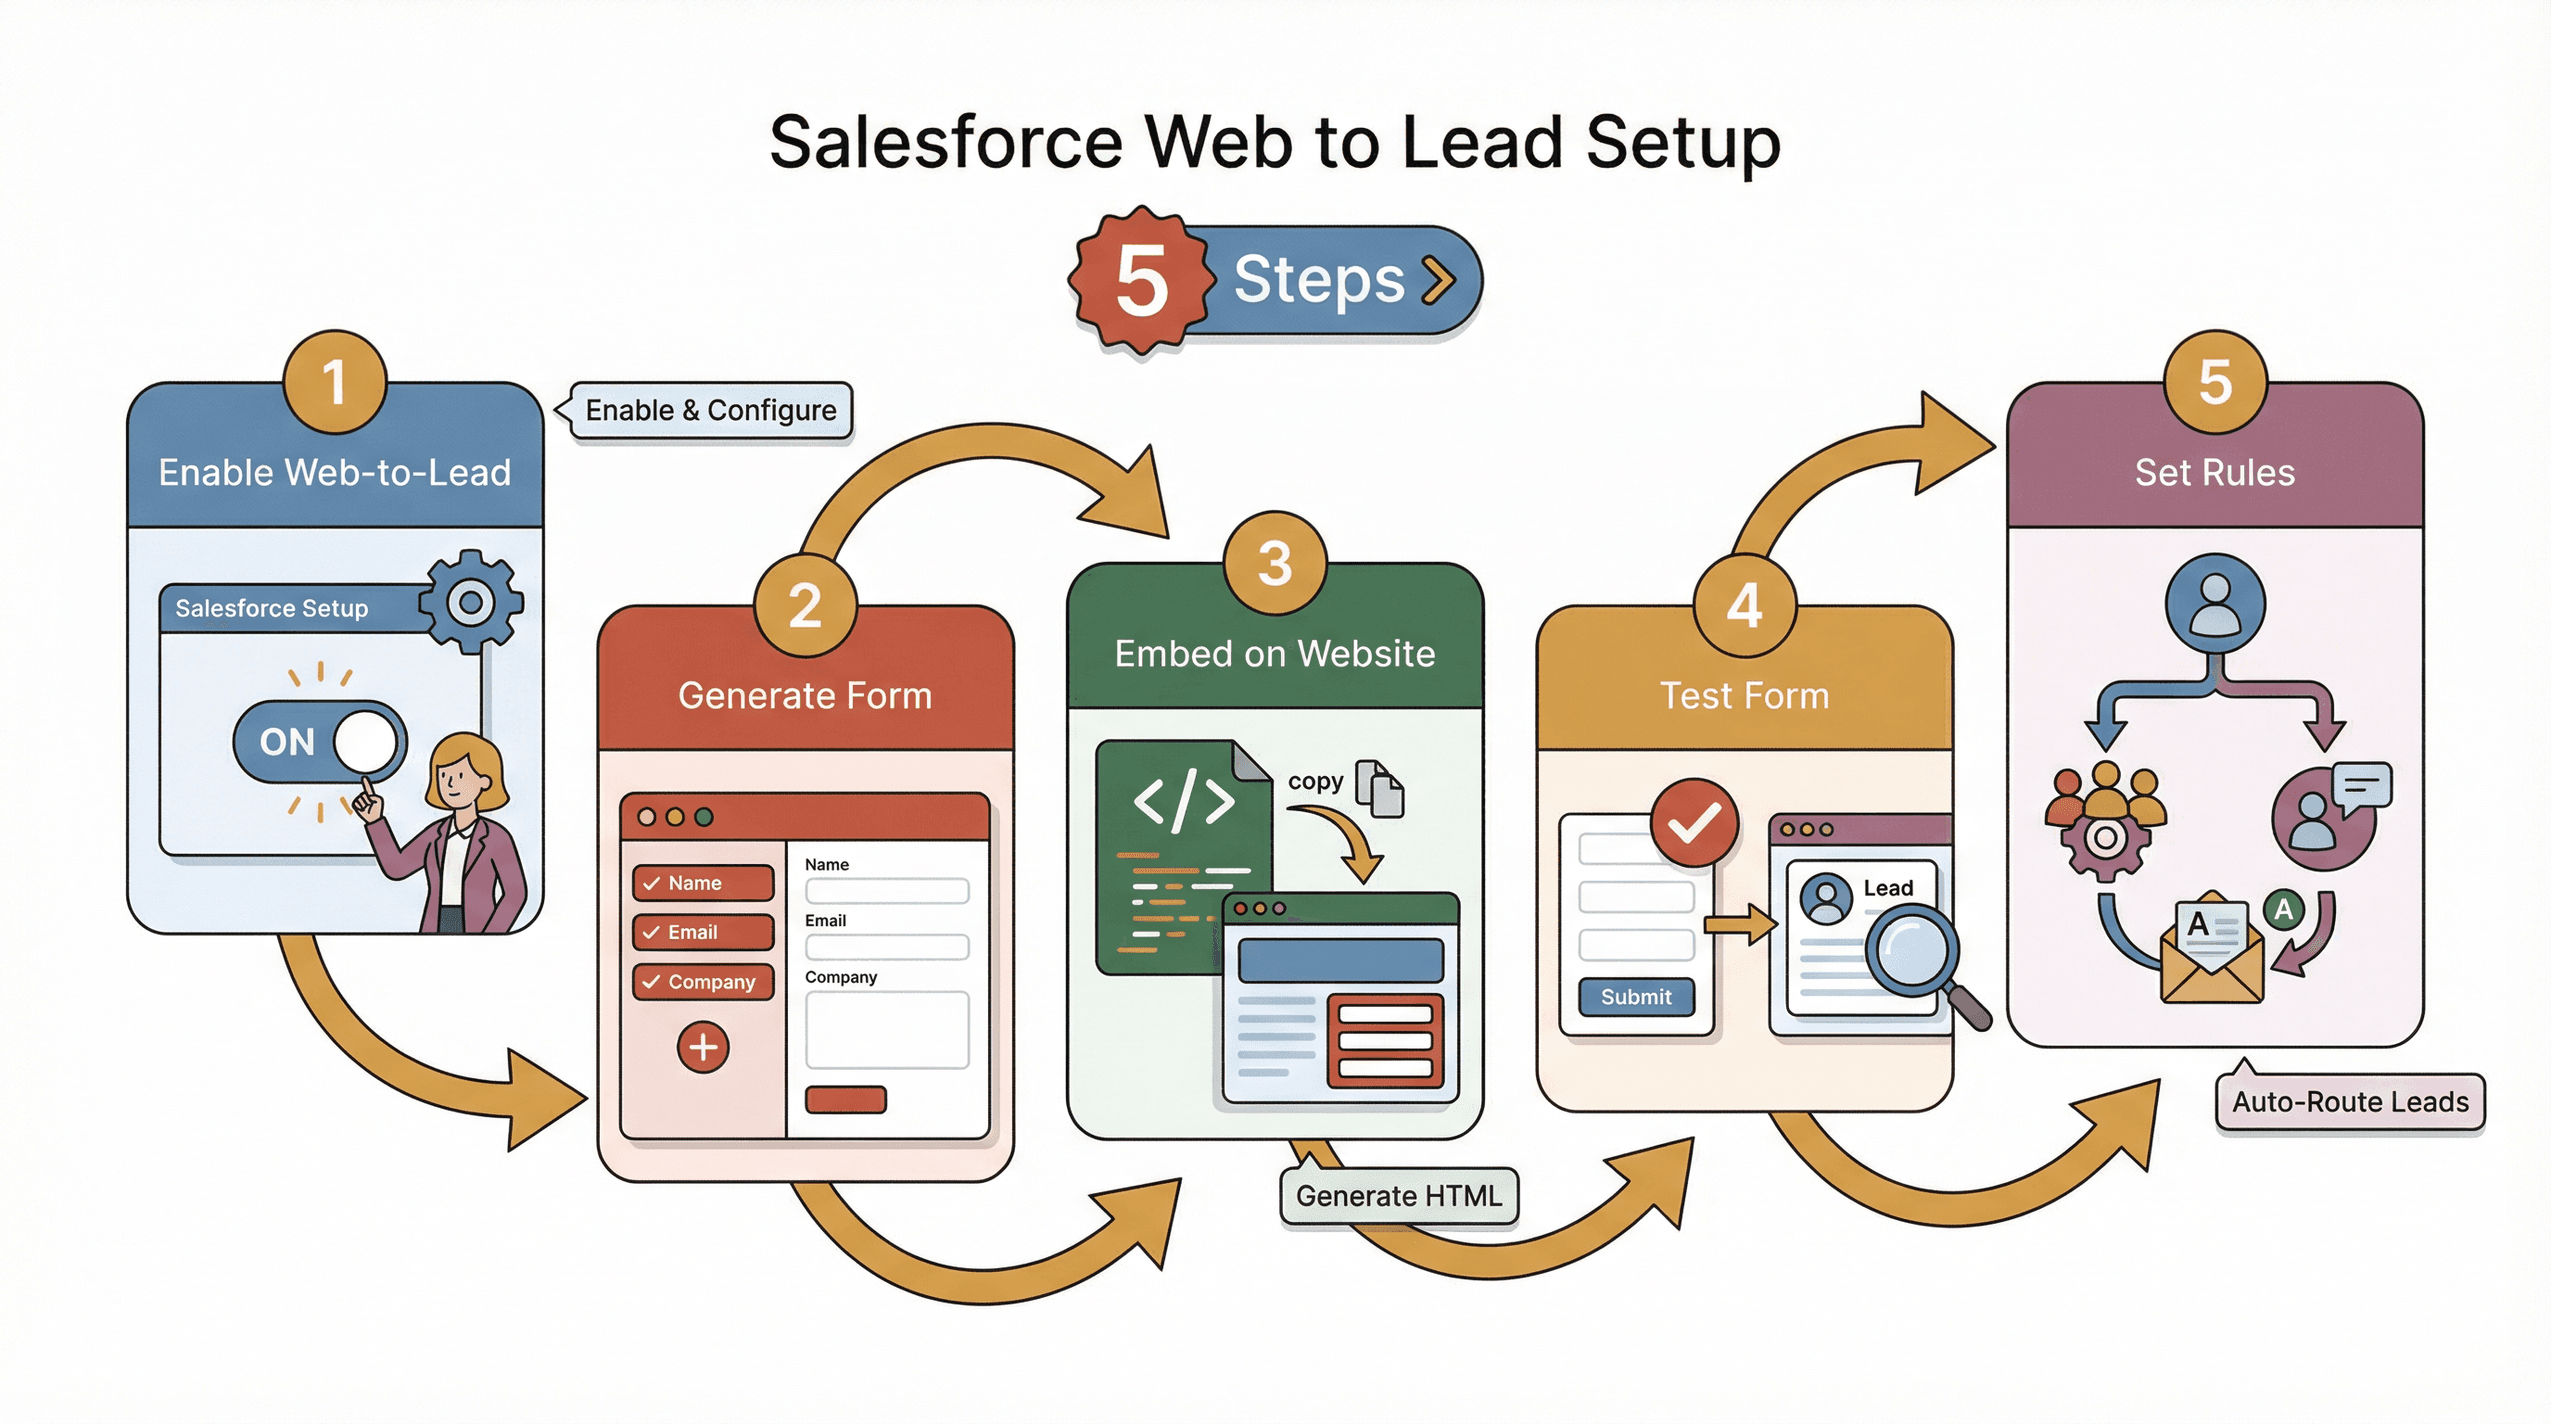
Enable Web to Lead in Salesforce
- Log in as an admin.
- Go to Setup and search for “Web-to-Lead.”
- Check Enable Web-to-Lead.
- (Optional) Enable Require reCAPTCHA for spam protection.
- Choose a Default Lead Creator and Default Response Template for auto-emails.
- Click Save.
-
Generate the Web to Lead Form
- On the same page, click Create Web-to-Lead Form.
- Select which Lead fields to include (Name, Email, Company, etc.).
- Move fields from “Available” to “Selected.”
- Enter a Return URL (the thank-you page after submission).
- If using reCAPTCHA, enter your Google reCAPTCHA keys.
- Click Generate—Salesforce will create the HTML code for your form.
-
Embed the Form on Your Website
- Copy the HTML snippet.
- Paste it into your website’s landing or contact page.
- Make sure the page is publicly accessible.
-
Test the Form
- Submit a test lead.
- Check Salesforce to confirm a new Lead record appears with the right fields.
- Troubleshoot any errors (Salesforce includes debug comments in the HTML).
-
Set Up Assignment Rules and Auto-Responses
- In Salesforce Setup, define Lead Assignment Rules to route new leads to the right sales queue or user.
- Set up Auto-Response Rules so prospects get an immediate confirmation email.
Mapping Fields and Setting Up Lead Assignment Rules
- Field Mapping: The fields you select in the form builder map directly to Salesforce Lead fields by API name. For custom fields, create them in Salesforce first, then include them in your form.
- Assignment Rules: Use criteria like territory, product interest, or campaign source to route leads automatically.
- Auto-Response: Send a personalized email to every new lead, confirming receipt and setting expectations.
Pro tip: Test your form on both desktop and mobile, and use descriptive labels for each field.
Optimizing Web to Lead Forms with AI Tools Like Thunderbit
Now, let’s talk about taking things to the next level. Manual mapping and field selection can still be a pain, especially if you’re dealing with complex forms or want to pull in data from multiple sources. That’s where comes in.
Thunderbit is an AI-powered web scraper Chrome Extension that can:
- Auto-suggest fields: Thunderbit’s AI reads any web page and recommends the best columns to extract (Name, Email, Company, etc.), even creating extraction prompts for each field.
- Subpage scraping: Need more info? Thunderbit can automatically visit linked detail pages (like company profiles or contact pages) and enrich your lead data.
- Instant export: Export your structured data directly to Excel, Google Sheets, Airtable, or Notion—ready to import into Salesforce.
- Templates for popular sites: One-click scrapers for LinkedIn, Yellow Pages, and more.
Use case: Let’s say you want to build a list of leads from an industry directory. With Thunderbit, you just open the page, click “AI Suggest Fields,” and let it extract all the relevant info—no manual mapping, no messy CSVs. You can even schedule Thunderbit to scrape new leads daily and auto-update your CRM.
How Thunderbit Enhances Data Quality and Reduces Errors
Thunderbit doesn’t just scrape data—it cleans, labels, and formats it for you:
- AI-driven field suggestions: The AI figures out which fields matter and how to structure them.
- Data validation: Thunderbit recognizes email patterns, normalizes phone numbers, and can even translate or categorize fields on the fly.
- Consistent, labeled tables: No more mixed-up columns or blank cells. Everything is ready for Salesforce import.
Users have told us Thunderbit “saved hours every week and gave us cleaner, more actionable leads than any other tool” ().
Best Practices for Designing High-Converting Web to Lead Forms
A great form isn’t just about capturing data—it’s about getting more people to actually fill it out. Here’s what I’ve learned (and what the research says):
- Keep it short: Fewer fields = higher conversions. Limiting your form to 3 fields can guarantee a . Every extra field you add can drop conversions by 10% or more.
- Clear labels & logical layout: Use concise labels above each input. Avoid long-winded instructions. A simple, one-column layout works best.
- Mobile responsiveness: Make sure your form looks great on phones—75% of users judge a business by its mobile experience.
- Strong CTA: Use a bold, contrasting button with clear text (“Get My Free Quote” beats “Submit” every time).
- Inline validation: Use JavaScript or third-party tools to check entries before submission (“Please enter a valid email”).
- Accessible design: Use proper
<label>tags, good color contrast, and error messages that work with screen readers (). - Confirmation & trust: Show a thank-you message after submission, and send a confirmation email. Add privacy notes or security badges to build trust.
User Experience Tips for Web to Lead Forms
- Progress indicators: For multi-step forms, show users where they are (“Step 1 of 3”).
- Error handling: Clearly highlight any fields with issues and explain what’s wrong.
- Spam protection: Use Google reCAPTCHA (Salesforce supports this natively) but keep it as frictionless as possible—CAPTCHA can reduce conversions by 3% or more.
- A/B testing: Try different field combinations, labels, and layouts. Use analytics to track submission rates and tweak your form for better results.
Common Challenges in Web to Lead Integration (and How to Solve Them)
Even with automation, things can go sideways. Here are the most common issues—and how to fix them:
- Spam submissions: Bots love forms. Always enable reCAPTCHA and consider adding hidden “honeypot” fields.
- Daily limits: Salesforce caps web-to-lead at 500 leads per org per day. If you need more, consider splitting into multiple orgs or using an integration tool like Thunderbit to batch uploads.
- Missing or invalid data: Use both front-end validation and Salesforce validation rules to ensure required fields are filled and data is clean.
- Duplicate leads: Salesforce’s duplicate rules can block or alert on incoming web leads. Configure them carefully so you don’t lose real opportunities.
- Integration errors: Double-check your Org ID, field names, and return URLs. Test everything end-to-end before going live.
- Security: Always use HTTPS, never expose sensitive info in your HTML, and make sure any scraping or integration tool (like Thunderbit) is compliant with GDPR/CCPA.
Thunderbit can actually help here, too—by structuring and validating data before it ever hits Salesforce, you’ll see fewer sync errors and cleaner records.
Ensuring Data Consistency and Security
- Data validation: Use both client-side (JavaScript) and server-side (Salesforce rules) validation.
- Duplicate prevention: Set up Salesforce duplicate rules and use Thunderbit’s AI to spot and merge duplicates before import.
- Secure transfer: Always use HTTPS for your forms and integrations.
Comparing Manual, Native, and AI-Powered Web to Lead Solutions
Let’s put it all together:
| Solution | Setup Effort | Accuracy | Scalability | Maintenance | Best For |
|---|---|---|---|---|---|
| Manual Entry | Low (no tech), high ongoing | Low (typos, duplicates) | Very limited (human capacity) | High (constant cleanup) | Very small businesses, no tech resources |
| Salesforce Web to Lead (native) | Medium (once-off setup) | Medium (structured, limited fields) | Moderate (500 leads/day) | Update form as fields change | Businesses wanting free basic automation |
| AI-Powered (Thunderbit) | Low (point-and-click) | High (AI cleans, labels, enriches) | High (thousands of leads) | Low (AI adapts, templates ready) | Teams needing advanced scraping, enrichment |
Manual entry is cheap on tech but expensive on time (and mistakes). Salesforce’s built-in web-to-lead is free and reliable, but limited in flexibility. AI tools like Thunderbit offer the most power and scalability, especially for teams scraping leads from directories, social media, or complex web forms.
Conclusion & Key Takeaways
If you’re still entering leads by hand, it’s time to upgrade. Salesforce Web to Lead turns your website into a lead-generation machine—faster response times, fewer errors, and more deals closed. But don’t stop there: optimize your forms for conversion, and consider AI tools like to automate even more of the process—scraping, structuring, and enriching data so your sales team always has the best leads at their fingertips.
Key takeaways:
- Speed matters: responding within minutes can multiply your conversions.
- Automation reduces errors and frees up your team for higher-value work.
- Great form design boosts completion rates and lead quality.
- AI tools like Thunderbit can handle complex data extraction, validation, and integration—no code required.
Ready to see the difference? Review your current lead capture process, set up a Salesforce Web to Lead form, and try to supercharge your lead pipeline. And if you want more tips, check out the for deep dives on lead generation, web scraping, and automation.
FAQs
1. What is Salesforce Web to Lead and why should I use it?
Salesforce Web to Lead is a feature that lets you automatically capture website form submissions as Salesforce leads. It eliminates manual entry, speeds up response times, and ensures every inquiry is logged and routed to your sales team.
2. How do I create a Web to Lead form in Salesforce?
Enable Web to Lead in Salesforce Setup, use the form builder to select fields, generate the HTML, and embed it on your website. Test the form to ensure leads are created correctly in Salesforce.
3. What are the main benefits of using AI tools like Thunderbit with Web to Lead?
Thunderbit can automate field mapping, extract data from complex or multi-page forms, clean and label data, and export it directly to Salesforce-ready formats—reducing errors and saving hours of manual work.
4. How can I design a Web to Lead form that converts more visitors?
Keep it short (3–4 fields max), use clear labels, make it mobile-friendly, and ensure a strong call-to-action. Use inline validation and show a confirmation message after submission.
5. What should I watch out for when integrating Web to Lead forms?
Watch for spam (enable reCAPTCHA), daily lead limits (500 per org per day), data validation issues, and duplicate leads. Test your form thoroughly and use secure, compliant tools for any integrations or scraping.
Ready to automate your lead capture and boost your sales pipeline? Try today and see how easy web-to-lead integration can be.
Learn More