
Openclaw isn't just another open-source project—it's become the go-to personal AI assistant for anyone who wants the power of a ChatGPT-like agent, but with the privacy and control of running it on your own machine. In 2026, Openclaw's adoption is hard to overstate: more than as of May 2026, tens of thousands of Docker pulls every week, and a community that's as passionate as it is demanding. But with great power comes… well, a few installation headaches, especially as new features roll out and compatibility requirements shift.
I've seen firsthand how even experienced users can get tripped up by a missed dependency or a subtle change in the onboarding flow. That's why I put together this step-by-step Openclaw installation guide for 2026—so you can skip the pain, avoid the classic pitfalls, and get your AI assistant up and running quickly. Plus, I'll show you how to use 's AI web scraper to streamline setup, check documentation, and even debug your install. Ready? Let's claw our way to a smarter, more secure AI setup.
What Is Openclaw? A Quick Overview
Openclaw is a self-hosted AI assistant that lives on your own device, not in someone else's cloud. Think of it as your personal chatbot, automation hub, and productivity sidekick—all running locally, so your data stays yours. In 2026, Openclaw is more than just a chat interface: it's a full platform with a local Gateway (control plane), a browser-based Control UI, and a growing ecosystem of plugins and "skills" that let it connect to your favorite chat apps and AI providers.
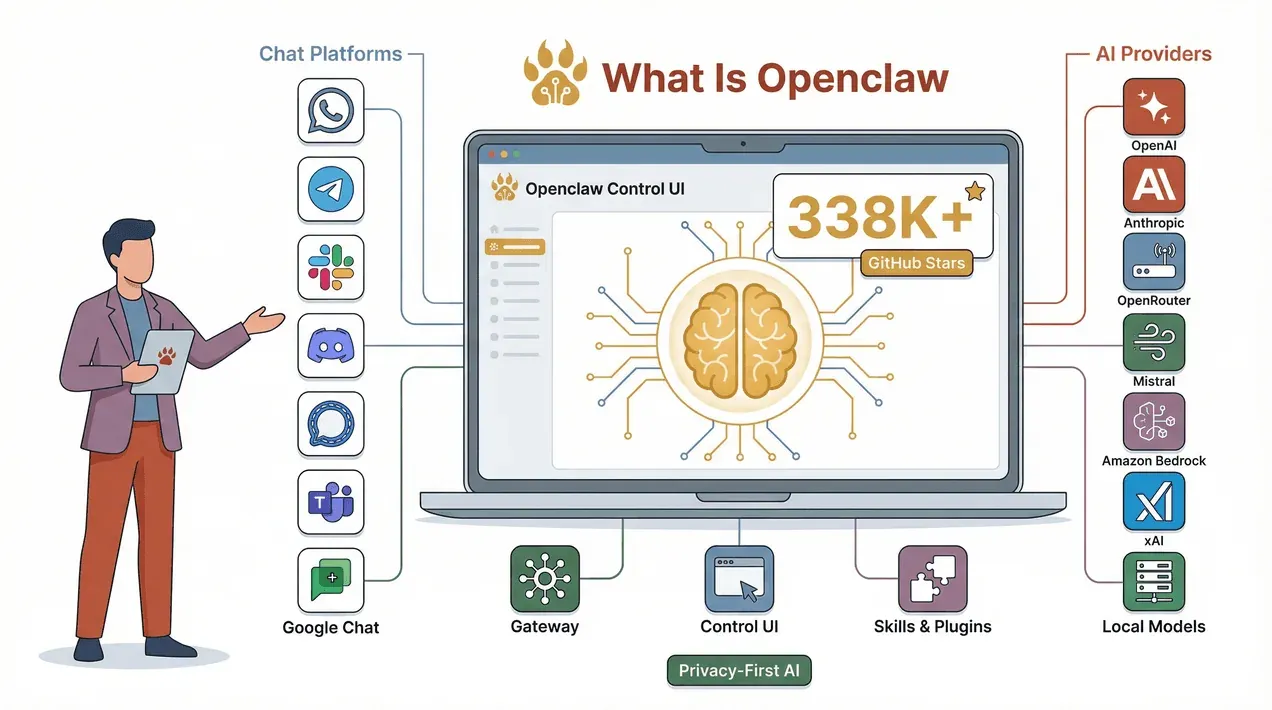
Supported chat platforms include , , , , , , and , among others. For AI brains, you can plug in OpenAI, Anthropic, OpenRouter, Vercel AI Gateway, Cloudflare AI Gateway, Mistral, Amazon Bedrock, xAI, and even local models via vLLM or SGLang (). In short: if you want a powerful, privacy-first AI assistant that talks to all your apps, Openclaw is where it's at.
Why Openclaw Installation Steps Matter in 2026
Let's be honest: Openclaw's popularity means it's evolving fast. In 2026, several new features and breaking changes have landed—like stricter Node.js version checks, improved onboarding flows, and a rapidly expanding plugin ecosystem. If you follow an old guide or skip a step, you might end up with a broken dashboard, missing skills, or (worst of all) a misconfigured Gateway that exposes your system to risk.
Recent updates have made installation both more powerful and a bit more complex. For example, Openclaw now enforces a minimum Node.js version (), and the onboarding process writes security tokens by default — even for local setups. The upside? You get better security, more reliable upgrades, and access to the latest features. The downside? One missed dependency or a PATH issue, and you're in troubleshooting mode for hours (trust me, I've been there).
That's why following the latest, step-by-step installation process is crucial. Not only does it save you time, but it also ensures you're taking advantage of Openclaw's new capabilities—without falling into the same traps that trip up so many new users.
Pre-Installation Checklist: What You Need Before Starting
Before you dive in, let's make sure your system is ready. Openclaw runs on macOS, Linux, and Windows (with WSL2 recommended for Windows users). Here's a quick checklist to keep you on track:
| Platform | Node.js Version | Service/Daemon Behavior | 2026-Specific Notes |
|---|---|---|---|
| macOS | Node 24 recommended; 22.16+ supported (docs) | LaunchAgent install via onboarding or gateway install | LaunchAgent PATH may differ from shell (can cause "command not found" for tools/skills) (issue) |
| Linux | Node 24 recommended; 22.16+ supported (docs) | systemd user service typical | Headless installs need proper user session; systemd "user bus" can be missing (issue) |
| Windows (WSL2) | Node inside WSL2; systemd enabled (docs) | systemd user service inside WSL2; optional Windows Scheduled Task | Full "boot chain" recipe in docs (docs) |
| Windows (native) | Node on Windows; WSL2 still recommended (docs) | Scheduled Tasks or Startup-folder | Non-interactive onboarding expects reachable local gateway (docs) |
Quick tips to verify readiness:
- Run
node -vto check your Node.js version. - Make sure you have permissions to install global npm packages.
- On Linux/WSL2, ensure systemd is enabled and you have a proper user session.
- For Docker installs, make sure you have at least 2GB RAM available ().
Step-by-Step Openclaw Installation Guide for 2026
Let's get to the good stuff: installing Openclaw. There are a few different paths, but I'll walk you through the most common and reliable ones for 2026.
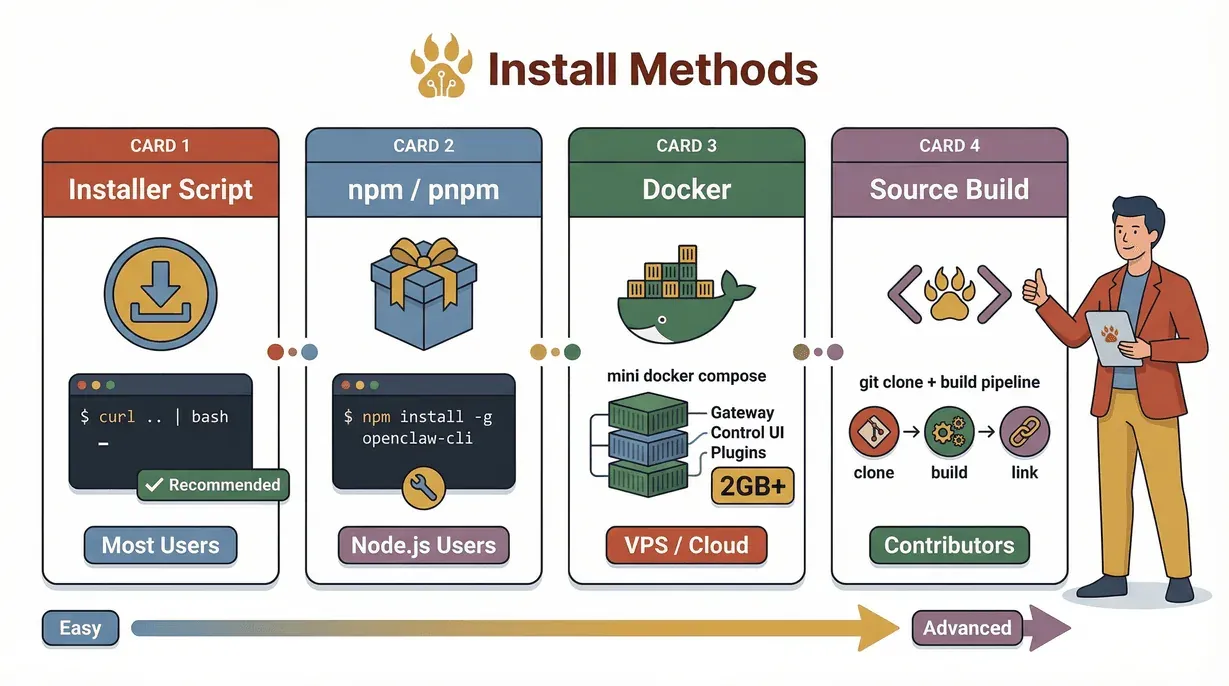
1. Website Installer Script (Recommended for Most Users)
This is the fastest way to get started. The script detects your OS, installs Node.js if needed, and launches the onboarding flow.
1curl -fsSL https://openclaw.ai/install.sh | bashOr, for PowerShell on Windows:
1irm https://openclaw.ai/install.ps1 | iexPros: Fast, handles most dependencies, launches onboarding UI automatically.
Cons: Still depends on PATH correctness; can inherit quirks from your shell or outdated Node in PATH ().
2. npm/pnpm Global Install (For Node.js Users)
If you already manage Node.js versions, this is a solid option.
1npm install -g openclaw@latest
2openclaw onboard --install-daemon
Pros: Easy to update, works well if you're comfortable with Node.
Cons: PATH/global bin issues are common; Linux users may hit EACCES permission errors ().
3. Docker Compose (For Isolation or VPS Installs)
Great for running Openclaw in a containerized environment.
1git clone https://github.com/openclaw/openclaw.git
2cd openclaw
3./scripts/docker/setup.sh
Pros: Isolated, predictable dependencies, easier for VPS/cloud.
Cons: Needs at least 2GB RAM for builds; you're responsible for port exposure and firewalling ().
4. From Source (For Contributors/Advanced Users)
If you want to patch or customize Openclaw, build from source:
1git clone https://github.com/openclaw/openclaw.git
2cd openclaw
3pnpm install && pnpm ui:build && pnpm build
4pnpm link --global .
Pros: Best for contributors, easy to work around packaging bugs.
Cons: Build breaks can happen; not ideal for "just get it running" users ().
Comparison Table: Installation Methods
| Method | Best For | Pros | Cons |
|---|---|---|---|
| Installer Script | Most users | Fast, handles dependencies, onboarding UI | PATH quirks, Node version issues |
| npm/pnpm | Node.js users | Easy updates, flexible | PATH/EACCES errors, packaging regressions |
| Docker | VPS/Cloud/Isolation | Predictable, isolated, health endpoints | RAM needs, port/firewall management |
| From Source | Contributors | Customization, patching | Build breaks, more complex setup |
Onboarding and Gateway Configuration
After installation, the onboarding process will walk you through:
- Configuring your local or remote Gateway (default port: 18789)
- Setting up chat channels (WhatsApp, Telegram, Slack, etc.)
- Connecting to AI providers (OpenAI, Anthropic, OpenRouter, etc.)
- Setting up skills/plugins and workspace defaults
The onboarding UI will prompt you for API keys and security tokens. For automation or non-interactive installs, use the --secret-input-mode ref flag to store secrets as environment variable references ().
Connecting to AI Providers
Openclaw supports a wide range of AI providers. For example, to connect to OpenRouter (a popular OpenAI-compatible gateway):
1openclaw onboard --provider openrouter --token $OPENROUTER_API_KEYYou'll find provider-specific instructions in the .
Avoiding Common Openclaw Installation Errors in 2026
Even with a solid guide, things can go sideways. Here are the most common errors I see (and how to fix them):
| Symptom | Likely Cause | Fix Pattern |
|---|---|---|
openclaw: command not found | npm global bin dir not on PATH | Check npm prefix -g, ensure <prefix>/bin is in PATH; restart shell (docs) |
Linux EACCES during npm install -g | Global prefix not user-writable | Move npm global prefix to $HOME/.npm-global and add to PATH (docs) |
systemctl --user ... Failed to connect to bus | No active systemd user session (Linux/WSL2) | Ensure linger/proper login session; follow WSL2 boot chain (issue) |
| Control UI shows "Missing Control UI assets" | Packaging/build output missing/mismatched | Upgrade to fixed release; use Docker image or source build + pnpm ui:build (issue) |
| macOS: tools fail inside LaunchAgent | LaunchAgent PATH missing Node/tools | Set explicit PATH in LaunchAgent environment; restart Gateway (issue) |
| Docker install fails (exit 137/OOM) | Too little RAM for image build | Use ≥2GB RAM for builds; use prebuilt image tags (docs) |
| Upgrade breaks on native module install | Node version mismatch or build requirements | Confirm Node version, follow sharp workaround, pin/retry per release guidance (docs) |
| Windows native: onboarding non-interactive fails | Health check expects running local gateway | Use --skip-health or prefer WSL2 (docs) |
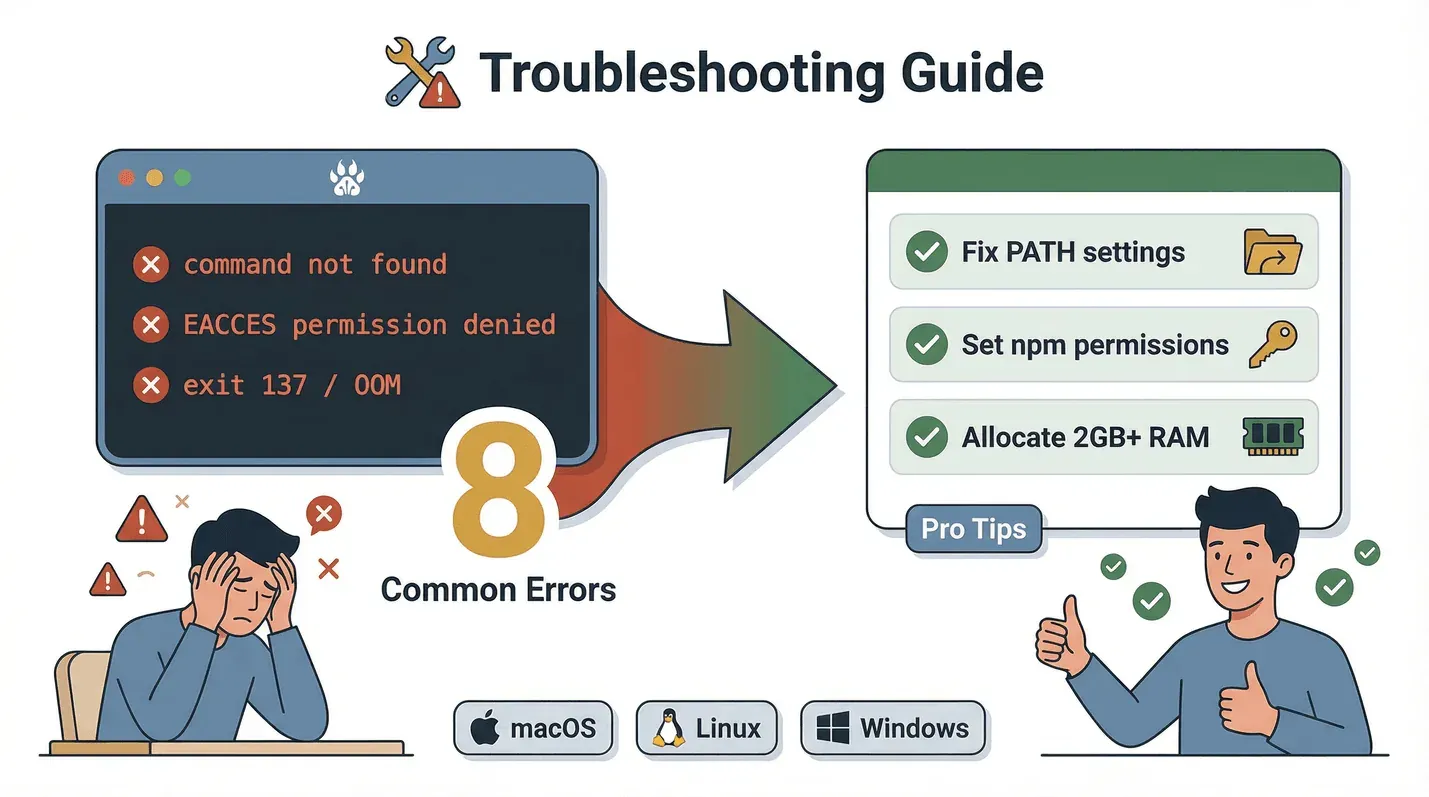
Pro tip: If you hit a wall, check the or the for up-to-date fixes.
Integrating Thunderbit AI Web Scraper to Streamline Openclaw Setup
Here's where things get fun. Openclaw's docs and plugin lists change fast—sometimes faster than you can keep up. That's where comes in. Thunderbit is an AI-powered web scraper (and yes, I'm a little biased here) that can turn sprawling documentation into structured checklists, tables, and resource lists.
- Aggregate provider/channel lists: Quickly pull supported AI providers or chat channels into a table, so you know what's available in 2026.
- Track breaking changes: Scrape the for install-impacting updates and changelogs.
- Build your own runbooks: Use Thunderbit to organize Docker setup steps, environment variables, and health check endpoints into a single, actionable checklist.
Mini-guide: Using Thunderbit for Openclaw setup
- Install the .
- Open the relevant Openclaw documentation page.
- Click "AI Suggest Fields" in Thunderbit to auto-detect tables, requirements, or step lists.
- Export the structured data to Google Sheets, Notion, or Airtable for easy tracking.
- Use the exported checklist to verify each install step as you go.
This approach saves you from flipping between tabs and missing a buried requirement. It's like having a personal research assistant for your install process.
Efficient Openclaw Debugging: Using Thunderbit for Post-Setup Validation
Once Openclaw is installed, you'll want to make sure everything's actually working. Thunderbit can help here, too.
How to use Thunderbit for post-setup validation:
- Check Gateway health: Scrape the
/healthzand/readyzendpoints from your Openclaw Gateway to confirm it's live and ready (). - Verify Control UI: Use Thunderbit to check that the Control UI loads correctly and matches the expected version.
- Audit skills/plugins: Scrape the ClawHub skills directory to see which plugins are installed, their status, and whether any need updates or security review.
- Export audit results: Use Thunderbit to extract the output of
openclaw doctorandopenclaw security audit --deepinto a structured report for your records.
Sample workflow:
- After install, open your browser to
http://localhost:18789/healthzandhttp://localhost:18789/readyz. - Use Thunderbit to scrape the status fields and export them for tracking.
- Run
openclaw doctorin your terminal, copy the output, and use Thunderbit to structure the results. - Repeat for
openclaw security audit --deep, and keep a record of any issues found.
This makes it easy to spot problems early, document your setup, and stay compliant with best practices.
Securing Your Openclaw Installation in 2026
Security is a big deal—especially when your AI assistant can access files, run commands, and connect to your chat apps. Openclaw's 2026 security docs are clear: treat your Gateway as a trusted boundary, and don't expose it to the public internet without strong authentication and firewalls.
Essential security steps:
- Bind Gateway to loopback: Only allow local connections unless you have a real need to expose it ().
- Require token authentication: Use the onboarding-generated token for all connections.
- Limit tool access: Only enable the skills/plugins you trust, and keep exec/command tools tightly scoped.
- Enforce workspace-only filesystem access: Prevent plugins from accessing your entire drive.
- Disable elevated tools: Unless absolutely necessary, keep "run as admin/root" features off.
- Audit regularly: Run
openclaw security audit --deep --fixafter any changes.
Checklist for a secure install:
- Gateway bound to 127.0.0.1 (or firewalled if remote)
- Token authentication enabled
- Only trusted skills/plugins installed
- Filesystem access restricted to workspace
- No elevated tools enabled
- Regular security audits scheduled
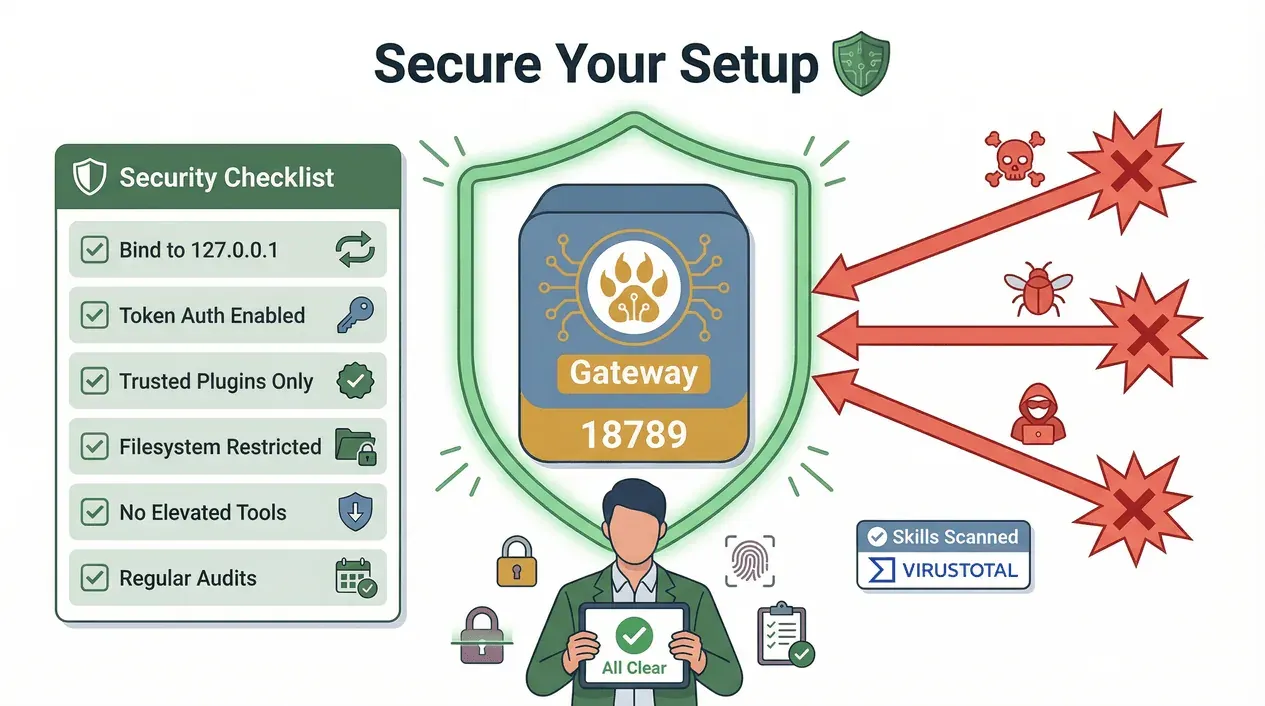
Why this matters in 2026: The rise of public skills marketplaces (like ClawHub) means there's a real risk of supply chain attacks. Openclaw now partners with to scan skills, but you should still review what you install and keep your Gateway locked down.
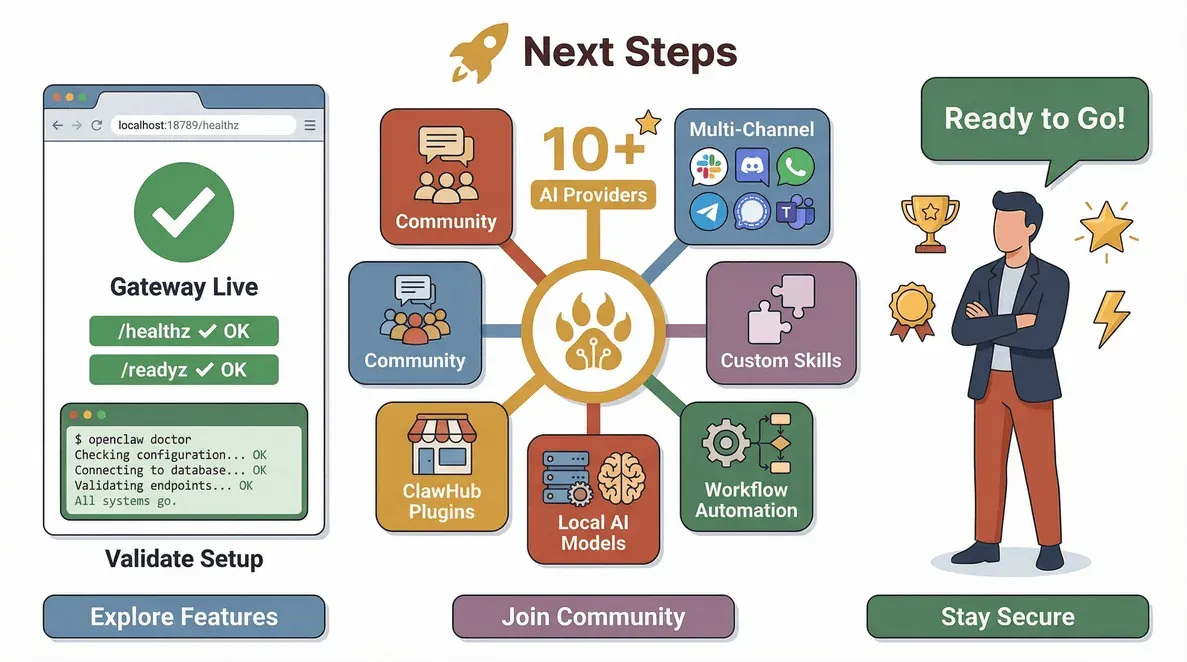
Maximizing Openclaw's Potential: Next Steps and Advanced Resources
Congrats—you've got Openclaw running! But don't stop at the basics. Here's how to get even more out of your setup:
- Explore advanced features: Try out multi-channel support, custom skills, and workflow automation.
- Connect more channels: Add Slack, Discord, Signal, or Teams for unified messaging.
- Customize your AI models: Use local models with vLLM/SGLang, or experiment with new providers as they launch ().
- Join the community: Check out the , , and .
- Watch for new skills: Browse ClawHub for plugins that fit your workflow—but always review permissions and security notes.
- Integrate with Thunderbit's open API: Automate documentation checks, dashboard monitoring, or even build your own install/runbook generator ().
Conclusion & Key Takeaways
Openclaw is leading the charge for self-hosted AI assistants in 2026, but getting it set up right means following the latest steps, watching out for common pitfalls, and keeping security front and center. By using tools like to organize your install process, check documentation, and validate your setup, you can save hours of frustration and get the most out of your AI assistant.
Remember:
- Always check for the latest Node.js and system requirements.
- Use the recommended installer script or Docker for the smoothest experience.
- Watch out for PATH and permission issues—these are the most common stumbling blocks.
- Secure your Gateway and audit your plugins regularly.
- Leverage Thunderbit to automate documentation checks and post-install validation.
Stay curious, stay secure, and enjoy your new AI-powered sidekick. If you run into trouble or want to explore more advanced integrations, the Openclaw and Thunderbit communities are just a click away.
FAQs
1. What's the fastest way to install Openclaw in 2026?
The recommended method is the website installer script (curl -fsSL https://openclaw.ai/install.sh | bash), which detects your OS, installs Node.js if needed, and launches onboarding. For Windows, WSL2 is recommended for the best experience.
2. What are the most common Openclaw installation errors, and how do I fix them?
PATH issues (e.g., openclaw: command not found), permission errors (EACCES on Linux), and missing Control UI assets are the top problems. Check your Node.js version, ensure npm global bin is in your PATH, and use Docker or source builds if you hit packaging bugs.
3. How can Thunderbit help with Openclaw installation and troubleshooting?
Thunderbit can scrape and organize Openclaw documentation, provider lists, and troubleshooting steps into structured checklists. It's also great for validating your install by checking Gateway health endpoints and exporting audit results.
4. How do I keep my Openclaw installation secure?
Always bind your Gateway to loopback or firewall it, require token authentication, limit plugin access, and run regular security audits. Be cautious with public skills/plugins and review permissions before installing.
5. Where can I find help or community support for Openclaw?
Check the , , Discord server, and the Openclaw community forums. For automation and scraping tips, visit the .
Ready to make your AI assistant truly yours? Download and start building your ultimate Openclaw setup today.
Learn More